CLICK HERE FOR FREE BLOGGER TEMPLATES, LINK BUTTONS AND MORE! »

Tutorials

Monday, December 31, 2012

2012 - A Year in Review Part II

Wow! I certainly can't believe a whole year has flown by? Looking back on our blog for 2012 was certainly fun for the kids and I.  Ethan wants to make a "green drink" RIGHT NOW!-- lol and Alyssa's clearing off her craft table so she can craft with me tomorrow.  She has to be my most favorite crafting buddy!  We can't wait to spend the first day of the New Year in our PJ's crafting the whole day away.. : )

It was hard to pick just one favorite so i've broken it down.

Here are a few of my FAVORITE posts of Leigha's:
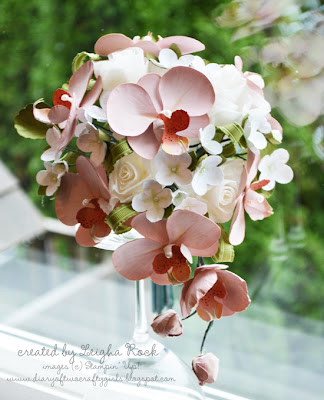
I'll be sad to see the beautiful flowers on the sidebar disappear after January 2nd.  Leigha has done such a wonderful job creating paper flowers, she brings the flowers to life!  It's no surprise to me that "Lynn's Bouquet" was chosen by SplitCoastStampers in their list of Favorites: The Best of 2012.  How gorgeous is that bouquet??!!!!!  My favorite bouquet has to be the Summer Bouquet .  I love the colours in this bouquet and with the matching boutonniere and table center pieces to boot.  Soooo AMAZING.. ; )

I also love Leigha's Butterfly card and Butterfly Scrapbook page.  As you can tell from many of my blog posts I LOVE butterflies.

Two other faves are the Domestic Goddess birthday card and St. Patricks Day Shamrocks card.  I think it might be the sewing... i love it when leigha sews on her projects!!  : )

The most popular/favorite posts of mine. Based on page views, the most popular posts posted by me were:

Shortened Framed Tulips Technique

Thank you to everyone who purchased my Cupcake Tutorial this past year.  I have to say i really enjoyed creating the cards for this tute.   Especially the Movie Strip Card...i still can't part with these gorgeous cards!  : )

Wishing you Health and Happiness in 2013. 


Sunday, December 30, 2012

2012 - A Year in Review - Leigha

Happy 2013!  


I'm also thrilled to say that the bouquet I created for Lynn's Bouquet Tutorial was chosen by SplitCoastStampers in their list of  Favorites: The Best of 2012.  What an honour to be chosen and included amongst such talented artists :)  Whoo hoo!  My humble thanks to the talented and dedicated ladies who volunteer their time to organize and  run the Favorites forum over at SplitCoastStampers.


Wow!  Can you believe a whole year has flown by?  I can't.  Looking back on 2012, I thought it would be fun to share some of our most popular and favorite posts with you. I had a blast looking back at this past year's posts, and seeing which ones were the most popular with our readers.  Did you have any favorites?

It was so much fun revisiting and going through old posts, that I just HAD to list more than one.  Here are a few of my FAVORITE posts of Natasha's

I LOVED this card!  Awesome colour scheme and layout. It actually inspired me to purchase the Make a Monster set :)

Gorgeous, Gorgeous card!  Love the colour combinations and the delicate simplicity.  The clear window sheets added just the "extra something".  Based on our stats, you guys loved this card too!  

Cool card!  Wow!  Way to encorporate all those team themes and colours.  What coach wouldn't love to get this for a gift?  

What a cute and awesome little gift idea!  I loved it, and you guys did too!  This was a huge hit on our blog and on Pinterest :)


Okay, on to most popular/favorite posts of mine.   Based on page views, the most popular post posted by me were these posts: 


 Thanks everyone for your lovely comments. 
Looking foward to 2013.
 

Wednesday, December 26, 2012

Thanks

Every Flower Tutorial is Retiring January 2nd, 2013!!   

Thanks to each and every customer who has made my flower tutorials so wildly successful!  It is now time to retire these tutorials. On January 2nd, these tutorials will be taken down off the sidebars.  If you've been sitting on the fence about purchasing one or more of these tutorials, now is your last chance.  Grab them before they're gone.  Plus, all tutorials are BOGO free! 


This CAS thank you card was inspired by Sylvia Blum.  

Products used for this project:  

Stamp Sets: Papillon Potpourri

Ink: Basic Black, Calypso Coral 

Card Stock:  Whisper White,  Calypso Coral DSP 

Accessories and more: Elegant Butterfly Punch, Dimensionals, Billboard Alphabet Decorative Strip Sizzlit (retired). 


Boxing Week BOGO Sale !! 

Starts midnight, December 26th, and goes until 11:59 pm January 1, 2013. (Pacific Standard Time)

Every flower tutorial that is along the right hand sidebar is on sale, buy one get one FREE*! (*free tutorial must be of equal or lesser value)  Yes, that's right!  Have you been waiting to purchase one of these? Don't Wait!!  Now is the time to grab one before they are gone, and get one for free.   Simply make your purchase with the PayPal button found with your tutorial, and then either add a comment to purchaser as to which one you would like for free, or, simply send me an email after you complete your purchase letting me know which tutorial you would like to have for free.  It's as simple as that!!

Questions?  Feel free to email me.  I'd love to hear from you. 


Wednesday, December 19, 2012

Snow Day......Let's Build a Snowman..

We woke up to snow this morning.  The kids were super excited!  Ethan was hoping for no school but no luck...off he went to school ----oh but only AFTER he attempted to "jump" off all the snow from the trampoline.. : )

When Alyssa looked out the window her eyes popped out!!  she yelled "wow..how did that happen??"  then she ran upstairs and put on her snowsuit! 


Since it was snowing i thought yay...INSIDE DAY...lets craft!  BUT oooh no.....you don't run around the house with your snowsuit on and watch the snow fall outside!!  so we bundled up and off we went to build a snowman... ; )


After we built a snowman we came inside for some hot chocolate, cookies and a snuggle.  We had snow much fun.... : )


Hope you like.... : )

Products used for this project:

Stamp Sets: Stylin' Snowfolk, Snow Much Fun

Ink: Pacific Point, Real Red, Basic Black, Pumpkin Pie, Lucky Limeade, Baja Breeze

Card Stock: Baja Breeze, Whisper White

Accessories and More:  Vintage Trinkets, Dazzling Diamonds Stampin' Glitter, 2-way Glue Pen, Paper Snips, Rhinestone Jewels, Stampin' Dimensionals, Snail adhesive


Sunday, December 9, 2012

Candy Cane Ribbon Card


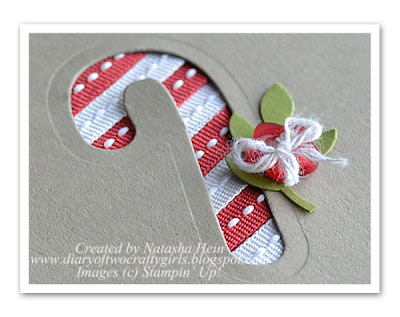
Here's yet another card Amanda and I created together. When Amanda showed me Michelle Le Breton candy cane card i just new i had to make it.   So easy to create and soooo stinkin' cute.  I've used ribbon behind the cut out candy cane image but you could also use strips of card stock or DSP.
 

Hope you like.... : )
Products used for this project:

Stamp Sets:  Greetings of the Season

Ink: Early Espresso

Card Stock: Crumb Cake, Real Red, Old Olive

Accessories and More: Big Shot, Holiday Collection Framelits, Bird Builder Punch, Brights Designer Buttons, White Bakers Twine, 1/4" Stitched Whisper White and Real Red Grosgrain Ribbon, Snail adhesive, Glue Dot.


Tuesday, December 4, 2012

Snowflake Soiree - Believe


This card was super simple to create, umm.. i mean put together!!  I arrived at my friend Amanda's for a fun night of card making and she had all the card stock cut and ready for me to assemble.  


If you look close enough you'll see we used the Illuminate Glimmer Watermark Stampin’ Pad on the bashful blue card stock and gave the card some bling with the silver glimmer paper.  I was going to add a bit of Silver cord to the Vintage Faceted Designer Button when i got home but totally forgot.  I'm just remembering that as i type this out...oh dear. : ) 


Hope you like.... : )

Products used for this project:

Stamp Sets: Snowflake Soiree

Ink: Midnight Muse, Illuminate Glimmer Watermark Stampin’ Pad

Card Stock: Bashful Blue, Whisper White, Not Quite Navy, Silver Glimmer Paper

Accessories and More: Big Shot, Snow Flurry Die, Vintage Faceted Designer Buttons,
Snail adhesive, Dimensionals


Friday, November 23, 2012

Card Stock Christmas Centerpieces

Black Friday Sale this weekend!! 

Starts midnight Black Friday, November 23rd, and goes until 11:59 pm Cyber Monday, November 26th. (Pacific Standard Time)

Every flower tutorial that is along the right hand sidebar is on sale, buy one get one FREE*! (*free tutorial must be of equal or lesser value)  Yes, that's right!  Have you been waiting to purchase one of these?  Now is the time to grab one, and get one for free.  Stock up in time for Christmas! Simply make your purchase with the PayPal button found with your tutorial, and then either add a comment to purchaser as to which one you would like for free, or, simply send me an email after you complete your purchase letting me know which tutorial you would like to have for free.  It's as simple as that!!


To celebrate this sale, and to get ready for Christmas, I created two different Christmas centerpieces using my Long-Stemmed Rose Tutorial.  The roses are made entirely out of card stock!!  Which one do you like better?  The red roses in the mercury glass? Or the cream roses in the cranberries?  Both will make GORGEOUS centerpieces or Christmas gifts.  


Thanks to all of you who have already purchased the Long-Stemmed Rose Tutorial.  Here is another way to use it.  Fill a container of your choice with floral foam or filler such as artificial cranberries.  Make 13 Real Red or Very Vanilla coloured roses using the Long Stemmed Rose Tutorial.   The roses in the tutorial are full blown roses with multiple layers.  To make these roses, which are smaller, and resemble tighter roses just leaving the bud stage, simply make the roses as per the tutorial but only with 6 layers instead of the usual number in the tutorial.   Remember to give the petals in the last row a little variation so that all the roses do not look exactly the same.   Cut the stems to 3".   Push the dozen roses down into the floral foam or filler.   


Remember, ALL flower tutorials are on sale, this weekend.  Buy one get one free!  Enjoy. 

Starts midnight Black Friday, November 23rd, and goes until 11:59 pm Cyber Monday, November 26th.  (Pacific Standard Time)

Questions?  Feel free to email me.  I'd love to hear from you. 


Thursday, November 22, 2012

Happy Thanksgiving!


Happy Thanksgiving to our American viewers! 

Stay tuned for a big Black Friday tutorial sale starting tomorrow, Friday November 23rd, starting at midnight (Pacific Standard Time) !! Each and every flower tutorial along the right hand sidebar will be on sale for the Holiday weekend only!  Be sure to come back and join us tomorrow to check it out!! 

This card was inspired by Penny Smiley.  The leaves have been stamped out in Soft Suede ink onto lighter card stock (Riding Hood Red, So Saffron, and Certainly Celerly) and then sponged with darker ink (Cherry Cobbler, More Mustard, and Old Olive) to add depth. 

Products used for this project:

Stamp Sets
: French Foliage, Seasonal Sayings

Ink: Cherry Cobbler, More Mustard, Old Olive, Soft Suede, and Early Espresso

Card Stock: Very Vanilla, Riding Hood Red, So Saffron, Certainly Celerly

Accessories and More: Designer Frames Folders, Crumb Cake 3/8" Taffeta Ribbon, Linen Thread


Tuesday, November 13, 2012

Decorating with Paper Pinecones

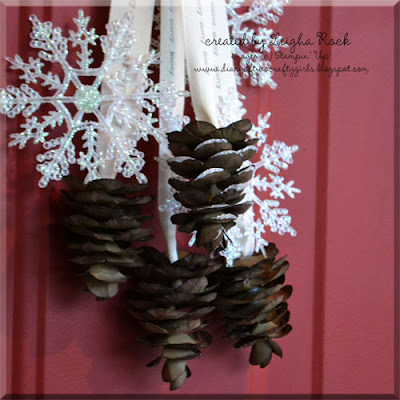
 These big, gorgeous, life-like, jumbo pinecones are made completely out of card stock and Stampin' Up! punches and dies.


 I've gone pinecone crazy! This year, I've decorated my holiday windows, mantle and front door with them. I've found tons of holiday decorating to do with them, and I know you will too!

 Thanks to all my customers who bought this tutorial and made it so successful!  I am always trying to show my customers how versatile these tutorials are.  For all of you who bought the Jumbo Pinecone Tutorial, here are more ways to use it.


For those of you who are interested in the Jumbo Pinecone Tutorial, there are two ways to get it.  It is available as a  stand alone tutorial here.  Or, it is also included in the Elegant Holiday Bouquet Tutorial here.  


Products used for these projects:

Stamp Set: Border Banter (to stamp on ribbon)

Ink:  Early Espresso (to stamp on ribbon)

Accessories and More: Pinecones from the Jumbo Paper Pinecone Tutorial, 7/8" Cotton Ribbon , Frost White Shimmer Paint, Dazzling Diamonds Stampin' Glitter, mini clothes pins, plastic snowflakes.  


Feel free to contact me if you have any questions. 


Sunday, October 28, 2012

Spooky {Cardstock} Bouquet


This spooky Halloween bouquet was inspired by Martha Stewart.  I simply rearranged the dozen card stock roses that I made in this post, and added a little Martha twist.

Thanks to all my customers who bought my card stock  Long Stemmed Rose Tutorial and made it so successful!  I am always trying to show my customers how versatile these tutorials are.  I'm committed to showing  new ways to use the tutorials you've already bought from me.   For all of you who bought the Long Stemmed Rose Tutorial, here is another way to use it.


Cut a piece of floral foam to match the size of a container of your choice. Glue down some dried moss onto the floral foam.


Make one dozen roses from the Long Stemmed Rose Tutorial out of Real Red cardstock.   The roses in the tutorial are full blown roses with multiple layers.  To make these roses, which are smaller, and resemble tighter roses just leaving the bud stage, simply make the roses as per the tutorial but only with 6 layers instead of the usual number in the tutorial.   Remember to give the petals in the last row a little variation so that all the roses do not look exactly the same.   Cut the stems to 3".   Push the dozen roses down into the floral foam.


Add plastick snakes, spiders, and cobwebs to complete the look.


Wednesday, October 24, 2012

Mummy Card


Halloween night is fast approaching and my kids are getting excited!   Even though we've had treats around the house for a few weeks now from trick or treating in Disneyland, the kids feel the NEEEEEEEED for more candy!!.  They wonder how 10 lbs of chocolates/treats could go missing is such a short period of time.. : ) : )

I absolutely love Halloween!  I'm not sure why??  I'm scared of ghosts, goblins, skeletons and frankenstein ...lol!  I love decorating the house up and making all sorts of Halloween goodies and crafts.  We can make scary things look cute...right...?  Like turning scary mummies into cute crafts to make them look way to cute!!  I love this card!  Alyssa was a good helper with wrapping the twill around the card and punching out and gluging on the pieces for the eyes and mouth.  

Although twill tape has retired from the SU catty i bet you could use the new 7/8" Cotton Ribbon that is being offered in the Holiday Catty.  Check out page 20.   : )


Hope you like.. : )

Products used for this project:

Stamp Sets: Teeny Tiny Wishes

Ink: Staz-on Black (or Craft Black)

Card Stock: Pumpkin Pie, Basic Black, Whisper White

Accessories and More: Big Shot, Finishing Touches Edgelits, 1-3/8" Circle Punch, 1-1/4' Circle Punch, Snail adhesive, 3/4" Twill Tape.


Sunday, October 7, 2012

Pinecone Placecard Holders

Happy Thanksgiving! 


Here in Canada, we are celebrating Thanksgiving this weekend.  My Jumbo Pinecone Tutorial has been selling like hotcakes this month! I'm committed to showing my customers new ways to use the tutorials they've already bought from me.   I decided to take the pinecones from this tutorial to create placecard holders for our Thanksgiving table.  


To create this  projects: 

Make name cards, cut 3" x 7/8" out of Very Vanilla card stock.  Cut the ends into a "v" shape using your paper snips, and give the name cards a slight curve by working them slightly with your fingers into a gentle curve.  

Make the jumbo pinecone as per the tutorial instructions.  However, for this project, you will not need to wire it.  Then take your paper snips, and cut a vertical slit into the first two layers as shown above.

Slide name cards into the slit you've just created, and place onto your place setting.  They'll  add just the subtle touch to your fall table.  Wouldn't they also look stunning for an autumn wedding?


Thanks to all my customers you have bought this tutorial and made it wildly successful!  I have lots of holiday decorating ideas coming up using these gorgeous jumbo pinecones. 


If you don't already own it, you can purchase if for only $2.50 

The tutorial gives clear step-by-step instructions with tons of gorgeous photos on how to make the pinecones, plus lots of instruction on how to create the subtle effects that really make them look real and come to life (click on the picture to see the close up details).   The complete tutorial is 7 pages in length and has 21 photos.  The pinecones are not difficult to make, but a lot of photos are required to give complete step-by-step instruction.

Or find the link to purchase on the top right sidebar.  The tutorial will be e-mailed to the email address registered to your PayPal account within 24 hours as an Adobe PDF file following your purchase.  If you do not receive your email, please check your spam box.  If you still have not received your file within 24 hours, please contact me so I can correct any issues. 


Feel fee to contact me  if you have any questions.