CLICK HERE FOR FREE BLOGGER TEMPLATES, LINK BUTTONS AND MORE! »

Tutorials

Monday, October 31, 2011

Happy Halloween

Hope you all had fun and safe Halloween. Just a quick post as I'm exhausted from a busy Halloween weekend! The kids had so much fun tonight!

We had a fun full weekend of Halloween adventures. It started off Friday with the pumpkin patch with Alyssa's preschool class. Then Saturday we took the kids to a Halloween parade and then Sunday we carved pumpkins and went on the spooky Halloween train ride at Bear Creek park. NOTE TO SELF: don't ever take young kids to anything spooky unless you are prepared for them to sleep with you for weeks! the chainsaw massacre actually came into our teeny weeny train cart blazing the chainsaw in our faces...when i saw my nieces face and the tears flying off her face i said "that thing was real.. i smell gas!"...hum yeah Natasha that makes things better!! ...Alyssa started to cry...Ethan had his face inside my jacket the whole time!! My niece came home with a dirt/grease mark above her eyebrow!! --lets say we all headed for ice cream afterwards to cheer everybody up!! : )

After Alyssa checked out every room in the house for big bad gorilla's...they were off to bed and I'm amazed that they slept through the night without any nightmares!

On to the projects...

I created these cards and chocolates for the kids teachers this year.


I'm just loving the Peek a boo die from the Holiday Mini!....it's so versatile.


These were quick fun cards to create using the circle peek a boo!! I switched up the DSP so the teachers didn't receive the same design. Ethan has 2 teachers and Alyssa 2as well.. ; )


Since the cards were pretty simple i dressed them up with black textured card stock for the "BOO" and added some black striped ribbon with a Happy Halloween greeting attached. oh and of course i complicated things for myself by tying a bow....you know how i LOVE bows.. : )


I wrapped the candy bars using the Halloween DSP from the Holiday Mini, Pick your Poison. And used the cute Halloween owl from the set Warmest of Wishes, also from the Holiday Mini. I used the Perfect Polka Dot's embossing folder on the black band that is around the DSP.


This scallop circle is from the Perfect Pennant die. I can't get enough of it! you'll see more projects using that specific scallop circle in the near future as I've been busy creating projects with this die! (note: i did use the 2-3/8" scallop punch on one of the chocolate bars - first photo above)


Friday, October 28, 2011

Paper Wedding Bouquet


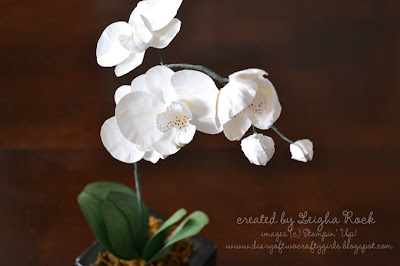
I created this stunning wedding bouquet COMPLETELY out of paper!  I used both my original  Paper Orchid Tutorial and my original  Paper Flower Bouquet Tutorial to create it.  I simply changed up the colours a bit, and put them together.


I've been selling these bouquets for quite a large sum of money like CRAZY!, but you can create them yourself for a whole lot cheaper (shhhh - don't tell my customers).  The flowers are not difficult to make.   My tutorials provide tons of gorgeous, detailed, step-by-step instructions (and tons of beautiful photos) on how to create each flower, including the subtle effects that really make the flowers look real and come to life.

If you purchase both the original Paper Orchid Tutorial and the original Paper Flower Bouquet Tutorial, I will also include a 5 page step-by-step Wedding Bouquet tutorial (lots of gorgeous pics here too) on how to do the colour variation for the wedding orchids (aren't they gorgeous in Blushing Bride?), and how to make and assemble the wedding bouquet.  (Of course, as always, the Paper Orchid Tutorial and the Paper Flower Bouquet Tutorial  will continue to be available seperately). 

To celebrate this new bouquet,  I am offering the Paper Orchid Tutorial AND the Paper Flower Bouquet Tutorial  TOGETHER for a reduced price. 


The complete five part  Paper Orchid tutorial and template AND the compete four part Paper Flower Bouquet tutorial PLUS the 2 part Wedding Bouquet Tutorial and colour variation  is available for purchase for only  $11.95.


UPDATE:  (added June 1, 2012):  You are purchasing a tutorial from 2011.  Some of the items used in the tutorial have been discontinued from Stampin' Up!  This tutorial is still easily re-created.  Simple substitutions are noted here.  As of June 1, 2012, the card stock colour Blushing Bride, Stampin' Pastels, the 5-Petal Punch, and the Mat Pack are  no longer available for ordering through Stampin' Up!  This tutorial includes instructions on how to make white orchids, and they would be equally beautiful in many other colours.  Also, the Stampin' Pastels can easily be substituted for other pastels, or with the corresponding classic ink sponged on with a cotton tipped applicator.  The 5-petal punch was used to create the tiny green leaves amongst the white hydrangea flowers.  This punch can easily be substituted for the Blossom Petals Builder punch or or the 5-petal shaped flower from the Island Floral die.  Any piece of thin foam can be substituted for the foam mat from the Mat Pack.  

Or find the link to purchase on the top right sidebar.  The tutorial will be e-mailed to the email address registered to your paypal account within 24 hours as several  PDF files following your purchase.  If you do not receive your email, please check your spam box.  If you still have not received your file within 24 hours, please contact me so I can correct any issues.

Did you purchase one of my tutorials already?  Wondering if you "upgrade" to both tutorials and qualify for the free Wedding Bouquet Tutorial?  Of course!  I want to be know for my awesome customer service and support!  E-mail me and I can send you a link to "upgrade" for a reduced cost. 

Details on the Paper Orchid Tutorial and Template are available here ($5.95 purchased separately).  
Details on the Paper Flower Bouquet Tutorial  are availble here ($6.95 purchased separately).

Here is a testimonial from one of my customers: 

"The tutorial looks fabulous!  You've done such a wonderful job of explaining each flower and leaf, and I can hardly wait to give the paper flowers a try.  A couple of times recently I've been disappointed with for-fee tutorials, but certainly not with yours.  I know it was a lot of work for you, and it was worth every penny to me!  Thanks so much for sharing your creativity and for putting together a thorough and well-illustrated tutorial."


Questions?  Please feel free to email me.  I'd love to hear from you! 


Thursday, October 27, 2011

Stitched Stocking - Sunshine Preschool SAS Card


Yesterday i mentioned i'd show you what card I designed for an upcoming fundraiser SAS card class. This is the card that made the cut! How could you go wrong with Cherry Cobbler..! : )

I wanted something quick and easy for these ladies and i'm happy with the design i've come up with for Sunshine Hills Preschool Stamp a Stack Fundraiser Class (located in Delta, BC). You can click here to veiw one of the other card designs that will be created at this class. Stay tuned for the 3rd design which i'll post next week.

This stamp a stack class is open to everyone so if you are interested in attending please email me at alittlebitofink@gmail.com for a registration form and more details. There are 2 scheduled sessions, November 30th and December 1st so you don't have to miss this event! Come out and join us for a fun night of stamping!!

If you can't join us for this class but are interested in creating the cards i will have some pre cut card kits available for purchase. All you have to do is purchase and assemble. E-mail me for more details...!!


Products used for this project:

Stamp Sets: Stitched Stockings (W123782,C123784), Four the Holidays (116921)

Card Stock: Cherry Cobbler (119685), Early Espresso (119686) Very Vanilla (101650)

Ink: Cherry Cobbler (119669), Early Espresso (119670)

Accessories and More: Big Shot (113439), Scallop Squares Duo Bigz Die (120903), Basic Rhinestones (119246), Stocking Builder Punch (124095), Linen Thread (104199), Jolly Holiday DSP (retired), Stampin Dimensionals (104430), Snail adhesive (104332),

Wednesday, October 26, 2011

Stitched Stocking Clean and Simple


In my last post i shared a quick simple SASable card. This one is very similar...I used the same layout but switched up the Chocolate Chip embossed card sotck with some Designer Series Paper (DSP) and changed the center image from the ornament to a stocking! I was playing around with some different colours to see what my options where with the Jolly Holiday DSP. This DSP was featured in last years SU catty and i must of loved it so much because i found an unopened package!! With a SAS fundraiser coming up i decided it was time to use it up. Although i was testing the waters with this design and the colours i'm sad to say this card didn't make the cut. I really love the colour combo but my judging panel voted for a different colour combo so i'll be back tomorrow to show you which card made the cut.. : )


Products used for this project:

Stamp Sets: Stitched Stockings (W123782,C123784), Four the Holidays (116921)

Card Stock: Soft Suede (115318), Cherry Cobbler (119685), Early Espresso (119686) Very Vanilla (101650)

Ink: Cherry Cobbler (119669), Early Espresso (119670)

Accessories and More: Big Shot (113439), Scallop Squares Duo Bigz Die (120903), Basic Pearls (119247), Stocking Builder Punch (124095), Linen Thread (104199), Jolly Holiday DSP (retired), Stampin Dimensionals (104430), Snail adhesive (104332),

Tuesday, October 25, 2011

Tags Til Christmas Clean and Simple!


Some of you may recognize this card from last year. I cased it from last years Holiday Mini and sent it out as one of my card designs last year. The one thing i loved about making this card is it came together quickly. I thought i'd share it again this year and remind everyone that card making can be simple. I know every year i say i want my Christmas cards to be completed before November 1st but that rarely happens and then i find with all the things happening within the season i'm rushing at the end of November to get them completed and mailed out!! Did you know it's only 2 months until Christmas...oh dear... : )


Products used for this project:
Stamp Sets: Tags til Christmas (W120847, C121169), Christmas Greetings (115448)

Card Stock: Riding Hood Red (111348), Crumb Cake (120953), Chocolate Chip (102128), Whisper White (100730)

Ink: Crumb Cake (121030), Riding Hood Red (111348), Chocolate Chip (100908)

Accessories and More: Big Shot (113439), Scallop Squares Duo Die (120903), Perfect Polka Dots Textured Impressions Embossing Folder (117335), Basic Pearls (119247), Ornament Punch (119847), Decorative Label Punch (120907), Stampin Dimensionals (104430), Snail adhesive (104332)

Sunday, October 23, 2011

Stitched Stocking Stamp a Stack card..

Here's another one of my Holiday Stamp a Stack (SAS) cards. If you've booked a SAS card class with me for the month of November this will be one of the 3 designs you'll be creating!!

If you haven't booked your SAS date it's not to late. --only 64 days until christmas..---eeeeeeks...did i scare you..? {big smile} Remember now is a great time to book a christmas card class with your friends and family!! You'll have the opportunity to create all your christmas cards in one sitting!! I've done most of the planning already...i've come up with the card designs, pre cut all the card stock and supplies needed for the cards... all you need to do is pick the date, invite some friends and have your adhesive and smiles ready to go!! Pop me an email and we can confirm a date and discuss all the details.


This layout was designed by stampin buddy Louise!! Isn't she so creative.. : ) : )

She created the layout with a Cherry Cobbler Stocking and used the "Happy Holidays" greeting from the stamp set Holiday Happiness which fit nicely into the polka dot Four Frames stamp she used. I really liked her card but thought since i didn't have the cherry cobbler ribbon or the greeting i'd play around with different colours and greetings to match the ribbon i had. i played around with all the different colours. i also switched up the night of navy card stock to cherry cobbler and stamped a night of navy stocking......oooooooh there are so many ways to make this design work!! Here's the card i decided to show you today!!


Don't you just love the new stitched stocking stamp set and punch to match!! Loving it!! AND the new silver glimmer paper is sooooooooooo much fun!! adds a tiny bit of bling to each holiday card.. and i'm sure it will definitely bring smiles to the person you send the card too..!! : )

If you haven't checked out the Holiday mini click here.. : )


Products used for this project:
Stamp Sets: Four Frames (W123440,C123442), Stitched Stockings (W123782,C123784), Petite pairs (W122495,C122497) OR Teeny Tiny Wishes (115370)

Card Stock: Crumb Cake (120953), Cherry Cobbler (119685), Always Artichoke (105119), Night of Navy (100867), Whisper White (100730)

Ink: Always Artichoke (105219), Cherry Cobbler (119669), Night of Navy (102977)

Accessories and More: Big Shot (113439), Petals-a-plenty Textured Impressions Embossing Folder (116824), Silver Glimmer Paper (124005), Always Artichoke (121000) OR Cherry Cobbler (120992) Seam Binding Ribbon, Basic Rhinestones (119246), Scallop Edge Border Punch (119882), Decorative Label Punch (120907), Stocking Builder Punch (124095), Stampin Dimensionals (104430), Snail adhesive (104332)

Friday, October 21, 2011

Lady Gaga Halloween Costume

Warning!  This is one of those CRAZY hybrid crafting posts!  You guys know how I LOVE to try to use my Stampin' Up! products in all sorts of different crafting ventures, not just papercrafting.  This time, I was able to incorporate a few products into a costume that my daughter Emma asked me to make.

Emma:  "Mom, will you make me a Lady Gaga costume for Halloween? Please?  I know how INSANELY busy you are right now, but you would be the best Mom in the whole world............please, please, PLEASE?"  Arrrgh!


So, THIS, is the costume she asked me to make.  It WAS insanely difficult, and I AM insanely busy right now.  It was extremely time consuming, and we even had to put Gramma to work to get it done in time for the big dance (Thanks Gramma!). 

Anyways, here's what we came up with.  How do you think we did?


And hey!..........look!...........it those shoes again!  I TOLD my husband they were versatile! 


And.......just in case you were wondering............that IS a whole jar of Silver Glass Stampin' Glitter (120995) on that spike ball :) We used Crystal Effects (101055) to glue it down.  That stuff is amazing! 


and that IS a whole jar of Dazzling Diamonds glitter (102023) on those orbiting rings :) .........and how did we get the rings to stay attached to the dress?.........Silver Mini Brads (122941)!

Thanks for letting me share my lastest crafting venture with you!  


or click here to email me your order 

Thursday, October 20, 2011

Snowflake Gift Card Holder {Tutorial}

It's been a busy October for sure. I can't believe Halloween is creeping up on us! I will work hard at finishing up my Halloween treat favors i'm in the process of making for the kids classes/teachers and show them off next week.

I did a stamp party this past weekend and have to thank Steph and Mandi once again for hosting such a fabulous party. The energy at this party was unbelievable.. i often heard squeals of excitement...i loved it.. : )

I had a GREAT time demoing some fabulous projects. Here is one of the cute projects that i shared with the ladies. I'm pretty sure this cute little gift card holder was a favorite among the guests and i promised the ladies i'd post a quick tutorial so they could recreate it when they got home.


Products you'll need for this Project:

Stamp Set: 115370 Teeny Tiny Wishes

Card Stock (CS):
119685 Cherry Cobbler (CC) 3-1/2" x 11" & 2-1/2 x 2-1/2" for scallop punch
100730 Whisper White (WW) 1"x 3-1/8" for scallop border punch & scrap for greeting, punched out with the word window punch.
100702 Old Olive (OO) 2" x 2" for 1-3/8" circle punch

Ink: 119670 Early Espresso (EE)

Accessories and More:
113439 Big Shot
120901 Northern Frost Sizzlit Decorative Strip Die
124005 Silver Glimmer Paper 2" x 2" (for snowflake)
122334 Simply Scored Scoring Tool
122349 Letters to Santa Designer Series Paper (DSP) 3" x 3-3/8"
121006 Brights Glimmer Brads (old olive)
119857 Word Window Punch
119854 Scallop Circle Punch
119860 1-3/8" Circle Punch
119882 Scallop Edge Border Punch
101227 1/16" Circle Handheld Punch
122977 3/8" Lucky Limeade Ruffled Ribbon - 16 inches
101610 Stampin' Sponge
104332 Snail Adhesive
110755 Multipurpose Liquid glue
104430 Stampin' Dimensionals
104294 Sticky Strip
103683 Mini Glue Dots

TIP: An easier way to die cut the snowflake using thicker paper such as the glimmer paper. Peel off the shinny backing of the silver glimmer paper before placing it on the northern frost sizzlet strip die. After you have cut out your snowflake use your piercing tool to poke out all the small pieces (hearts and circles of the snowflake)

Once you have gathered all the supplies above and cut your CS as directed follow these quick easy steps to complete the gift card holder:

1. Ink up your greeting with EE ink and stamp onto the scrap piece of WW CS. Punch out greeting with the Word Window Punch. Sponge around the edges with EE ink.

2. Place your 3-1/2" x 11" piece of CC CS onto the Simply Scored Tool. Score at 4", 5-1/2" and 7.


3. Fold your crease lines as shown here.


4. Place sticky strip on the 3 sides shown here. DO NOT place a piece of sticky strip on the bottom where it will be folded together. This is where the gift card will be placed.


5. Peel off back of sticky strip and adhere sides together. The inside of your card should now look like this.


6. Line up the word window punch a quarter inch of the way in and punch. (If you are using an older style black SU punch, i used the lines on each side as a guide)


7. Move your punch over just a little and punch again to make the opening a bit longer to fit the gift card.


8. Now grab all of your pre cut CS, punched out CS, ribbon, the brad and get ready to adhere to the front.


a) Adhere the WW scallop border to the DSP
b) Adhere DSP to CC card front with snail adhesive
c) Line up your ribbon around the card and place 2 mini glue dots on the back to hold the ribbon in place so when you untie your ribbon bow the ribbon stays attached to the card.
d) Adhere the OO punched out circle to the CC punched out scallop piece.
e) Adhere your die cut snowflake to the OO circle using multipurpose glue.
f) Punch a hole through the OO CS using your handheld punch. Adhere shimmer brad.
g) Pop up the CC Scallop with stampin' dimensionals. One at the top of the scallop circle and one at the bottom --or half a dimensional at the top and half at the bottom end to save on dimensionals.. : )
h) Adhere your word window greeting with snail adhesive.
i) Add sentiment whereever you choose to inside the gift card and then place gift card in word window slot you previously created.
j) Tie Ribbon to close.. : )


Tuesday, October 18, 2011

Hanging Ornament Card


This is one of the projects my club girls created last month at club/card class. I just realized i didn't post last months projects. : )

I was inspired by this card. Thank you Renee for the inspiration!

I added an ornament from the stocking accents die. I popped up the ornament with a dimensional and added a rhinestone in the middle for a bit of bling! Please DON'T LAUGH at my bow. I DON'T DO BOWS..it's a little funny looking.. : )

... i'm a "knots" girl!

This will be one of the three card designs we will be creating at Lillana's private stamp a stack card class in November. If you are interested in having your own private stamp a stack card class with your friends and family please email me at alittlebitofink@gmail.com for more details.


Products used for this project:
Stamp Sets: Delightful Dozen (W122650,C122652), Delightful Decorations (116517), Texture Jumbo Wheel (116685)

Card Stock: Cherry Cobbler (119685), Crumb Cake (120953), Cherry Cobbler Texture (121076), Very Vanilla (101650)

Ink: Crumb Cake (121030), Cherry Cobbler (119669)

Accessories and More: Big Shot (113439), Stocking Accents Die (124099), Snow Burst Textured Impressions Embossing Folder (124096), 3/8" Cherry Cobbler Quilted Satin Ribbon (124105), Scallop Trim Border Punch (118402), 3/4" Circle Punch (119873), Stamping Sponge (101610), Linen Thread (104199), Basic Rhinestones (119246), Jumbo Wheel Handle (103661), Stampin Dimensionals (104430), Snail adhesive (104332)

Friday, October 14, 2011

Stitched Stockings Christmas Club Card


This is one of the cute cards we will be doing at club/class this month.  This card features the super cute Stitched Stockings set and the matching Stocking Builder Punch.  (I'm SUCH a sucker for coordinating stamps and punches :)!).  I also love this new Hand-Penned Holidays set.....gorgeous.........and so versatile!  Also love, love, LOVE the oh so sweet Mini Jingle Bells, and the Mini Clothespins were perfect to use with this set. 


To Recreate this Project:

Stamp Sets:  Hand-Penned Holidays, Stitched Stockings.

Card Stock:  Crumb Cake, Whisper White.

Ink: Cherry Cobbler, Lucky Limade, Basic Black

Accessories and More: Top Note Bigz die, Cherry Cobbler Baker's Twine, Mini Clothespins, Mini Jingle Bells, Stocking Builder Punch, and Dazzling Diamonds glitter. 


Wednesday, October 12, 2011

Snowflake SAS card...


I designed this card for Sunshine Hills Preschool Stamp a Stack Fundraiser Class (located in Delta, BC). This is one of three designs that will be created at this class. We have scheduled 2 sessions, November 30th and December 1st so pick a night and come on out and join us for a fun night of stamping!!

If you are interested in participating in this class please email me at alittlebitofink@gmail.com for a registration form and more details : )

If you can't join us for this class but are interested in creating the cards i will have some pre cut card kits available for purchase. All you have to do is purchase and assemble. E-mail me for more details...!!

(Click here to see another card design for this class)


Products used for this project:

Stamp Sets: Contempo Christmas (W118734,C120594), Serene Snowflakes (115438)

Card Stock: Riding Hood Red (111348), Baja Breeze (111352), Very Vanilla (101650)

Ink: Baja Breeze (111833), Not Quite Navy (103008)

Accessories and More: Big Shot (113439), Perfect Polka Dots Textured Impressions Embossing Folder (117335), Designer Frames Textured Impressions Embossing Folder (123130), Northern Frost Sizzlit Decorative Strip Die (120901), Riding Hood Red Strip Ribbon (Retired-Clearance Rack while supplies last), Cutter Kit (106958-distresser), Linen Thread (104199), Basic Pearls (119247), Stampin Dimensionals (104430), Snail Adhesive (104332)