CLICK HERE FOR FREE BLOGGER TEMPLATES, LINK BUTTONS AND MORE! »

Tutorials

Wednesday, November 30, 2011

Gorgeous Jumbo Paper Pinecones {Tutorial}

Just in time for your holiday decorating!  Detailed Step-by-Step Tutorial Available for Purchase.


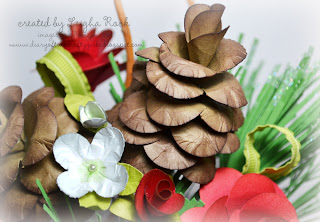
These big, gorgeous, life-like, jumbo pinecones are made completely out of cardstock and Stampin' Up! punches and dies.


These jumbo pinecones are almost as big as my hand!  I've gone pinecone crazy!  I've decorated my holiday mantel with them.  I've used them to make a beautiful wreath.  Plus, I've used them in some stunning paper flower arrangements that I will be giving away as gifts.   I've found tons of holiday decorating to do with them, and I know you will too!


I have put together a detailed tutorial on how make each of these beautiful, detailed and life-like pinecones.  Note:  these pinecones are very different from the mini pinecones featured in my Candy Cane Bouquet Tutorial .   The tutorial gives clear step-by-step instructions with tons of gorgeous photos on how to make the pinecones, plus lots of instruction on how to create the subtle effects that really make them look real and come to life (click on the picture to see the close up details).   The complete tutorial is 7 pages in length and has 21 photos.  The pinecones are not difficult to make, but a lot of photos are required to give complete step-by-step instruction.  


The complete tutorial on how to make these big, life-like pinecones is available for purchase for only  $2.50


Or find the link to purchase on the top right sidebar.  The tutorial will be e-mailed to the email address registered to your PayPal account within 24 hours as an Adobe PDF file following your purchase.  If you do not receive your email, please check your spam box.  If you still have not received your file within 24 hours, please contact me so I can correct any issues. 


Feel free to contact me if you have any questions. 


Monday, November 28, 2011

French Foliage club card {Tutorial}

It's been a busy couple weeks around here! I hope everyone is enjoying there holiday crafting. I can't wait to start my holiday gift making and baking this friday.. : )

Today i thought i'd show you a card we created at September's Club/Class get together. Some club members who missed the class had a few questions about how this card was created. Most were curious about the images inside the inked block image.

I do apologize, I created this card back in August and for the life of me can't remember who i cased it from.... : (

I remember the original card having a real button but i wanted to show my club girls how to create a "fake" paper button!! To create the button i used the button sizzlet and cut out 4 of the same button and glued them all together to create the thickness of a real button. (you can add more layers or less depending on how thick you want your button to look) You can also apply crystal effects to the top of the button to give a shiny look but i didn't do this for club as it would take to long (probably a few hours) to dry..!


To create the images inside the clear block image I used a clear block masking technique. Here's a quick step by step tutorial on how to keep your stamped images neatly inside the inked block image.

1. Ink up your clear block in More Mustard stamp pad.


2. Transfer the ink from the block onto your card stock.


3. Place stickie notes all around the edges of your stamped clear block image covering all spaces around the clear block image.


4. Start stamping your images inside the clear block image, over lapping on the stickie notes as the photo below shows.


5. Changing stamp images and ink colours continue to randomly stamp your images as you want them to appear inside the clear block image.


6. Remove all your stick notes.


7. Design your card as desired! I distressed the edges, attached the main card stock with the masking clear block technique on it to More Mustard card stock, added Early Espresso Bakers Twine, and a "fake" button and voila.. : )


Products used for this project:

Stamp Sets: French Foliage (W120845, C121166), Teeny Tiny Wishes (115370)

Card Stock: Early Espresso (119686), More Mustard (100946), Naturals Ivory (101849)

Ink: Early Espresso (119670), Cajun Craze (119671), More Mustard (103162)

Accessories and More: Big Shot (113439), Sweet Buttons Embosslits Dies (121813) Early Espresso Baker's Twine (123124), Cutter Kit (106958-Distresser), Snail Adhesive (104332), Mini Glue Dots (103683)


Hope you like..... : )

TO ORDER STAMPIN' UP! PRODUCTS ON-LINE 24/7, CLICK HERE

Friday, November 25, 2011

Gingerbread Houses


Every year I do an annual gingerbread house :).  Here is this years's creation!  Now, if you have been getting to know me at all, you will probably know by now, that I have a little OCD issue <smile>.  This year, it was about trying to get the side walls of my gingerbread house to curve (see that?)  (Gingerbread side walls baked onto large tin cans).  Well, after a few tries, I'm happy to say that I managed to "get it" <yeah!!! :)>  Anyways, here it is.  Thanks for letting me share my latest crafting ventures with you. 

On to the next challenge.   I also LOVE cake decorating and also love trying to parlay that into papercrafting...............(and sometimes visa versa).  This sweet little gingerbread house was made out of the oh so sweet Mini Milk Carton Bigz L die. 


Products used for this project:

Stamp Sets: Got Treats.

Card Stock: Soft Suede, Whisper White, Cherry Cobbler, Garden Green, and Wild Wasabi

Ink: Early Espresso Stampin' Marker

Accessories and More: Mini Milk Carton Bigz die, Scallop Edge Border Punch, Blossom Bouquet Triple Layer Punch, Heart to Heart Punch, Birds and Blooms Sizzlits 4-Pack Dies (retired) , Mini Clothespins, Early Espresso Bakers Twine, Dazzling Details, Early Espresso 1/8" Taffeta Robbon, Metallic Brads, Owl Builder Punch


 click here to email  your order.


Tuesday, November 22, 2011

Online Extravaganza and Club Card


Online Extravaganza has arrived!! Click here to check out this fabulous promotion!! Stampin' Up! has some awesome deals for your Holiday shopping or TREAT yourself!!--Stamp Sets 30 to 50% off!! Accessories from 20 - 60% off!!

Thank you for all your online orders to date! I've had a few questions about on line ordering so i thought i'd answer them here just in case you have the same questions!!

Q: How come your name doesn't appear as the demo in the top right corner when i click on shop now?

A: if you are ordering online please check that you see my name listed at the top of the website as the demonstrator for your order. Sometimes it will default to a demonstrator you have previously used. You may need to clear your cookies before a new demonstrator's name will appear. You can contact me if you need help with this.. : )

Q: How come i see the original price of the product?

A: prices will be adjusted at checkout so don't worry if the sale price doesn't show up right away!! : )

Q: I only want a few items, do i have to submit an on-line order?

A: This sale is geared towards online ordering but if there are a few items you'd like i can submit the order for you. Please note i will only be submitting an order if all the orders add up to $100 and i will be ordering on November 30th, the last day of the sale.... : )

Don't forget the fabulous thing about ordering online is it will arrive on your doorstep 7-10 after you submit the order!! wooohoo..-- love online shopping.. sit back, relax and shop!!

Just a quick note to let those of you who did order within the first 24hours of the sale that i have submitted your order and the orders will arrive on my doorstep within 10 days!!-- once i receive the order i'll contact you to arrange pick up or drop off.. : )


We created this beautiful stunning card at September's stamp club get together. I cased it awhile ago from Jen Sannes. Thank you Jen for creating such a lovely card!


Products used for this project:

Stamp Sets: Fabulous Florets, Word Play

Card Stock: Certainly Celery, Very Vanilla, Tangerine Tango, Chocolate Chip Textured

Ink: Certainly Celery, Tangerine Tango, Chocolate Chip

Accessories: Big Shot, Lattice Embossing folder, Pearls, Snail Adhesive, Paper Snips, Dimensionals

Hope you like..... : )

TO ORDER STAMPIN' UP! PRODUCTS ON-LINE 24/7, CLICK HERE

or click here to email me your order!

Friday, November 18, 2011

Candy Cane Bouquet {Tutorial}

Detailed Step-by-Step Tutorial Available for Purchase


This stunning bouquet is made completely out of paper and various Stampin' Up! punches and dies. (Well, and a little floral wire and some candy canes of course!)  

Wouldn't you love to make this stunning Christmas centerpiece for yourself or for someone special?  Now you can!   I have put together a detailed tutorial on how make each of these stunning flowers and how to replicate and assemble this bouquet.

The tutorial is in four parts.  Each tutorial gives clear step-by-step instructions with tons of gorgeous photos on how to make the velvety roses, the frosty pine needles, and the snowy mini pinecones to make this bouquet. I wish the photos showed off how much this centerpiece shimmers!  The complete tutorial is 12 pages in length and has 34 photos.  The flowers are not difficult to make, but a lot of photos are required to give complete step-by-step instruction.   It also gives lots of instruction on how to create the subtle effects that really make the flowers, pinecones and greenery come to life. 


The complete  four part tutorial on how to make this project is available for purchase for only  $5.95  


UPDATE:  (added June 1, 2012):  You are purchasing a tutorial from 2011.  Some of the items used in the tutorial have been discontinued from Stampin' Up!  This tutorial is still easily re-created.  Simple substitutions are noted here.  As of June 1, 2012,  the Mat Pack is  no longer available for ordering through Stampin' Up!  Any piece of thin foam can be substituted for the foam mat from the Mat Pack.  

The tutorial will be e-mailed to the email address registered to your paypal account within 24 hours as four Adobe PDF files following your purchase.  If you do not receive your email, please check your spam box.  If you still have not received your file within 24 hours, please contact me so I can correct any issues. 


Here is a testimonial from one of my customers: 

"The tutorial looks fabulous!  You've done such a wonderful job of explaining each flower and leaf, and I can hardly wait to give the paper flowers a try.  A couple of times recently I've been disappointed with for-fee tutorials, but certainly not with yours.  I know it was a lot of work for you, and it was worth every penny to me!  Thanks so much for sharing your creativity and for putting together a thorough and well-illustrated tutorial."


 Feel free to contact me if you have any questions. 


Wednesday, November 16, 2011

Gently Falling with a bit of Spice Cake!


I cased this card awhile ago from Catherine Pooler and had it in mind for club this month. I wanted to show my club girls another fun way to use the Shimmer Paint. You can't see the shimmer on the leaf in the photos but i'll briefly explain how the shimmer paint makes the leaf come to life and then you'll have to give it try to see the full effect.. : ) : )


First i inked up the leaf in More Mustard and then rolled the edges of the stamp (rock n' roll technique) in soft suede. With a sponge dauber i dabbed a bit of champagne mist directly onto the rubber of the stamp. I then stamped onto the vanilla card stock. Volia...you have a nice fabulous shimmery leaf! Its such a wow factor but it's too bad the shimmer doesn't show up when taking a photo. You can click here to see Catherine's video. Thank you Catherine for the great inspiration!


Products used for this project:

Stamp Sets: Gently Falling (W123802, C123804), Teeny Tiny Wishes (115370)

Card Stock: Soft Suede (115318), Very Vanilla (101650), More Mustard Textured (121076)

Ink: Early Espresso (119670), Soft Suede (115657), More Mustard (103162)

Accessories and More: Big Shot (113439), Perfect Pennants Die (123126), Neutrals Buttons (119743), 2-1/2" Circle Punch (120906), Modern Label Punch (119849), Spice Cake DSP (124003), Shimmer Paint Champagne Mist (116806), Linen Thread (104199), Spice Cake Designer Fabric (124066), Paper Snips (103579), Cutter Kit (106958-Distresser), Stampin Dimensionals (104430), Snail adhesive (104332), Mini Glue Dots (103683)

Monday, November 14, 2011

Simply Soft with a little Spice Cake!


Well i have to be honest and say that I'm getting a little bored showing you Christmas cards! --i know.. how could i even say that! i love Christmas and all the joy it brings but I've been creating Christmas projects since August and with all the prepping for Christmas classes/workshops this past month i seriously need a break....and since November is a busy month filled with Christmas classes i don't see myself taking a break anytime soon..!! With all that said how about i show you some NON Christmas cards this week! ; )

A while back i shared this card with you and when my good friend and of course talented Downline Teresa shared this card with me i asked if i could share it with you all. Thank you Teresa for sharing your version of the step card with me!! I love how you incorporated the spice cake DSP! I also like the look of the flowers. If you look at the flowers a bit closer you will see Teresa has used a bit of Crystal Effects for some 3D dimension.


You can view my step by step tutorial on how to create this style of step card by clicking here. I'd love to see your version! : )

Products used for this project:

Stamp Sets: Fabulous Phrases, Simply Soft (Hostess Set)

Card Stock: Crumb Cake, Soft Suede, Pool Party, Very Vanilla

Ink: Early Espresso, Soft Suede

Accessories and More: Crystal Effects, Large Oval Punch, Scallop Oval Punch, Spice Cake DSP (124003-Holiday Mini), Stampin Dimensionals, Snail adhesive

Friday, November 11, 2011

Christmas Snow Globe Easel Card


 I'm excited to share the first of a couple of Christmas projects I have been working on.  I made this easel card with Treat Cups and Mica Flakesfrom the Holiday Mini.  I overlayed the Marina Mist mat with vellum that had been stamped with Serene Snowflakes in VersaMark and then heat embossed with Irridescent Ice emboss powder.  The vellum and the embossing powder add a beautiful and sheer sparkle to the whole card. 


I've decided to hop  Hand Stamped Sentiments and enter this card into this week's challenge.  This week's challenge,  HSS Theme Challenge #92 is "Over the Top"!!  Head on over to check out the other entries. 


Products used for this project:

Stamp Sets:  Baroque Motifs, Serene Snowflakes, Sweet Centers, Autumn Days, Hand-Penned Holidays.

Card Stock: Cherry Cobbler, Marina Mist, Whisper White, Vellum

Ink: Basic Black, Garden Green, VersaMark, Garden Green Marker, Chocolate Chip Marker.

Accessories and More: Top Note Bigz Die, Irridescent Ice Emboss Powder, Silver Emboss Powder, Heat Tool, Circle Treat Cups, Mica Flakes, Picture, Cherry Cobbler Seam Binding Ribbon. Subtles Designer Buttons, Cherry Cobbler Baker's Twine, Mini Jingle Bells, Dazzling Diamonds Glitter, 2-Way Glue Pen, Dimensionals, Glue Dots.


or click here to email me your order.


Thursday, November 10, 2011

Penannt Tree - Merry Christmas Card


Thank you so much for the wonderful emails and comments regarding Ms. Alyssa's Butterfly card...! After showing her the post and reading all the emails and comments to her she said can i make Papa a birthday card!! (his birthday is next week so stay tunned.. ; )

On to today's card:

This was the first Christmas card i made this year. I create this card back in August! I was inspired by the mini pennant tree card on page 69 of the Idea Book & Catalogue. One look at this adorable little card and i was off to create something similar.

I love the non traditional Christmas colours and LOVE how simple it was to create.


Since this card has been up on display for a few months i've had a lot of fabulous comments on the layout, colour, texture..etc. Although when people take a closer look at the card there seems to be one question on everyones mind-- "what is on the tree..?" --gasps of OMG is that paper? that must of taken you a lot of time and work? How did you get them on there? My answer is YES it's paper..and it's simple! i used the leftover dots from the Dotted Scallop Ribbon Border punch. I placed my 2 way glue along the dotted image of the tree stamp and then with the pointy sharp end of the paper piercing tool i picked up the colourful dots and placed them on the glue. Once i finished adding the little dots then i sprinkled Dazzling Diamonds over top to fill the glue and Viola..! Easy Peasy.... took less then 2 mins.. : )

I also extended my Whisper White cardstock before i punched out the greeting with the Jewelry Tag punch.


Products used for this project:

Stamp Sets: Pennant Parade (W122740,C122742), Wonderfully Worn Background (118533), Petite Pairs (W122495,C122497)

Card Stock: Certainly Celery (105125), Peach Parfait (119794), Whisper White (100730), So Saffron (105118)

Ink: Pear Pizzazz (119784), Early Espresso (119670)

Accessories and More: Big Shot (113439), Snow Burst Embossing Folder (124096), Petite Pennant Builder Punch (122361), Jewelry Tag Punch (117190), Decorative Label Punch (120907), Dotted Scallop Ribbon Border (119275), White Bakers Twine (124262), Peach Parfait (119801), Early Espresso Marker (119680), 2 way glue (100425), dazzling diamonds glitter (102023), Paper Piercing tool (116631), Stampin Dimensionals (104430), Snail adhesive (104332),

Tuesday, November 8, 2011

Ms Alyssa's Butterfly Card {Tutorial}


As i mentioned yesterday, Ethan couldn't wait to make Nana a birthday card! He loves to see his Nan!.. He is constantly asking when Nana's coming over and then when she's leaving he asks when he's going to see her again!!

Since he was so excited and eager to create I told him he could use whatever he wanted....(eeeeeeeeks...in hopes he wouldn't touch EVERYTHING..lol). As he started to create his card he asked what Nana's favorite colour was? I said hum...i'm not sure..? He was eager to call her to find out. After he hung up the phone he had to start all over!! Apparently Nan told him her favorite colours are purple and green? --WHAT? seriously Nan? --do those colours even go together...lol... ; )

Here's what he came up with using lucky limeade and wisteria wonder....and I'm pretty proud of him for sitting still for as long as he did and creating the card all by himself without any help from me (well, ok.. i tied the bow! and since there was no pressure it turned out pretty DAMN GOOD!!)

I loved watching him write inside the card. He knew exactly what he wanted to write to Nana!


Alyssa was all over this craft project. She has really become interested in arts and crafts since she started preschool this year. I was truly amazed how she got right into craft mode with the punches and glue!! She kept asking me if i was taking photos..?? and i said what for? she said for our blog!! --i want to show my friends at school how i made Nana's card!! --gosh i was cracking up! too cute! I guess she hears Leigha and i talk about "our blog" and thought it would be a great idea to to share her craft project. Ms Alyssa is way too cute for words! I grabbed my phone that was beside me and started shooting some pics so i do apologize for the poor photos.. as it was pretty dark outside there was no natural light peeking in so the glare from my table lamp made for some very bad photos : (

With all of Alyssa's excitement i wish i was better prepared! Next time I'll be a bit more prepared for a photo shoot...or video...lol.. : )

Ms Alyssa's Step by Step Butterfly Card:

Step One: Wait until older sibling is finished with supplies so there is no fighting over certain supplies! Everybody needs to use the heart punches when making cards for grandma!


Step 2: Have Mom or Dad cut card stock in half and fold for card base. Run any necessary dies through the big shot (in this case Alyssa used the scallop duo die)---watch those little fingers!

Punch as many hearts out as you can. In this case Alyssa uses one full sheet of 8-1/2 x 11" card stock! -lucky mom provided her NON stampin up card stock--{big smile}.


Step 3: Punch out any other images you may want to add to the card. In this case Ms Alyssa decides she wants a million and one butterflies! She punches like crazy for about 10 mins.


Step 4: With SU's kid friendly non messy glue stick, glue all your punched out images to the card. And don't worry if you only use ONE of the hundred's of hearts you punched out earlier because you only need ONE heart on the card to show grandma how much you love her!!


Step 5: Stamp your favorite birthday greeting! Make sure you push really really hard and wiggle and rock the stamp as much as you can cuz you want to make sure the greeting shows up on grandma's card.. : )


Voila! Here's your finished card!


This card comes with a Warning: --Due to an overwhelming need for butterflies please be cautioned when opening this card. Butterflies my fly out unsuspectingly .... : )


Supplies Ms. Alyssa recommends in order to create a Beautiful Butterfly Card:

Stamps: Your Favorite Birthday Greeting and any heart or love stamp
Kid's Card Stock: Red, Blue, Green, scraps of pretty in pink.
Ink: Basic Black
Accessories and More: Big shot, Scallop Duo Die, Perfect Polka Dot Embossing Folder, Full Heart punch, Butterfly Punch, Markers, Glue Stick.

Hope you like! ...Nana LOVED her cards and told the kids she'd cherish them forever and ever! : )

TO ORDER STAMPIN' UP! PRODUCTS ON-LINE 24/7, CLICK HERE

or click here to email me your order!