CLICK HERE FOR FREE BLOGGER TEMPLATES, LINK BUTTONS AND MORE! »

Tutorials

Friday, September 28, 2012

Give Thanks


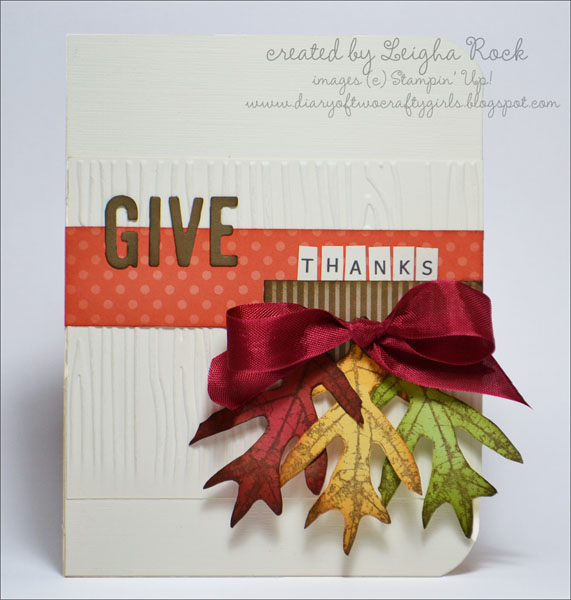
Well, fall is here now.  It's time to put away the summer projects, and start working on autumn themed projects.  The layout on this fall card was inspired by Alice Carman.  Lots of sponging brings subtle depth to the elements on this card.  The leaves were stamped with Soft Suede ink onto lighter paper colours (Riding Hood Red, So Saffron, and Certainly Celery).  After they were cut out, the edges were sponged with darker colours of ink (Cherry Cobbler, More Mustard, and Old Olive).   The Tangerine Tango DSP strip was sponged with lots of Cajun Craze ink.  Stay tuned for more fall inspired projects!


Products used for this project: 

Stamp Sets: French Foliage

Card Stock: Very Vanilla,, Riding Hood Red, So Saffron, Certainly Celerly, Soft Suede,  Naturals DSP (Soft Suede), Brights DSP (Tangerine Tango)

Ink: Soft Suede, Cajun Craze, Cherry Cobbler, More Mustard, Old Olive

Accessories and More: Billboard Decorative Strip Die (retired, ) MDS (for the word "thanks"), Woodgrain Embossing Folder, Cherry Cobbler Seam Binding Ribbon


Friday, September 21, 2012

A Perfectly Preserved Reason to Smile


I thought I'd show you one more sweet, summery card while the weather is still nice.  Soon the crisp fall weather will be upon us.  I have a couple of great autumn cards and projects to share with you soon....

Products used for this project:

Stamp Sets: Perfectly Perserved, Reason to Smile, You're a Gem.

Card Stock: Crumb Cake, Whisper White, Raspberry Ripple.

Ink: Basic Black, Old Olive, VersaMark, Summer Starfruit (marker), Crumb Cake (marker).

Accessories and More: Summer Starfruit 3/8" Stitched Satin Ribbon, Curly Label Punch, Beautiful Wings Embosslit, Basic Pearls Jewel, Essentials Paper-Piercing Pack.


Saturday, September 15, 2012

Tweet Leaves CASE


It's been a busy, busy week.  Back to work!  Back to school!  Back to dance!  I'm sure everyone is in the same boat!  I haven't had any time to sit down in my craft room and be creative.  At times like these, I find it very calming to carve out 20 minutes in my week, and sit down and do a straight CASE.  This card is CASEd straight out of the holiday mini catologue. 


Products used for this project:

Stamp Sets: Woodgrain (background stamp) Tweet Leaves, A Word for You.

Card Stock: Crumb Cake, Early Espresso, Very Vanilla..

Ink: (markers): Old Olive, More Mustard, Cajun Craze, Baja Breeze, Early Espresso.

Accessories and More: Lucky Limade Ruffled Ribbon, Early Espresso 1/4" Stitched Grosgrain Ribbon,  Ribbon Slide, Colour Sprizer Tool, Dimensionals, Sponges.


Friday, September 7, 2012

Lynn's Bouquet {Tutorial}

Happy 1st Anniversary Lynn and Matt!

Did you know that the traditional first wedding anniversary gift is paper? To help celebrate their first wedding anniversary, I recreated my friend, Lynn's wedding bouquet in PAPER!  The bouquet pictured below is made completely out of card stock using various Stampin' Up! punches and dies.  I just love the classy white on white theme! 


  I first introduced you to my friend Lynn when I created her butterfly wedding place cards.  Can you believe a whole year has gone by?  I can't!  


 This is a picture of Lynn's real wedding bouquet on her wedding day.  


And this was cake I made to celebrate her wedding shower. 


And this is the bouquet I created out of paper.  To create this bouquet,  I used both my original  Paper Orchid Tutorial and my original Summer Bouquet Tutorial.  I simply changed up the colours a bit, and put them together. Wouldn't you love to make it for someone special?   Now you can!  If you purchase both the original Paper Orchid Tutorial and the original Summer Bouquet Tutorial, I will also include a 6 page step-by-step Lynn's Bouquet Tutorial (lots of gorgeous pics here too) on how to do the colour variation for the wedding orchids, the creamy roses, the white hydrangea, and beargrass, as well as  how to make and assemble the  bouquet.  (Of course, as always, the Paper Orchid Tutorial and the Summer Bouquet Tutorial  will continue to be available seperately).  

To celebrate this new bouquet,  I am offering the Paper Orchid Tutorial AND the Summer Bouquet Tutorial  TOGETHER for a reduced price. 


The complete five part  Paper Orchid Tutorial and template AND the compete four part Summer Bouquet Tutorial PLUS Lynn's Bouquet Tutorial  is available for purchase for only $11.95.  


UPDATE:  (added June 1, 2013):  You are purchasing a tutorial from 2012.  Some of the items used in the tutorial have been discontinued from Stampin' Up!  For the most part, these beautiful flowers can still be recreated using alternate colours and products.  

Or find the link to purchase on the top right sidebar.  The tutorial will be e-mailed to the email address registered to your paypal account within 24 hours as several  PDF files following your purchase.  If you do not receive your email, please check your spam box.  If you still have not received your file within 24 hours, please contact me so I can correct any issues.


 I want to be know for my awesome customer service and support!  Did you purchase  both of these tutorials already?  You can have the Lynn's Bouquet Tutorial for FREE!  Simply email me.  Did you purchase one of tutorials already?  Wondering if you can purchase the other one and qualify for the free Lynn's Bouquet Tutorial?  Of course! Simply purchase the tutorial you need, and either place a comment to seller at the time of purchase letting me know you qualify for the free tutorial.  

Details on the Paper Orchid Tutorial and Template are available here ($5.95 purchased separately).  
Details on the Summer Bouquet Tutorial  are availble here ($6.95 purchased separately).


Questions?  Please feel free to email me.  I'd love to hear from you!  

P.S.  One other tiny tidbit....... Lynn's wedding anniversary and my wedding anniversary are the same day!  First for Lynn, and 14th for me :)

Saturday, September 1, 2012

Butterfly Place Card {Tutorial}


Ever since I posted this post on the butterfly wedding place cards that I made for my friend Lynn's wedding, I get regular requests for help recreating them.  Although I have offered a free template for people to use, I often get requests for a tutorial.  It's actually quite simple:


I created a template for the guest names (through trial and error), and practiced by printing it onto regular copy paper until I got the placement just right.  Lynn and I used Majestic font in 18 point.  We typed each guest name into the template, and then printed them onto 8-1/2" x 11" vellum paper.  You can create your own template, or you are welcome to use the one I created in My Digital Studio (its a ".mds" file). Just email me, and I'll pop it off in the mail to you.  (Note:  the following pics show the process on copy paper, but you will be printing on vellum or other paper of your choice)

If you are using my .mds template, you will need to make sure that you "print setup" before printing, and set the top, bottom and side print margins to "0".  My template requires the following cuts once you have printed the names:  1) Cut 1/8" off the top of the top.  2) Cut 1/2" off the left margin.  3) Cut six pieces which are 2-7/8" wide and 3-5/8" long.  Use the above photo for a guide.  (Click on the photo to enlarge)


Fold each piece in half.  Notice how the name is printed in exactly the right spot.  


Lay the folded piece of vellum (with the fold along the centre) onto the Beautiful Butterflies Bigz die.  (The preprinted name is on the inside). 


Once you have cut the butterfly, cut a small diagonal slit along the folded centre to allow the butterfly to sit onto the rim of a glass.  You can also place a Mini Glue Dot under the butterfly to ensure they are secure. 


Enjoy..........