CLICK HERE FOR FREE BLOGGER TEMPLATES, LINK BUTTONS AND MORE! »

Tutorials

Thursday, May 31, 2012

You're the Apple of my Eye


I'm back to show you a few more DIY teacher gifts that I've been creating to thank the people who make such a difference in my kids lives all year.  My son Finn has 3 wonderful preschool teachers.  We will be giving them the pencil vase filled with flowers that I showed you here.  Plus, we made each one of them a crocheted apple cozy to keep their apples from getting bruised. (Don't you hate it when that happens!?)  I CASEd their cards from this ADORABLE card made by Natasha. 


Products used for this project:

Stamp Sets: Thank You Kindly, School Lines

Card Stock: Crumb Cake, Basic Black, Whisper White, Real Red,  Chocolate Chip, Lucky Limeade

Ink:  Whisper White (craft), Basic Black Marker

Accessories and More: 1/2" Circle Punch, Cupcake Builder Punch, 3/16" Corner Punch, Stampin' Dimensionals, White Crayon, MDS.


I created the inside of the card with the School Lines stamp in Tempting Turquoise in MDS.  I added the sentiment right onto the lines in MDS and then printed them off in Whisper White card stock.  Then Finn signed his name with a Basic Black marker.  We used the Cupcake Builder punch to add the apple to his "i" :). 


 Stay tuned for more teacher, daycare, and coach thank you gifts coming up! 


Monday, May 28, 2012

I scream, you scream, we all scream for ice cream.....


I love how versatile the cupcake builder punch is.  I've created so many different styles of cards with this punch in the last little while and can't get enough!! 

I had fun with is card!! -- I used the petite pendant builder punch for the ice cream cone and for the ice cream i used the cupcake punch.  I JUST LOVE love love ice cream and have a hard time sharing... ; )   I've never had a 4 scooper ice cream cone before..hum...maybe I'll have to put that on my list of things to do this summer!

I just realized as I'm typing up the ingredients to this card that the texturz plate i used for the ice cream retired from the SU catty last year.  Oh dear..!   I'm sure you can "fancy" up your ice cream with one of the "new" textured impressions folders which will be available June 1st!


Supplies used for this Project:

Stamp Sets: Apothecary Art, Sweet Cake

Card Stock:  Crumb Cake, Whisper White, Tempting Turquoise, Daffodil Delight, Pumpkin Pie, Melon Mambo 

Ink: Basic Black

Accessories and More:  Big Shot, Labels Collection Framelits, Cupcake Builder Punch, Petite Pennants Builder Punch,  Basic Rhinestones, Island Indigo Bakers Twine, Snail Adhesive, Stampin Dimensionals


My very popular Cupcake Punch Tutorial is Now Available!  Check out the top Right Hand side bar to purchase and receive your 45 page step by step tutorial.--Are you looking for new fresh ideas? Looking to be inspired? Look no further, I have put together a 7 part tutorial which includes 6 amazing cards and one stinkin' cute scrapbook page layout! The tutorial is in seven parts. Each tutorial gives step-by-step instructions with tons of photos to help you recreate each card. The complete tutorial is 45 pages long and includes over 100 photos. Four of the 6 cards have hidden greetings and i have incorporate the cupcake punch into all 6 cards! You'll be amazed at what you can do with the cupcake punch! I'm so excited to share this tutorial with you! : )

Friday, May 25, 2012

Teacher Bouquet {Tutorial}


It's that time of year again, where we need to start thinking about thank you gifts for all of those wonderful people who help our children grow throughout the year.  I know my list is huge.  We have daycare teachers, preschool teachers, school teachers, dance teachers, and coaches to thank in May and June.  I'm excited to share some of the things I have been working on over the next few posts with you :)


The first project is this pencil vase.  What a great teacher gift!  This sweet little vase is perfect for my Spring Bouquet (click here), or one of my other paper flower bouquets (see the right side bars).  Thanks to all my customers who bought this tutorial and made it so successful!  I am always trying to show my customers how versatile these tutorials are.  For all of you who bought the Spring Bouquet Tutorial, here is another way to use it.


You will need a round shaped object to form the pencil vase around.  I used a glass vase which was 1-1/2" in diameter.  (Note:  the pencils are not glued to the vase.  They are glued to each other.  The vase is used just as a form. )  It took 23 pencils to form this vase.  I purchased a box of 24 pencils for $2.  I wanted my finished vase to be about 5-1/2" high.  Start by cutting the pencils down to approx 6" with a pair of gardening shears to save a lot of sharpening to get them down to that size.  Then use a pencil sharpener to place the points onto the pencils and get them down to a uniform length. 


Place an elastic band around the vase or other former.  Place a sharpened pencil under the elastic so that erraser end sits square on the table surface, and the pencil is nice and vertical.  Place some hot glue along the side of the pencil, and add another pencil under the elastic and press the two pencils together.  Continue adding pencils around the vase.  Take care as you go that you are being neat and not gluing the pencils to the vase inadvertantly. 


When you are done gluing all the pencils together, slip the vase out.  You are now left with a perfect cylinder of pencils.  Decorate with a strip of paper or ribbon.  I used a strip of Whisper White paper stamped with the Elementary Alphabet builder wheel in Basic Black ink.


Use the glass vase that you used as a former as a guide to cut a 3" thick piece of floral foam into a cylinder.  Stuff the cylinder of floral foam inside the pencil vase.  The vase is now ready to be filled with paper flowers.  You can find my Spring Bouquet Tutorial  here, or check out some of my other paper flower bouquet tutorials on the right sidebar. 


Enjoy!

Monday, May 21, 2012

Flower Garden Club Card

When i was in prep mode for club projects last spring i saw this card created by Jen Sannes and just had to CASE it for a club card.  My club girls always love it when i show them a quick simple card that they can go home and recreate a few of for any occasion.


At that time i created this card the Ribbon Lace Border punch just came out and i thought I'd give it a try.  I finally had a chance to pull this card out of the "club box" last month for club not knowing that I'd find the Ribbon Lace Border Punch on the retiring list.  Be sure to check out the retiring stamp sets and accessories - you don’t want to miss out on your retiring favorites! All the stamp sets on the list are going away on May 31st.  All accessories are available only while supplies last. Order online to avoid disappointment.


Thanks Jen for sharing such a beautiful card. ; )

Supplies used for this Project:

Stamp Sets: Perfect Punches

Card Stock:  Crumb Cake, Very Vanilla, Perfect Plum 

Ink: Perfect Plum

Accessories and More:  Big Shot, Flower Garden Embossing Folder, Extra-Large Oval punch, Lace Ribbon Border Punch, Lots of Tags Sizzlits, Basic Pearls, 3/8" Crumb Cake Taffeta Ribbon, Snail Adhesive, Stampin Dimensionals


My very popular Cupcake Punch Tutorial is Now Available!  Check out the top Right Hand side bar to purchase and receive your 45 page step by step tutorial.--Are you looking for new fresh ideas? Looking to be inspired? Look no further, I have put together a 7 part tutorial which includes 6 amazing cards and one stinkin' cute scrapbook page layout! The tutorial is in seven parts. Each tutorial gives step-by-step instructions with tons of photos to help you recreate each card. The complete tutorial is 45 pages long and includes over 100 photos. Four of the 6 cards have hidden greetings and i have incorporate the cupcake punch into all 6 cards! You'll be amazed at what you can do with the cupcake punch! I'm so excited to share this tutorial with you! : )

Thursday, May 17, 2012

Father's Day with Season of Friendship


Isn't this a cute little idea for Father's Day?  I found the idea here. They have tons of cute handprint ideas.  I used MDS to print the words "Happy Father's Day" in Chocolate Chip onto Whisper White card stock.  Then I inked up the tree from Season of Friendship with Chocolate Chip and stamped it above the sentiment.  Then the fun part began!  My 4 year old son had a blast getting his hands messy.  My hubby is going to love it! 


Supplies used for this Project:

Stamp Sets: Season of Friendship


Card Stock:  Whisper White

Ink: Chocolate Chip

Accessories and More:  MDS, various colours of acrylic craft paint, frame 


Friday, May 11, 2012

Fabulous Florets Flower Pot Card

Have you ever been inspired by your own creation?  How cute was the the flower pot gift idea tutorial??!! Click here if you missed it... : )

After making this cute gift I was inspired to create a card with similar design and layout.  This is what i came up with.  I love how easy card making can be.  This card took less then 15 minutes to create.


Here's how i created the flower pot:

1.  With Cajun Craze card stock punch out a word window piece and a 1-3/8" square piece. 


 2. Shorten the word window piece just slightly by feeding the punched out piece back into the word window punch. 


3.  Trim the sides of the 1-3/8" square piece to form the bottom of the flower pot.


4.  Adhere the shortened word window piece to the slightly cut square piece and voila you have a cute little flower pot for your flower.   


Hope you like.. : )
Supplies used for this Project:

Stamp Sets: Fabulous Florets (W123025,C123027), Messages for Mom (W117016,C118580 - retiring May 31, 2012)

Card Stock:  Naturals Ivory (101849)- 3-1/2" x 11, scored at 5-1/2", Scraps for Flowers, Cajun Craze (119684) scraps for flower pot, Daffodil Delight (119683) 5-1/2" strip for Dotted Ribbon Punch. 

Ink: Early Espresso (119670),  Daffodil Delight (119667), Old Olive (102277)

Accessories and More:  Word Window Punch (119857), 1-3/8" Square (119877), Dotted Scallop Ribbon Punch (119275), Basic Pearls (119247), Paper Snips (103579), Multipurpose Liquid Glue (110755), Stampin Dimensionals (104430), Raffia


My very popular Cupcake Punch Tutorial is Now Available!  Check out the top Right Hand side bar to purchase and receive your 45 page step by step tutorial.--Are you looking for new fresh ideas? Looking to be inspired? Look no further, I have put together a 7 part tutorial which includes 6 amazing cards and one stinkin' cute scrapbook page layout! The tutorial is in seven parts. Each tutorial gives step-by-step instructions with tons of photos to help you recreate each card. The complete tutorial is 45 pages long and includes over 100 photos. Four of the 6 cards have hidden greetings and i have incorporate the cupcake punch into all 6 cards! You'll be amazed at what you can do with the cupcake punch! I'm so excited to share this tutorial with you! : )

Wednesday, May 9, 2012

It's a Boy!


Ooohhh! I just love how this sweet little baby card turned out!   I CASEd this card from this card, originally created by Heather Klump.    The little lion is from the Fox and Friends set.  I don't own this set, and it's going to be retiring soon :(, so I purchased it in MDS!  Wow!  It was great to be able to size the stamp to just the size I needed.  I printed out the lion three times (twice in So Saffron, and one in Pumpkin Pie).  Then I cut out the different layers, and popped them out with Stampin' Dimensionals.  I used a Chocolate Chip marker to draw his little face.  The elephant is from the Nursery Necessities set.  I printed him twice in Pool Party, popped out his ear, and added a google eye.  The giraffe is also from Fox and Friends.  I printed her out in So Saffron.  Then I used a Chocolate Chip marker to draw on her eyelashes.  I added some Certainly Celery leaves for her munch on from the Just Believe stamp set.


Products used for this project:

Stamp Sets:  Nursery Necessities, Fox and Friends, Just Believe

Card Stock: Whisper White, Crumb Cake, Certainly Celery, and Certainly Celery DSP

Ink: Early Espresso, So Saffron, Pumpkin Pie, Pool Party, Certainly Celery, and Chocolate Chip marker
Accessories and More:  MDS, 1-1/4" Square Punch, 1-3/8" Square Punch, Certainly Celery twill ribbon (retired), White Gel Pen, and Dimensionals.  


Friday, May 4, 2012

Flower Pot Gift Idea {Tutorial}


For stamp club this month we created this cute little gift!.. This little flower pot holds a flower bulb in it so whomever receives this special gift will be able to plant it and watch it grow.. : )

This would be a great gift idea for Mother's day or for a year end teacher's gift.--I'm sure anyone who loves to garden would adore this gift idea as well!!  This project uses very minimal supplies which makes it very simple and of course fun to create.

Supplies needed to create project:

Stamp Sets: Fabulous Florets (W123025,C123027), Teeny Tiny Wishes (115370)

Card Stock:  Naturals Ivory (101849)- 3-1/2" x 11, scored at 5-1/2", Scraps for Flowers

Ink: Early Espresso (119670),  Daffodil Delight (119667), Pumpkin Pie (105216), Old Olive (102277)

Accessories and More:  Big Shot (113439), Adorning Accents Edgelits Dies (125595), Word Window Punch (119857), 1-3/8" Circle Punch (119860), Crop-a-dile (108362), Basic Pearls (119247), Paper Snips (103579), Stampin Dimensionals (104430), Raffia and Minin Flower Pot.

Instruction on how to create the flower pot gift holder:

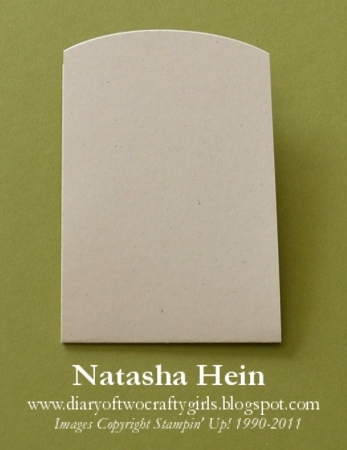
Step one:  Fold your 3-1/2" x 11" Natural Ivory card stock in half.  Place the Adorning Accents die at the top of the open end of the card stock and run through the Big Shot.


 Your card stock will now have a nice rounded edge.


2.  Centering the 1-3/8" punch at the bottom of the folded end of the Naturals Ivory card stock, punch out a half circle. (if you have a old style black punch line up your card stock to the black line, this is half way)


 3.  Center the Word Window punch at the bottom of the folded end, over top of the punched out half circle.  Punch out the word window shape. (if you have an older style black punch, go in as far as the punch will go)


If you have a newer style Word Window punch the distance from the bottom to the punched out word window shape is approximately 1-5/16" as shown here. 


4.  Place a Sticky note just below the punched out word window shape.  Ink up the Stem/leaves stamp in Old Olive and stamp on the Natural Ivory card stock. (the sticky note will block the bottom bit of the stem).  Repeat this step so you have 2 flower stems. --Flip your card stock over and repeat the above steps so you have the stem/leaves on the back of your project as well.


5.  With the 3/16" setting on the Crop-a-dile punch a hole approximately 1/2" in from each side (aprx. 1-3/4" up from the bottom)

 6. Ink your solid flower stamp in Pumpkin Pie and stamp onto a scrap piece of Natural Ivory card stock.  With Paper snips cut out flower. Repeat this step to create 2 pumpkin pie flowers.  Now repeat this step with Daffodil ink to create 2 more flowers for a total of 4.


 7. Ink up your greeting in Early Espresso ink and stamp greeting above the stems.  Add Pearls to your flowers if desired.  With Stampin Dimensionals attach 2 of the flowers to the stems on the front of the project. 


8. Using Raffia (or ribbon of your choice) loosely thread a few strains through one of the front holes making your way around the back of your project and ending back at the front. (where you will end up tying your bow)  Note: It's easier to thread the Raffia through the holes before placing the flower pot between the card stock.  Once the Raffia is threaded through the back just pull a bit of extra so you'll have room to open the card stock and place the flower pot at the bottom. 


 9.  Gently place the mini flower pot in the circle at the bottom of the card stock.  Add a flower bulb of your choice and then pull the strains of Raffia to close the card stock.  Make sure the top edges of the flower pot rest nicely in the word window slots.  Once the flower pot is nice and snug pull the raffia a bit tighter and tie a pretty bow.  Lastly attach the last 2 flowers to the back of the project with Stampin Dimensionals.


10.  Voila... you have a nice gift for someone special.  : )


Hope you like.. : )


My very popular Cupcake Punch Tutorial is Now Available!  Check out the top Right Hand side bar to purchase and receive your 45 page step by step tutorial.--Are you looking for new fresh ideas? Looking to be inspired? Look no further, I have put together a 7 part tutorial which includes 6 amazing cards and one stinkin' cute scrapbook page layout! The tutorial is in seven parts. Each tutorial gives step-by-step instructions with tons of photos to help you recreate each card. The complete tutorial is 45 pages long and includes over 100 photos. Four of the 6 cards have hidden greetings and i have incorporate the cupcake punch into all 6 cards! You'll be amazed at what you can do with the cupcake punch! I'm so excited to share this tutorial with you! : )