CLICK HERE FOR FREE BLOGGER TEMPLATES, LINK BUTTONS AND MORE! »

Tutorials

Thursday, June 30, 2011

Sweet Blog Award

Thank you to Angela McKay at North Shore Stamper for this Sweet Blog Award!


Part of this award is to share 7 random facts about ourselves and pass the award along to 8 other bloggers. So here they are:


Three random things about Natasha:

1. Love Love Ice Cream!!
2. Love Love Stamping Friday Evenings with my BFF!!
3. Love Love Spending Time with my Kids!! --you know while they still love hanging out with mom.. ; )

Three random things about Leigha:

4. I grew up in northern B.C., Canada
5. I love, and I mean LOVE diet Coke <grinning sheepishly>
6. The last book I read was "These is My Words: the Diary of Sarah Agnes Prine" by Nancy L. Turner <and I recommend it>.

One random thing about both of us

7. We only met two maybe three times before we started this blog together. We hit it off instantly! We meet once a week to get creative, plan our projects/clubs/classes/posts!! (oh and eat -- hum...we love to eat...LOL)

We are awarding the following 8 people the Sweet Blog Award:


Have a Sweet Day!


and

Wednesday, June 29, 2011

Lollipop Flower Pot

I'm so sad that the Pop-Up Three Tier Cake bigz XL die will be retiring! I loved using it for wedding and birthday cards.  This time I built the pieces upside down to make a flower pot instead of a cake.  I stabilized the pot with Cork Sheets,  poppedin  this sweet lollipop, and added a few embellishments.  Done!  How simple is that? 


To create this project you will need: 

Stamp Sets: Birthday Bakery (Level 1 Hostess - w117034, c120115), Build a Blossom (w121923, c121994)

Card Stock:  Peach Parfait textured (119799), Pear Pizzazz (119795), Watercolor Paper (105019)

Ink: Pear Pizzazz (119784), Black StazOn (101406), Real Red (103133), Regal Rose ( 105211), Bashful Blue (105209)

Accessories and More: Big Shot (113439),Pop -Up Three Tier Cake Bigz XL Die (116760), Cork Sheets (119819), Blossom Petals Builder Punch (121808), Large Tag Punch (119876), Blender Pens (102845), Cherry Cobbler/White Baker's Twine (123125), Sticky Strip (104294), and Lollipop.


Have a sweet day!


Sunday, June 26, 2011

Yummy Treat and Card to Match


Well, only 4 days left to get your hands on any retiring products from SU's 2010/2011 Idea Book and Catalogue!! Click here to order online through me OR click here to order online from Leigha. You can also contact either one of us with your order!! (email addresses are on left hand side bar)

ONLY 3 MORE DAYS until school ends for the summer!! wooooohooooo.. I thought this would be a great year end project for a teacher's gift. The "WAY TO GO" on the front of the card is for Ethan's teacher. She had her hands full this year with 18 BOYS in her class and only 5 girls. At the beginning of the year she said that she was happy that there were lots of boys in her class -- they are much "easier" to teach at this age!! well ask her now and she'll say it's her first year in 21 years of teaching where that statement may not be true!! LOL.. she sure had her hands full this year!! So "way to go" Mrs. Bauer you made it through the school year with 18 rough tough boys... : )

The treat holders are super easy to create. They are a great little gift for classmates or co-workers!! Switch up the front with a design of your own for any party favor!!

Check out the supplies and dimensions below.. : )

Two Tag Treat - With Small Kit Kat inside.


Products used for this project:

Stamp Sets: Recess (Summer Mini Pg. 18: W123090, C123092)

Card Stock: Real Red (102482) 8 1/2 x 2 3/4", fold in half and cut out with two tag die (fold must be below the cut line), Basic Black Textured (119922)- Scrap for punched Scallop, Whisper White (100730) -scrap for punched circle, scrap for greeting (punch out greeting with the word window punch and then stick the piece of white card stock back in the punch to shorten), 2 strips of 1/2" x 2 3/4".

Ink: Black StazOn (101406), Real Red (103133), Daffodil Delight (119667), Tempting Turquoise (100814),

Accessories and More: Big Shot (113439), Blush Blossom Stampin' Write Marker (100037), Blender Pens (102845), Brights DSP (117155) -3" x 2 3/4". Two Tag Die (115954), 2 3/8" Scallop Circle punch (118874), 1 3/4" Circle Punch (119850), Word Window Punch (119857), Black 1/8" Taffeta Ribbon (119261), Sponge (101610), Stampin' Dimensionals (104430), Snail Adhesive (104332)


Two Tag Card:


Products used for this project:

Stamp Sets: Recess (Summer Mini Pg 18: W123090, C123092)

Card Stock: Daffodil Delight (119683) 8-1/2 x 5-1/2", Real Red (102482) 3-1/4" x 4-1/2" Cut tag out with Two Tags Die, Basic Black Textured (119922)- Scrap for punched Scallop, Basic Black (121045) 3-3/4" x 5", Whisper White (100730) -scrap for punched circle, scrap for greeting (punch out greeting with the word window punch and then stick the piece of white card stock back in the punch to shorten) and then 2 strips of 1/2" x 2 3/4".

Ink: Black StazOn (101406), Craft Whisper White (101731), Real Red (103133), Daffodil Delight (119667), Tempting Turquoise (100814), Pumpkin Pie (105216)

Accessories and More: Big Shot (113439), Blush Blossom Stampin' Write Marker (100037), Blender Pens (102845), Brights DSP (117155) -3" x 2 3/4". Two Tag Die (115954), 2 3/8" Scallop Circle punch (118874), 1 3/4" Circle Punch (119850), Word Window Punch (119857), Red 1/8" Taffeta Ribbon (119251), Glimmer Brads (121006), Sponge (101610), Stampin' Dimensionals (104430), Snail Adhesive (104332)


Hope you like... : )

TO ORDER STAMPIN' UP! PRODUCTS ON-LINE 24/7, CLICK HERE


Friday, June 24, 2011

Mini In-Colour Promo

WOW is June almost over?? WHAT Happened?—where did the days go? I hate for June to end so fast but I love, LOVE this time of year, the sun starts shinning, we have the opportunity to sleep in (well …we all try to don’t we??…), we plan fun day trips with the kids and of course VACATION with the family!—can hardly wait! Also this is the time of year where things change. Stamp Club get togethers end for the summer and the new SU Catty begins. –wooohoooooo! There are so many fabulous new sets and products i can't wait for you to see. If you haven't received a new 2011/2012 catty yet and do not have a SU demonstrator please email me today for your copy! My new catty is completely covered in sticky notes..—ut oh… : )

The new catty brings NEW In colours!! For all you stampers out there looking for a fabulous deal on the NEW in colours I’m hosting a MINI In-Colour Kit promo! (Please note this offer is only being offered through me, not SU)


Aren't these new colours fantastic? Do you want every coordinating item? I know I do! And so can you - and for a fraction of the price!

This In Colour Mini Kit promo will run for only 2 months. This is a one time offer!! I will not be advertising this special promo again so don't miss your opportunity to grab all the new in-colours at a discount. Here is the cost breakdown:

July: $57.25
August: $57.25

So what do you get? Check this out! To purchase all of these products, it would cost you $193.86 but by purchasing through the In Colour Mini Kit Promo, it will cost you a total of $114.50 - a savings of $79.36!

For everything to work out evenly we need 5 stampers to participate. Here are the items that each stamper will have at the end of the two months:

All 5 In Colour Classic Ink Pads
All 5 In Colour Markers
All 5 In Colour Ribbons (2 yards of each colour)
In Colour 8 1/2 x 11 assorted Cardstock
In Colour Designer Paper

And, each month there will be a draw for a hostess stamp set (from the new catty) and you'll get a FREE 2011/2012 Idea Book and Catalogue! What are you waiting for? Grab a friend and Join today!

The first 5 people to participate in this promo will receive this beautiful handmade card created by me along with a FREE gift from me!


Isn't this card fantastic!! It features all of the new in colours!!


Products used for this project:

Stamp Set: Fabulous Phrases (W117002, C120501); Sanded Background (109294 -Retiring June 30th)

Cardstock: Pool Party (122924), Calypso Coral (122925), Lucky Limeade (122926), Wisteria Wonder (122922), Island Indigo (122923), Crumb Cake (120953), Very Vanilla (101650)

Ink: Basic Black (101179)

Accessories and More: Big Shot (113439), Beautiful Butterflies Die (114507), Beautiful Wings Embosslit (118138), Cork Sheets (119819), First Edition Specialty DSP (121878), Jewelry Tag Punch (117190), Basic Rhinestones Jewels (119246), Linen Thread (104199), Snail Adhesive (104332), Stampin' Dimensionals (104430), Mini Glue Dots (103683)

Hope you like... : )

TO ORDER STAMPIN' UP! PRODUCTS ON-LINE 24/7, CLICK HERE

or click here to email me your order!

Wednesday, June 22, 2011

Stamp Club and New Hostess Rewards!

One more week and then it's summer break. I LOVE summer break!! During the summer i have tons of time to fully take in the new SU catty, order new stamp sets and supplies, rejuvenate with fresh new ideas and then bombard you with lots of new ideas and techniques come September. I’ve already been asked to host a Christmas Stamp a Stack (SAS) card class. It will be one of many Christmas SAS's i host this coming fall --wwwoooohooo! If you are ready to join us for some fabulous times this coming fall/spring and want to join stamp club in September please email me ASAP as I only have a few spots left!! If you are looking to accumulate your crafting supplies while staying on a wee budget plus learn fresh new techniques this club is for you!!

I’m sure most of you have heard by now that there is a NEW Hostess Rewards Program starting July 1st! Want the details?? --- of course you do!

You no longer have to pick a level one or two hostess set. You can now cash in your hostess dollars for product of your choice. Wooohoo.... how exciting is that?? Once your workshop (or hostess month) total reaches $200 in sales before taxes, you will achieve hostess dollars which you can spend on regular and mini catalogue items or on hostess exclusive stamp sets. Here is mini breakdown of the sales/benefits in the new Idea Book and Catalogue:

$200 = $35
$265 = $40
$330 = $55
$400 = $70
$525 = $90 plus
one 1/2 price item!
$650 = $110 plus two 1/2 price items!

It just goes up from there!


I've posted many club projects here on our blog so take a peek at past projects and don't miss the next session of stamp club starting this September!!

Since June was our last club get together for this session we created 4 projects this month. Here are 2 of the 4 projects.


I created a Snip & Tuck card back in February using the sale-a-bration DSP and loved the outcome so much i just had to recreate with different DSP and stamp set for this month's stamp club get together.


You can see that the card is snipped and then tucked under to close! How clever!! You can click here to see where i got the idea for this card and view the instructions on how to recreate this card. (Thank you Julie for the inspiration!)


The idea for this gift card holder came from Stamping 411 - Thank you Connie for the Inspiration! To view full instructions along with the dimensions click here.


Products used for these projects:

Stamp Set: Extreme Elements (115181)

Card Stock: Cherry Cobbler (119685), Crumb Cake (120953), Crumb Cake Textured (119946), Basic Black (121045), Very Vanilla (101650)

Ink: Staz-On Ink (101406)

Accessories and More: Big Shot (113439), Two Tags Die (115954), Paper Cutter (104152). Dotted Scallop Ribbon Border (119275), 1-3/4" Scallop Circle Punch (119854); 1-1/4 Circle Punch (119861), 1-3/8" Circle Punch (119860); Love Letter DSP (117162 - Retiring June 30th), Basic Black 3/8" Taffeta Ribbon (119261); Basic Rhinestone Jewels (119246); Snail Adhesive (104332), Stampin' Dimensionals (104430)

TO ORDER STAMPIN' UP! PRODUCTS ON-LINE 24/7, CLICK HERE


Hope you like... : )

Sunday, June 19, 2011

Happy Father's Day!


Happy Father's Day everyone!  Hope you are all having a special day.  Earlier in the week, the kids and I went out to have our pictures taken with the idea of making this card in mind. 

Although this was the picture that made the cut, you should have seen some of the "bloopers"......too funny.

We made the card with the Stampin' Sound Card (Thanks for the idea Jenn).  You can cover this card with card stock or DSP and then embellish it for a personal touch.  Then you record a message up to 10 seconds.  The kids sang a little Happy Father's Day song.  My hubby is a softy for this sort of stuff.  I know this card will stay in his memory box, and he will be able to listen to the kids little voices when they are older.  
 
 
Products used for this project:

Stamp Set:  Love You Much (113756) Retiring soon! -- HURRY!

Card Stock: Whisper White (100730), Poppy Parade (119793) and Pawsitivily Prints II DSP (117396)

Ink: Poppy Parade (119782), and So Saffron (105213)

Accessories and More: Heart to Heart Punch (119881), 1-1/4"Circle Punch (119861), 1" Circle Punch (119868), Itty BittyShapes Punch Pack (118309), Linen Thread (104199),  Bitty Buttons (118761), Beautiful Wings Embosslit (118138), Vintage Trinkets (118764), Cork Sheets (119809), and Stampin' Sound Card (121009).


Friday, June 17, 2011

More Teacher Thank You Cards and Gifts

Well, this was not the post that I thought I was going to post today.  I thought that I would be showing you all a cute idea after the Vancouver Canucks won the Stanley Cup on Wednesday...............but that didn't happen.  The loss here kinda made my post inappropriate............but then again, there must be some Boston fans out there in blog land.  And I know that there are readers that have boys and could use the idea for boys hockey, birthdays, etc (I'm looking at you Dawn Pritchard and Angela McKay hee hee)..........so read to the end, and I'll post the idea there anyways. 


Well, as I mentioned earlier, June is here, and that means lots of Thank You cards and gifts for all those people who do such an amazing job of helping our kids all year long.  I already showed you the cute gift card holders I made for my daughter's dance teachers here.  Now I'd like to show you the cards I've made for my daughter's teacher, and my son's daycare/preschool teacher.

Wooden spools seem to be so hot in paper crafting right now.  I painted one with red craft paint .  The Whisper White card stock has been punched with the Scallop Edge Border punch.  The little black apple seeds are the "left over" bits from the Blossom Bouquet Tripple Layer punch.  I tied everything together with Linen Thread. 

When you untie the thread, you see the message I created with My Digital Studio (MDS)inside:


Products used for this project:

Card Stock:  Whisper White (100730), Basic Black (121045)

Accessories and More:  My Digital Studio (118108), Scallop Edge Border Punch (119882), Blossom Bouquet Triple Layer Punch (122464),  Linen Thread (104199), Multipurpose Liquid Glue (110755), Wooden Spool, Red Craft Paint.


The cute little card that goes with it is a gift card holder.  I CASED the idea straight from Natasha.  You can see her original Grad Owl card here.  I just LOVED her adorable card and new that I wanted to case it as soon as I saw it.   She added a pack of gum to hers (or money).  I'm going to tuck a gift card into mine. 


Products used for this project:

Stamp Sets: Thank You Kindly (111700), Tart & Tangy (111514) Retiring Soon -- HURRY!

Card Stock: Crumb Cake (120953z), Baja Breeze textured (124265), Basic Black (121045), Chocolate Chip (102128), Whisper White (100730), So Saffron (105118), and Soft Subltes Patterns DSP Stack (117152)

Ink: Whisper White Craft Pad(101731), Chocolate Chip Marker (100071), Old Olive Marker (100079), and Real Red Marker (100052).

Accessories and More: Owl Builder Punch (118074), Scallop Edge Border Punch (119882), 1-3/4" Scallop Circle Punch (1419854), Cork Sheets (119819), Vintage Trinkets (118764), Linen Thread (104199), Stampin Dimensionals (104430), and Sticky Strip (104294).


Kay................here's the cute idea..................I made Stanley "CUP" Cakes for my co-workers in Vancouver on Wednesday since I had the day off, and they all had to work through the game. I baked cake batter into ice cream cups, cut the dome off, turned them upside down, used royal icing to glue on a disc shaped out of fondant.  Then I used edible silver cake decorating dust mixed with alcohol (use vodka or gin) to paint the whole thing.  Everyone loved them.  Hope that helped to ease the loss..............


Wednesday, June 15, 2011

Happy Birthday Great Friend


Today is my "Great Friend" Amanda's Birthday! Happy Birthday Schweeeetie! I've mentioned Amanda before in previous posts. Amanda always finds the best cards to CASE and then i CASE her CASE...ooooh we are such great CASERS!! ; )

Amanda and i met a few years ago through SU! After attending and chatting at a few Downline meetings we instantly connected! We were drawn to each other with our craft style, we have the same card making style...oh and of course our personalities just clicked. Amanda is and has been such a GREAT friend over the years and i just love our friendship!! (Thank you Amanda!) Our daughters are great little buddies. Alyssa can hardly wait to she her Little pal Natalie. She always tells me Nataile is her favorite --so cute. We all love getting together for play dates! The kids play and Amanda and i get some time in there to chat and craft!!

Each year Amanda finds time during the busy holiday season, first -to remember it's my birthday (i often get forgotten...LOL) and second -to create a beautiful handmade birthday card for me!!.... and i have to admit I'm horrible at sending birthday cards!! --I finally got my act together this year and created a card for a fabulous friend....this one's for you girlfriend!! (can you hear my valley girl voice--LOL)


Quick Tip: I inked up my sponge in More Mustard and ran it across the Whisper White card stock and then embossed the leaves with versamark and embossed with white embossing powder. I then used the Cherry Cobbler marker and spritzer tool to give it some texture.


Products used for this project:

Stamp Sets: Great Friend (113792 - Retiring June 30th), Wonderfully Worn Background (118533), Teeny Tiny Wishes (115370)

Card Stock: Cajun Craze (119684), Whisper White (100730)

Ink: More Mustard (103162), Cherry Cobbler (119669), Cajan Craze (119671), VersaMark (102283)

Accessories and More: White Embossing Powder (109132), Embossing Buddy (103083), Mini Library Clips (109857), Linen Thread (104199), Stamping Sponge (101610), Colour Spritzer Tool (107066), Cherry Cobbler Stampin Marker (119681)

TO ORDER STAMPIN' UP! PRODUCTS ON-LINE 24/7, CLICK HERE


Hope you like... : )

Monday, June 13, 2011

Amazing, Thoughtful, Sweet, Wonderful...Genuine!

I CASED this card from one of our Stampin' Success Magazines!! I love how quickly it all came together! I'M TOTALLY IN LOVE with the textured card stock. I just can't get enough of it!

I've had a sneak peek at the new catty and it looks like the textured card stock is going back to the family packs so if you love the textured card stock and have favorite colours you'll have to stock up NOW!! Currently you can purchase 12 sheets of 12x12 card stock (6 textured and 6 smooth). When July rolls around your option for textured card stock changes to purchasing the whole family pack (20 sheets, 2 sheets of each colour in that specific colour family)

Don't forget to check out the retiring lists to see what other favorite products may be leaving the catalogue for good!!


Products used for this project:

Stamp Sets: Wonderfully Worn Background (118533), On a Pedestal (113814 Retiring June 30th)

Card Stock: Cherry Cobbler (119685)-8 1/2" x 5 1/2", scored at 4 1/4" on the 8 1/2" side, and scraps for Floral Fusion flowers. Early espresso (119686)- 2" x 1/2". Whisper White (100730)- 1 3/4" x 2", Cajun Craze (119684)-1/4" x 4 1/4". More Mustard Textured (119931)-2 1/4" x 4 1/4", and 3 itty bitty punched circles.

Ink: Early Espresso (119670)

Stampin' Write Markers: Cherry Cobbler (119681), More Mustard (100076), Cajun Craze (119678),

Accessories and More: Floral Fusion Sizzlit Die (115969), Scallop Edge Border (119882), Itty Bitty Shapes Punch Pack (118309), Regals Brads (119737), Stampin' Dimensionals (104430), Snail Adhesive (104332), Bone Folder (102300), Paper-Piercing Tool (116631), Distresser (Cutter Kit-106958)

ClICK HERE TO ORDER STAMPIN' UP! PRODUCTS ON-LINE 24/7


Hope you like... : )

Saturday, June 11, 2011

Grad Owl


Well it's that time!! Kids are just about outa school for the summer!... wwwwwooohoooo!! Another school year gone by..!! Can't believe it's JUNE!


Isn't this little guy super cute?? Do you have someone in your family graduating this year?? This is a super easy card to create!! I've added a pouch to the front of the card so you can include a treat, gift card or better yet MONEY!!


Products used for this project:

Stamp Sets: A to Z (115711), Woodgrain Background (117100)

Card Stock: Soft Suede (115318) 4 1/4" x 11, Scored at 5 1/2 on the 11" side. Scraps for punched owl. Baja Breeze (111352), Baja Breeze Textured (119972) Scraps for eyes. Basic Black (2 1/2" x 2 1/2"), Early Espresso (119686) 1/2" x 1/2" -grad hat. More Mustard (100946)-scrap for beak) Very Vanilla (101650) Scraps for eyes.

Ink: Whisper White Craft

Accessories and More: Big Shot (113439), Scallop Squares Duo (120903), Owl Punch (118074), 1 3/4" Scallop Circle (119854)- owl wings. Cork Sheets (119819) 3 1/4" x 3 1/4", First Edition DSP (121878), Elegant Soiree DSP (117163- Hurry it's retiring), Marina Mist 1/8" Taffeta Ribbon. Bone Folder (102300), Snail Adhesive (104332), Multipurpose Liquid Glue (110755) -glue cork down. 2 way glue (100425) -to piece the owl together.


Baja Breeze - 4 1/4" x 4", Scored at 1/2" and 3 3/4" on the 4 1/4" side. Scored at 1/2" on the 4" side. On the bottom fold snip both ends diagonally so the sides fold in nicely and adhere to card base with sticky strip. NOTE: the sticky strip should be placed on the OUTSIDE of all three flaps.

TO ORDER STAMPIN' UP! PRODUCTS ON-LINE 24/7, CLICK HERE


Hope you like... : )

Thursday, June 9, 2011

Paper Flower Bouquet {Tutorial}

Detailed Step-by-Step Tutorial Available for Purchase


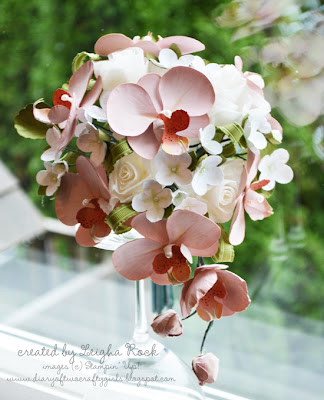
This stunning bouquet is made completely out of paper and various Stampin' Up! punches and dies. 

Wouldn't you love to make this beautiful bouquet  for someone special?  Now you can!  Due to an overwhelming demand, I have put together a detailed tutorial on how make each of these stunning flowers and how to replicate the bouquet.  The tutorial is in four parts.  Each tutorial gives clear step-by-step instructions with tons of gorgeous photos on how to make the roses, leaves, ranunculus, and white hydrangea to make this bouquet. The complete tutorial is 22 pages in length and has 57 photos.  The flowers are not difficult to make, but a lot of photos are required to give complete step-by-step instruction.   It also gives lots of instruction on how to create the subtle effects that really make the flowers look real and come to life.  


The complete  four part tutorial on how to make this project is available for purchase for only  $6.95 


UPDATE:  (added June 1, 2012):  You are purchasing a tutorial from 2011.  Some of the items used in the tutorial have been discontinued from Stampin' Up!  This tutorial is still easily re-created.  Simple substitutions are noted here.  As of June 1, 2012, Stampin' Pastels, the 5-Petal Punch, and the Mat Pack are  no longer available for ordering through Stampin' Up!  The Stampin' Pastels can easily be substituted for other pastels, or with the corresponding classic ink sponged on with a cotton tipped applicator.  The 5-petal punch was used to create the tiny green leaves amongst the white hydrangea flowers.  This punch can easily be substituted for the Blossom Petals Builder punch or or the 5-petal shaped flower from the Island Floral die.  Any piece of thin foam can be substituted for the foam mat from the Mat Pack.  

Or find the link to purchase on the top right sidebar.  The tutorial will be e-mailed to the email address registered to your paypal account within 24 hours as four Adobe PDF files following your purchase.  If you do not receive your email, please check your spam box.  If you still have not received your file within 24 hours, please contact me so I can correct any issues. 

Alternatively, purchase a minimum of $60 in Stampin' Up! products, and I will email you the PDF Tutorial free of charge!

Here is a testimonial from one of my customers: 

"The tutorial looks fabulous!  You've done such a wonderful job of explaining each flower and leaf, and I can hardly wait to give the paper flowers a try.  A couple of times recently I've been disappointed with for-fee tutorials, but certainly not with yours.  I know it was a lot of work for you, and it was worth every penny to me!  Thanks so much for sharing your creativity and for putting together a thorough and well-illustrated tutorial."


or contact me  to place an order (Canadian orders only please).    
(NOTE:  if you are ordering online, please check that you see my name listed at the top of the website as the demonstrator for your order.  Sometimes it will default to a demonstrator you have used previously.  You may need to clear your cookies before a new demonstrator's name will appear.  This is important if you want to qualify for the free tutorial).

 Feel free to contact me if you have any questions.