


I created this card with my club girls a couple months ago. I showed them how to shorten the
Framed Tulips Textured Embossing folder.
Here's how to create a smaller tulip frame border:
1. Place a 4" x 2-3/4" piece of card at the bottom of the Tulip embossing folder and run it through the big shot.

Your card stock will now have a tulip border around 3 sides.

2. Once run through the big shot, open folder and turn (do not flip) your card stock half way around. The already embossed sides should "lock" into the embossing folder. Feed the open end of the embossing folder into the Big Shot turning the handle only 2 or 3 times, reverse the embossing folder back out after the 2 or 3 turns. You do not want to feed the embossing folder all the way through as it will flatten the already embossed tulip border at the top of the card stock. If the sides are properly locked in they will remain the same and no new markings on the sides should appear.
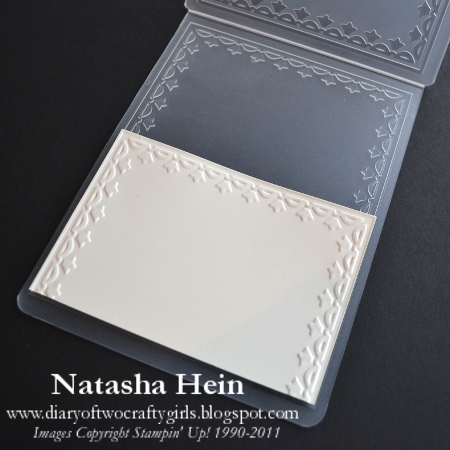
Voila.. you have a shorten tulip frame border.

Now you are ready to stamp your image! The nature walk bird fits nicely. : )

Products used for this project:
Stamp Sets: Nature Walk (W121925,C121997), Tiny Tags (W118091,118592), Wonderfully Worn Background (118533)
Card Stock: Very Vanilla (101650), Soft Suede (115318), Cherry Cobbler (119685), Baja Breeze (111352),
Ink: Early Espresso (119670), Crumb Cake (121030), Cherry Cobbler (119669), Sahara Sand Marker (105105)
Accessories and More: Big Shot (113439), Framed Tulip Embossing folder (121809), Cutter Kit (106958-distresser), Jewelry Tag Punch (117190), Antique Brads (117273), 3/8" Blushing Bride Pleated satin ribbon (125570), Spritzer Tool (107066), Piercing Tool and mat for brad, Stampin Dimensionals (104430), (103683), Snail adhesive (104332)


My very popular Cupcake Punch Tutorial is Now Available! Check out the top Right Hand side bar to purchase and receive your 45 page step by step tutorial.--Are you looking for new fresh ideas? Looking to be inspired? Look no further, I have put together a 7 part tutorial which includes 6 amazing cards and one stinkin' cute scrapbook page layout! The tutorial is in seven parts. Each tutorial gives step-by-step instructions with tons of photos to help you recreate each card. The complete tutorial is 45 pages long and includes over 100 photos. Four of the 6 cards have hidden greetings and i have incorporate the cupcake punch into all 6 cards! You'll be amazed at what you can do with the cupcake punch! I'm so excited to share this tutorial with you! : )
Click here to read more...


2 comments:
what a great idea thanks for sharing it best wishes Lesley x
Thanks for the tip. I never even considered using a frame-type of embossing folder with smaller pieces of cardstock.
Post a Comment