CLICK HERE FOR FREE BLOGGER TEMPLATES, LINK BUTTONS AND MORE! »

Tutorials

Friday, September 30, 2011

Tags Til Christmas Ornament Card


Here's another version of this card. I used the same DSP, Letters to Santa but just switched up the pattern of the paper. I used the ornament stamp from Tags til Christmas stamp set and i added 2 silver brads.


Products used for this project:
Stamp Sets: Tags til Christmas (W120847, C121169), Christmas Greetings (115448)
Card Stock: Whisper White (100730), Marina Mist (119682), Old Olive (100702), Early Espresso (119686)
Ink: Cherry Cobbler (119669), Early Espresso (119670)
Accessories and More: Big Shot (113439), Perfect Polka Dots Impressions Embossing folder (117335), Letters to Santa DSP (122349), Silver Brads (104336), Early Espresso/White Baker's Twine (123124), Ornament Punch (119847), Decorative Label Punch (120907), Paper-Piercing Tool (116631), Mat Pack (105826), Stampin Dimensionals (104430), Snail adhesive (104332)

Hope you like... : )

TO ORDER STAMPIN' UP! PRODUCTS ON-LINE 24/7, CLICK HERE


Tuesday, September 27, 2011

Delightful Decorations SAS card


It's that time of year when we all start to think about Christmas!! Have you started planning your Christmas cards for this holiday season?? I'm happy to say i'm all pumped and ready to stamp a big STACK of cards!! woooooohooooooo! This is one of many stamp a stack (SAS) cards i have planned for my upcoming SAS card classes this season. I just love the simplicity of this layout! It's super easy to recreate multiples...!! : )

Keep an eye out for dates, times and locations of my annual SAS card classes. They should be up on my events calendar the first week of October!--(just confirming private SAS dates with those who expressed interested in hosting a class in their home this holiday season)

If you are interested in hosting a private class in your home or in my stampin' studio please contact me ASAP at alittlebitofink@gmail.com to confirm a date and time.


Products used for this project:
Stamp Sets: Delightful Decorations (116517), Four the Holidays (116921)
Card Stock: Whisper White (100730), Marina Mist (119682), Old Olive (100702), Early Espresso (119686)
Ink: Cherry Cobbler (119669), Early Espresso (119670)
Accessories and More: Big Shot (113439), Perfect Polka Dots Impressions Embossing folder (117335), Letters to Santa DSP (122349), Silver Mini Brads (122941), Early Espresso/White Baker's Twine (123124), Ornament Punch (119847), Decorative Label Punch (120907), Paper-Piercing Tool (116631), Mat Pack (105826), Stampin Dimensionals (104430), Snail adhesive (104332)

Hope you like... : )

TO ORDER STAMPIN' UP! PRODUCTS ON-LINE 24/7, CLICK HERE


Sunday, September 25, 2011

Shakin' Up Snow Much Fun!


When i saw this card on Catherine's blog i knew right away it would be a perfect project for club get together. It's a wonderful technique that shows off some great new products from the Holiday Mini -- Mica Flakes, Shaker Frames and Frostwood Lodge DSP. I really had fun re-creating a similar version of the shaker card......thanks for the inspiration Catherine!! : )


We will be creating this card at October's Stamp Club get together so if you haven't registered yet please do so ASAP. Click here to Register!

It's not to late to join stamp club!! A second club will be starting in October so if you missed registration please email me ASAP at alittlebitofink@gmail.com to reserve your spot.


Products used for this project:
Stamp Sets: Snow Much Fun (W122560, C122562), Teeny Tiny Wishes (115370)
Card Stock: Whisper White (100730), Crumb Cake (120953), Garden Green (102584),
Ink: Black Stazon (101406), Garden Green (102272), Cherry Cobbler (119669), Pumpkin Pie (105216), Daffodil Delight (119667); Baja Breeze (111833)
Accessories and More: Shaker Frames (124155- Holiday Mini), Mica Flakes (124115- Holiday Mini), Frostwood Lodge DSP (124002- Holiday Mini), Dazzling Details (124117- Holiday Mini), Modern Label Punch (119849), 1-3/8" Circle Punch (119860), Word Window Punch (119857), Linen Thread (104199), Blender Pens (102845), Distresser (106958-Cutter Kit), Stampin Dimensionals (104430), Snail adhesive (104332), Clear Envelopes (102619) or Window Sheets (114323), Hobby Blade and Mat.

Hope you like... : )

TO ORDER STAMPIN' UP! PRODUCTS ON-LINE 24/7, CLICK HERE


Friday, September 23, 2011

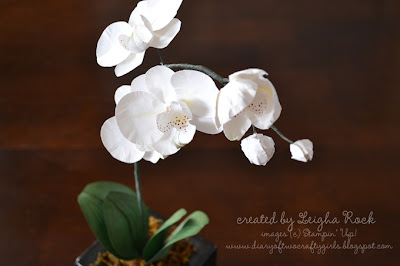
Paper Orchid Tutorial

Detailed Step-by-Step Tutorial Available for Purchase


This stunning spray of orchids and the leaves are completely out of paper (and a little floral wire and tape). 


Wouldn't you love to make this beautiful arrangement  for someone special?  Now you can!  Due to an overwhelming demand  from this post, I have put together a detailed tutorial on how make each of these stunning flowers and how to replicate the arrangement.  The tutorial is in six parts.  The tutorial includes the orchid template (designed by me) necessary to create the flowers and leaves.  It also includes five detailed tutorials which give clear step-by-step instructions with tons of gorgeous photos on how to make the full blooms, the partially opened orchids, the buds, the leaves, and how to put it all together.  The complete tutorial is 15 pages in length and has 32 photos.  The flowers are not difficult to make, but a lot of photos are required to give complete step-by-step instruction.   It also gives lots of instruction on how to create the subtle effects that really make the flowers look real and come to life.  


The complete template and five part tutorial on how to make this project is available for purchase for only  $5.95  


UPDATE:  (added June 1, 2012):  You are purchasing a tutorial from 2011.  Some of the items used in the tutorial have been discontinued from Stampin' Up!  This tutorial is still easily re-created.  Simple substitutions are noted here.  As of June 1, 2012, Stampin' Pastels and the Mat Pack are  no longer available for ordering through Stampin' Up!  The Stampin' Pastels can easily be substituted for other pastels, or with the corresponding classic ink sponged on with a cotton tipped applicator.   Any piece of thin foam can be substituted for the foam mat from the Mat Pack.  

Or find the link to purchase on the top right sidebar.  The tutorial will be e-mailed to the email address registered to your paypal account within 24 hours as six Adobe PDF (one template and 5 tutorials) files following your purchase.  If you do not receive your email, please check your spam box.  If you still have not received your file within 24 hours, please contact me so I can correct any issues.

Please note:  these flowers are created with a template (which is included in the tutorial), not with punches* like my other paper flower tutorial.   The great thing about this is, you do not need a tons of supplies to make these blooms, just some paper, a little ink, and some floral wire and tape. (* except the orchid bud which is formed with the Fun Flowers die)   

Alternatively, place a minimum of $60 in Stampin' Up! products on my online store , and I will email you the PDF Tutorial free of charge!


Here is a testimonial from one of my customers: 

"Leigha!!!!

Your tutorial is fantastic! I’m making Christmas gifts and can hardly wait to get started for  two daughters, three daughters-in-laws, and one other gift. And one for myself. I have an orchid that blooms for about 3 months and then it’s done for a while…this will be great to add when it’s not blooming."  -- Elaine


The blooms can be wired and made into an arrangment like above (these leaves are paper and are also included in the tutorial), or they could be worked into a beautiful paper flower bouquet.  You can also make the blooms without wiring them, and use them for lots of different papercrafting projects. 


or contact me  to place an order (Canadian orders only please).    
(NOTE:  if you are ordering online, please check that you see my name listed at the top of the website as the demonstrator for your order.  Sometimes it will default to a demonstrator you have used previously.  You may need to clear your cookies before a new demonstrator's name will appear.  This is important if you want to qualify for the free tutorial).
or click here to email me your order 

Feel free to contact me if you have any questions.


Friday, September 16, 2011

Snow Much Fun with Bells


I'm amazed on how many Halloween projects I've created this year..!! I do have more to show you but thought I'd slip in a Wintry card since it feels really cold today!! : )

When i first saw Snow Much Fun as a pre order stamp set i JUST fell in love with it... i love snowmen!!...but i resisted to buy it because i thought "i have enough Christmas stamps".. do i really NEED another one...?? don't we all ask ourselves this very question.. : )

After the release of the 2011/2012 catty in July i keep going back to this cute set admiring the snowmen!! the more i saw it the more i LOVED it!! something about those snowmen caught my eye and i just couldn't resist purchasing it... MY WANTS got the best of me and I'm happy i caved because i absolutely adore this set!

Don't you just love the little jingle bells? so stinkin cute.. : )


Products used for this project:
Stamp Sets: Snow Much Fun (W122560 C122562), Tiny Tags(W118091 C118592)
Card Stock: Whisper White (100730), Baja Breeze (111352), Night of Navy (100867),
More Mustard (100946)
Ink: Basic Black (101179),
Accessories and More: Big Shot (113439), Northern Flurry Textured Impressions Embossing folder (120902), Northern Frost Sizzlit Decorative Strip Die (120901), Cherry Cobbler Marker (119681), Night of Navy Marker (100069), Baja Breeze Marker (120965), More Mustard Marker (100076), Pumpkin Pie Marker (105115), Blender Pen (102845), Regals Brads (119737), Jewelry Tag Punch (117190), Dotted Scallop Ribbon Border Punch (119275), Mini Jingle Bells (124116 -Holiday Mini), Dazzling Details (124117 -Holiday Mini), Baja Breeze Seam Binding Ribbon (122331), Stampin Dimensionals (104430), Snail adhesive (104332), Multipurpose Liquid Glue (110755), Sticky Strip (104294)

Hope you like... : )

TO ORDER STAMPIN' UP! PRODUCTS ON-LINE 24/7, CLICK HERE


Wednesday, September 14, 2011

Lynn's Wedding


Well, my good friend Lynn got married this week, and I'm dying to show you a few of the things that I had the pleasure of working on for her wedding shower and wedding.  Last week, I showed you the beautiful butterfly place card holders we made in this post.  Thanks for all your wonderful comments and inquiries!


Well, Lynn's bridal bouquet was pretty much the most unique thing I had ever seen.  I centered around a white on white theme (very classy!).  It featured moth orchids  and was entirely made out of CLAY!  I wish I had pictures to show you!   If you saw it, you would never know it was clay.  The artisian who made it is one of the most talented, gifted artists I have ever seen.  Now, if you know me at all, you know that I have a love of trying to recreate flowers in sugarpaste for cakes and in paper for papercrafting.  Lynn's bouquet was an insipiration to me, and with this in mind, I created these things:


This is the cake I made for her wedding shower.  The cake was a white genoise cake studded with bittersweet chocolate.  Then each of the three tiers was torted into three layers.  I placed raspberry preserves and whole raspberries on each layer and then slathered on a creamcheese/white chocolate filling.  I restacked each layer, and then covered each tier with a vanilla french buttercream.  The tiers were then stacked, and I placed the orchids and ivy that I had carefully made by hand out of sugarpaste.  


Well, making all those sugar orchids, got me to thinking about trying to make orchids out of paper.  This is the design I came up with.  What do you think?  


To create this card, I used:

Stamp Sets: Word Play ("happy I do day") (on the inside - not shown) 
Card Stock: Whisper White
Ink: Cherry Cobbler Stampin Write Marker
Accessories and More:  Stampin Pastels, Elegant Lines Embossing Folder, Pearl Jewels, and my own template for orchid flowers.

Complete template and tutorial now available for the orchid flowers here!! 

More gorgeous projects to make with these orchid flowers coming up!

Please check out my other Paper Flower Bouquet Tutorial here.

Sunday, September 11, 2011

Creepy Crawly, Oh my golly..


Creepy Crawly, Oh my golly was this ever a fun card to create!! It was so simple...and you know how i LOVE simple.. : )

The only thing that i had to wait on was the drying of the clothespins and twine. I was away when i created this card and didn't have my reinkers with me so i used a marker and it took some time to colour and dry. I've used black clothespins/twine on another project since i've been home and using the black reinker, powder pal, stipple brush, and heat tool made the process much quicker!!

I popped up the spiders to give the card some dimension.


Products used for this project:
Stamp Sets: Batty for You (116576), Delightful Dozen (W122650, C122652)
Card Stock: Whisper White (100730)
Ink: Basic Black (101179)
Accessories and More: Frightful Sight DSP (122351), Mini Clothespins (122942) Basic Black Stampin Write Marker (100082)--or you can use Basic Black reinker to dye the clothespins and twine), White Bakers Twine (124262), Cajun Craze Marker (119678), 1-1/4" Basic Black Striped Grosgrain Ribbon (115615), Stampin Dimensionals (104430), Paper Snips (103579), Snail adhesive (104332)

Hope you like... : )

TO ORDER STAMPIN' UP! PRODUCTS ON-LINE 24/7, CLICK HERE


Thursday, September 8, 2011

Peek-a-Booing Out on a Limb....


Sorry for taking so long to show you my first Halloween card of the season..! Thank goodness Leigha returned when she did!! --don't you just love Leigha's amazing creative mind! Fabulous wedding idea!! I'm so happy she's back.. : )

This past week has been non stop with running around!! It started with returning from holidays and Alyssa having a birthday! She turned into a big girl on Sunday!! Sweet Terrible 3's!! AND with back to school ..you can only image what happens the first week of school!! I've had NO computer time at all this week! We are starting to get the hang of our daily routines again and to top it all off, all of our activities also started up this week!!--soccer practices/games, hockey evaluations and this year Alyssa is starting activities too...she starts dance this weekend! THANK GOODNESS my stamp club starts back up this month..---I'll need some serious MOMMY time for sure!! ; )

Ok on to the cute Halloween card....


When it came to pre order for the upcoming holidays the peekaboo die was first on my list!! I could just see the possiblities with this die!! Have you seen it? Isn't it totally cool???!!!


See how it opens... i love it..! There are so many different options on this die. You must check it out. Click here, it's on page 36 of the Holiday mini.


Products used for this project:
Stamp Sets: Out on a limb (W123822, C123824), Wicked Cool (W118738, C120600)
Card Stock: Whisper White (100730), Basic Black (121045), Crumb Cake (120953), Pumpkin Pie (105117), Old Olive (100702), Rich Razzleberry Textured (121077)
Ink: Basic Black (101179), White Craft Ink (101731)
Accessories and More: Big Shot (113439), Peekaboo Frames Bigz Die (124587), Spider Web Textured Impressions Embossing Folder (120889), Old Olive Stampin Write Marker (100079), Basic Black Stampin Write Marker (100082), Rich Razzleberry Stampin Write Marker (120970), Daffodil Delight Stampin Write Marker (119677), Blush Blossom Stampin Write Marker (100037), Sliver Mini Brads (122941); Decorative Label Punch (120907), Jewelry Tag Punch (117190), 1-1/4" Basic Black Striped Grosgrain Ribbon (115615), Stampin Dimensionals (104430), Paper Snips (103579), Stamping Sponges (101610), Snail adhesive (104332), Multipurpose Liquid Glue (110755)

Hope you like... : )

TO ORDER STAMPIN' UP! PRODUCTS ON-LINE 24/7, CLICK HERE


Monday, September 5, 2011

Butterfly Wedding Place Cards

My good friend, Lynn, asked me to help her design guest place cards for the reception for her upcoming wedding.  I came up with a couple of different design ideas, but she loved this butterfly idea.


I originally saw this idea in a Martha Stewart magazine.  However, instead of using card stock and cutting out individual butterflies by hand, we decided to use vellum and Stampin' Up!'s Beautiful Butterflies Bigz Die.  The vellum turned out soooooooo pretty.   The butterflies had such a light, sheer, almost glowing quality about them.  The flowers are paper and are part of my Paper Flower Tutorial available here.


First, we printed each of the guests names onto sheets of vellum.  We did this by creating a template in My Digital Studio.  It took us a bit to figure out exactly where to place the names on the paper.  We used regular copy paper as tests until we got it perfect.  Six butterflies ended up fitting onto each piece of paper.  Once we created the template, we sailed through this task.  Her wedding was fairly intimate with 60 guests, so it wasn't too much work.  Then we cut the printed vellum sheets with a Paper Cutter.  Folding the small cut out sheets (with the names now printed on them) first, made lining up and cutting out the butterflies easier.  We found that we could cut 3 or 4 at a time quite easily.  Then we cut a small slit on each butterfly along the fold where they would be placed on each guest's wine glass.  A mini glue dot under the butterfly secured it so that they would not blow off in the breeze. 


Products used for this project:

Card Stock: Vellum Card Stock

Accessories and More: My Digital Studio, Big Shot, Beautiful Butterflies Bigz Die, Paper Snips,  Mini Glue Dots

Update:  I have had so many requests for help on how to recreate these place cards, that I made a mini tutorial in this post.  


All the flowers shown in the pics of these posts are from my Paper Flower Bouquet Tutorial available here (or on the right hand sidebar). 


Saturday, September 3, 2011

Blog Award and Blog Candy Winner!


Thanks so much to fellow Stampin' Up! Demonstrator Sabriena Satchwell for awarding us with The Versatile Blogger Award!  Sabriena's blog, Little Miss Scrapalicious is an awesome source of inspiration. Love her style!  Be sure to drop by her blog and and check it out.

Now for the Blog Candy Award!  Thank you so much for all of your sweet comments and birthday wishes from this post.  As Natasha mentioned, we are giving away some blog candy, and the winner is:


   Comment number 12 is from P2Designs:

Picture is just too cute! Happy B-day - hope you have lots of fun things to do on your special day.
Pam

Pam, please be sure to email me your address so I can get your Blog Candy off to you in the mail. 


Thanks to Pam and to all of our followers who leave us comments.  We LOVE getting comments !!! It's what keeps us inspired, and keeps us going. Thanks so much.

We will also be sending you this Thank You card :)


Just got back from 2 weeks away, and nothing like a quick CASE to get your mojo going again.  I cased this card from someone, but the pic wasn't watermarked, so I have no idea who to credit.  If you recognize this card email me and I'd be happy to give credit.  I changed up the card just a little bit.  Loved using the new 2-step Simply Soft Hostess Set.  Also used my craft ink in Whisper White to make the embossed dots on the Designer Frame embossed piece pop out (looks like little pearls).  

Products used for this project:

Stamp Sets: Simply Soft (Hostess).

Card Stock: Naturals Ivory, Early Espresso, Whisper White, Crumb Cake, Rose Red, and Pink Pirouette textured.

Ink: Early Espresso, Rose Red, Old Olive, and Whisper White (craft)

Accessories and More: Dotted Scallop Ribbon Border Punch,  Designer Frames Embossing Folders Set, Subtles Designer Buttons, Antique Brads, Linen Thread, Color Spritzer Tool, and Pearl Jewels.


 and