Friday, December 30, 2011
Stitched Stocking Just for Fun Card
Isn't this such cute card using the Stitched Stocking Stamp Set and Stocking Builder punch?? I thought it would be a fun card to create to show you a different way to use this coordinating stamp set and punch!! I just love it!!
Stampin' Up! has recently announced that the stocking punch will NOT carry over into the Idea Book & Catty in July..boo woooo! It's very unusual for SU to come out with a punch and not carry it over so I'm super sad it won't be offered at a later date!! Once the inventory is depleted, it will no longer be available. Get it while it lasts! The item number for the punch is #120495 and it is $22.95. You can order it through me, or through my SU! website, HERE.
The Stitched Stockings matching stamp set can be found on page 34 of the Holiday Mini Catalog.
Clear mount item number is #123784 and is $25.95.
The wood mount item # is 123782 and is $33.95.
Please contact me asap if you'd like me to add these items or any other items to my order that will be going in tomorrow!! (or order online before January 3rd and have it shipped directly to you!)
Also don't forget to check out the clearance rack for some GREAT deals --up to 80% off... WOW.. I'm still wondering why i didn't purchase more ribbons and accessories on my last clearance rack order!! I'm pretty certain I'll be adding some more good deals on my December 31st order.. ; )
For the ears, muzzle (nose?), and mane i used the pieces from the builder stocking punch. For the horse's eye i used a small pearl and coloured it with a black sharpie pen. I also used my square punch to "fork" the end of the DSP.
Hope you like... : )
Products used for this project:
Stamp Sets: Stitched Stockings (W123782,C123784), Sweets for the Sweets (W122510,C122512), Wonderfully Worn Background (118533)
Card Stock: Pear Pizzazz (119795), Soft Suede (115318), So Saffron (105118), Crumb Cake (120953)
Ink: Soft Suede (115657), Early Espresso (119670)
Accessories and More: Big Shot (113439), Scallop Squares Duo Bigz Die (120903), Basic Pearls (119247), Stocking Builder Punch (124095), 1-3/8" Square Punch (119877), Twitterpated DSP (125406), White Bakers Twine (124262), DSP (retired), Stampin Dimensionals (104430), Stamping Sponge (101610), Snail adhesive (104332),
TO ORDER STAMPIN' UP! PRODUCTS ON-LINE 24/7, CLICK HERE
or click here to email me your order!
Tuesday, December 27, 2011
In Colour Pennant Parade
I hope you all had a wonderful Christmas..!! The excitement and energy is slowly winding down over here and the kids are happily playing with their new goodies!!
Thank you all so much for the warm Birthday Wishes the other day! I had a wonderful day with friends and family!! : )
Awhile ago Leigha brought over all the stuff pre cut for this cute card! -thank you Leigha!! : )
We created this card at stamp club this month. My club girls were asking for some ideas on how to use their 2011-2013 "in colour" card stock and accessories and right away i thought of this card. --we'll be creating another cute card next week at stamp club get together using more of the newer in colour card stock, DSP and ribbon!
I hope to use the pennant parade set and punch a little more in the new year!! There are so many possibilities for this stamp set and punch and i can't wait to create more!!
Products used for this project:
Stamp Sets: Pennant Parade (W122710, W122742),
Card Stock: Wisteria Wonder (122922), Whisper White (100730), Daffodil Delight (119683), Lucky Limeade (122926), Pool Party (122924)
Ink: Basic Black (101179), Wisteria Wonder (122936), Lucky Limeade (122935), Pool Party (122938)
Accessories and More: Big Shot (113439), Perfect Dots Textured Impressions Embossing Folder (117335), Petite Pennants Builder Punch (122361), Scallop Trim Border Punch (118402), Itty Bitty Shapes Punch Pack (118309), Bitty Buttons (118761), White Bakers Twine (124262), Craft Scissors (108360), Stampin Dimensionals (104430), Snail adhesive (104332)
Hope you like..... : )
TO ORDER STAMPIN' UP! PRODUCTS ON-LINE 24/7, CLICK HERE
or click here to email me your order!
Saturday, December 24, 2011
Friday, December 23, 2011
Happy Birthday Tether Ball Fans
This was a fun card to create with a fun story to go along! : )
November was sure a busy month for birthdays. My son attended 4 birthday parties last month!!
I'm always stumped for card ideas when it comes to guys and kids---mainly boys!! .... i find it more difficult to come up with "male" cards.
As Ethan brought home each invite i thought to myself, oh no..what am i going to create? .....what are these boys interests!!?? After putting some serious thought into it a wave of excitement came over me!!--Have you ever had a brilliant idea and you're super excited to share it with somebody and eagerly look around the room wanting to shout out your brilliant idea in hopes somebody is eagerly awaiting to hear your marvelous idea but then you look over and the only person in the room is your non crafty child engaged in a video game??!! ...i paused for a moment and then blurted out --ETHAN!!! I HAVE A GREAT IDEA!-- he's like ..."what mom!" (in a low tone, like don't bother me i'm in the middle of a GREAT VIDEO GAME) -- i said what if i make tether ball cards for your buddies at school? What do you think? Is that a cool idea?
Last year the cool thing to do at recess and lunch was to play beyblades and this year the cool thing to do is play tether ball. There are a few tether ball poles set up at the school and this year ethan is heavily involved at being the master of the tether ball match even if it means coming home with bruised writs, arms and muddy pants--and no teeth! All the kids in his class love the game or maybe it's the challenge of beating the other in a match!! He kept saying how he wished he had a tether ball at home!! (we have a small yard) I said sure we can get you a tether ball. All we need to do is buy the ball and then we can take it up to the school and hook it up whenever we want!! simple!! Wellll.... that seams simple in a womans mind but what i didn't realize was the inconvenience of it all!! ... having to go all the way to the school to play!!?? the school is soooooooooooooo far away! (5 mins..lol) so my husband's brilliant idea was to stick a nail in the tree outside our front yard!! NICE!
Here's Ehtan and his cousin tearing up the grass...oh dear, hubby is having second thoughts of his brillant nail in the tree idea.. : )
Ethan thought it was a pretty cool idea to make tether ball cards and since the only sports cards i've ever made are soccer, baseball and hockey for his friends it made for something different. But like any other card i make for his buddies there were specific requests for each tether ball card. Since they all owned their own tether balls i had to make sure the colour of the ball was the same as the one they owned. So off i went to create!
Ethan was happy with the out come of the cards but mentioned that one of the tether balls was suppose to be black and yellow...-- and asked why there was hopscotch in the background? "mom we don't play hopscotch!?" -- WOW.. seriously...? I should of took better notes when he was putting in his order..!! My response was -i was just trying to add a little something to the card... : ) : ) : )
Products used for this project:
Stamp Sets: Sweets for the sweets (W122510,C122512), Wonderfully Worn (118533), Recess (From 2011 Summer Mini)
Card Stock: Crumb Cake (120953), Not Quite Navy (101722), Whisper White (100730), Old Olive (100702), More Mustard (100946), Basic Gray (121044)
Ink: Basic Gray (109120), Not Quite Navy (103008), More Mustard (103162)
Accessories and More: Hemp Twine (100982), 1" Circle Punch (119868), Large Oval Punch (119855), Spiral Edge Border Punch (retired), Paper Snips (103579), Stampin Dimensionals (104430), Snail adhesive (104332)
Hope you like..... : )
TO ORDER STAMPIN' UP! PRODUCTS ON-LINE 24/7, CLICK HERE
or click here to email me your order!
Labels:
Recess,
Sweets for the Sweets,
Wonderfully Worn
Tuesday, December 20, 2011
Going to Get Our Christmas Tree
Well, it was time to head out for our annual trek to get our family Christmas tree..................
We found the PERFECT one! Then headed home to warm up with hot chocolate for the kiddies (and rum and eggnog for Mom and Dad :)). Then it was time to decorate the tree...............
..............gotta luv days like this :)
Products used for this project:
Stamp Sets: The Snowflake Spot (retired)
Card Stock: Window Sheets (114323)
Ink: White StazOn (106960)
Accessories and More: 1/16" Handheld Punch (101227), Red Red 5/8" Satin Ribbon (117286), Mini Glue Dots (103683), Mica Flakes (124115), Gold Thread, Clear Glass Ornament.
Monday, December 19, 2011
Lovely as a Tree Christmas Style
Another quick post today!
This card was created by Teresa. It's so gorgeous! I love Cherry Cobbler, Crumb Cake and Black together --very simple and elegant looking.. : )
I stamped a stack of them and sent them out to friends and family this holiday season! And of course i was in a rush to send them off so i didn't take a photo of my version of the card but it was basically the same except i switched up the snowflakes from Christmas Punch (retired) to Serene Snowflakes.
Thank you Teresa for inspiring me!! Miss you.. : )
Hope you like..... : )
Sunday, December 18, 2011
Happy Birthday to me MDS style..
I haven't used My Digital Studio (MDS) as much as i would like to and when Stampin Up! (SU) sent me this card a couple weeks ago it really made me think how easy it would of been to do my Christmas cards this year if i would of created them using MDS! And then i was really kicking myself when i saw Leigha's cute MDS Christmas Wish to everyone!! Her card is super creative.. just the right amount of perfect! Now I've really made it a goal for the new year!!
The program offers so much and is really not that hard to use. I'll start slow by learning how to navigate through MDS once i get a new computer! --i have such an old computer, yes I'm living in the dinosaur ages over here! and i can't load the program without my computer having a melt down and crashing!! {very sad face}! I'm asking Santa for a Laptop so if i get one for Christmas i will certainly be playing with this program in the New Year..---I've been really really good this year so let's hope Santa brings me one.. {big smile}
SU has a great MDS site. You'll have to check it out: www.mydigitalstudio.net
SU sends out a cute birthday card to all their active demonstrators. The fun part is you get to choose one item for 15% off plus you receive the discount you already receive as a demonstrator so it's a pretty cool gift. I've already pick and received my gift--Thank you SU!
Just a note: If you are currently a demo or just signing up you need to register your birthday with SU in order to receive this wonderful gift!
My Birthday is in ONE week! WOW! I'll have to admit that having a birthday in December kinda sucks ; ). With all the hustle and bustle of Christmas i tend to forget about my birthday (and when you get older you just forget alot of things..) I was quite surprised and excited to receive this card in the mail. Thank you again SU for putting a smile on my face.. : ) : )
Well today is a quick post as the kids and i are in the middle of some fun christmas baking!--wrapping presents and watching some old Christmas Classics. The kids are really getting into the Christmas spirit and counting down the days until Santa arrives. I have 2 more days of work then i'm off for a little break! Yay!
Friday, December 16, 2011
Wednesday, December 14, 2011
Cherry Swing Club Card
Leigha introduced me to this cute adorable card a while back. (Thank-you Leigha!) I think she saw this design on Robin Merriman's blog. (Such a GREAT card Robin, Thank-you for the inspiration!)
I've been wanting to show my club girls this card for months but kept putting it aside!! Now with the stress of christmas card making over for the season i was super thrilled to show the girls how to create this cute adorable swing card! I'm even more thrilled that my pre order arrived friday and i can't wait to show off Stampin' Up!'s NEW scented embossing powders!! Cherry, Vanilla and melon! oh yummers..!
Products used for this project:
Stamp Sets: Button Buddies (W122735,C122737), A word for you (W117032,C120528), Got treats (W119114,C120627)
Card Stock: Early Espresso (119686), Whisper White (100730)
Ink: Stampin Write Markers - Early Espresso (119680), Cherry Cobbler (119681), Old Olive (100079)
Accessories and More: Big Shot (113439), Scallop Circle #2 die (113469), 2-1/2" Circle Punch (120906), Espresso Bakers Twine (123124), Patterns DSP Bold Brights (117155), Subtles Buttons (119745), Jewelry Tag Punch (117190), Cutter Kit (106958-Distresser), Subtles Brads (119738), 1-1/16" Handheld punch (101227), Paper Snips (103579), Snail adhesive (104332), Mini Glue Dots (103683)
Hope you like..... : )
TO ORDER STAMPIN' UP! PRODUCTS ON-LINE 24/7, CLICK HERE
or click here to email me your order!
Monday, December 12, 2011
Jolly Jingles Snowflake Card
This holiday season i created a few different cards using the Jolly Jingles Jumbo Wheel.
Here is one of my favorite designs. Did you notice the cards are slightly different??! Both cards feature the same colours and layout but I added different snowflakes from the Northern Frost Decorative Strip Die. For the first card above i added the early espresso scallop circle and the crumb cake circle behind the snowflake.
Quick Tip: After a few uses of the Decorative Strip your snowflakes may start to get stuck inside the metal edges of the die as this die is very intricate. If your snowflakes are getting stuck and are not easily releasing from the die after you have run it through the Big Shot grab some clear packing tape. Place a piece of clear packing tape, sticky side down, over the gray foam part of the decorative strip and run the die through the big shot. The sticky tape should remain on the decorative strip, now place your card stock over the snowflakes of the die and run it through the big shot. Your snowflakes will now remove nicely from the die.... : )
Products used for this project:
Stamp Sets: Petite Pairs (W122495,C122497), Jolly Jingle Jumbo Wheel (120864)
Card Stock: Not Quite Navy (101722), Crumb Cake (120953), Old Olive (100702), Early Espresso (119686), Whisper White (100730)
Ink: Not Quite Navy (103008), Old Olive (102277),
Accessories and More: Big Shot (113439), Northern Flurry Textured Impressions Embossing folder (120902), Northern Frost Sizzlit Decorative Strip Die (120901), Sweet Buttons Embosslits Dies (121813), 1-3/8" Circle Punch (119860), Scallop Circle Punch (119854), Ruffled Pool Party Ribbon (122975), Paper Snips (103579), Stampin Dimensionals (104430), Snail adhesive (104332), Mini Glue Dots (103683)
Hope you like..... : )
TO ORDER STAMPIN' UP! PRODUCTS ON-LINE 24/7, CLICK HERE
or click here to email me your order!
Friday, December 9, 2011
Merry Christmas.... You're a Gem!
One of my downline, Teresa, brought over a stack of cards she created and this one caught my eye right away!! I really love the layout of this card and the "coloured" gems!! I was eager to CASE it but thought since i'm done creating Christmas cards for this season i would recreate it a bit different! I switched the striped ribbon and greeting. I also just noticed that she used Chocolate Chip for the card base and i for my card i used Early Espresso. Thank you so much Teresa for sharing.. i loved all the cards you shared with me!! : )
I cut the red circle out with the circle scissors plus at 2-3/4". I coloured Stampin Up!'s rhinestone jems with a red sharpie pen. How cool is that!!?? : )
Products used for this project:
Stamp Sets: Easy Events (W116958, C123225), You're a Gem (W122268, C122270)
Card Stock: Early Espresso (119686), Very Vanilla (101650), Real Red (102482)
Ink: Early Espresso (119670)
Accessories and More: Big Shot (113439), Vintage Wallpaper Textured Impressions Embossing Folder (120175), Circle Scissor Plus (112530), (2-1/2" Circle Punch (120906), Scallop Edge Border Punch (119882), First Edition Specialty DSP (121878), 1-1/4" Marina Mist Striped Grosgrain Ribbon (119772), 1/8" Marina Mist Taffeta Ribbon (119257), Pear Pizzazz Stampin Write Marker (119801), Craft Scissors (108360), Stampin Dimensionals (104430), Snail adhesive (104332)
Hope you like..... : )
TO ORDER STAMPIN' UP! PRODUCTS ON-LINE 24/7, CLICK HERE
or click here to email me your order!
Tuesday, December 6, 2011
A Christmas Gift for You! {Tutorial}
A Christmas Gift from Me to You!
With Christmas just around the corner, I'd like to take a moment to thank all of our awesome readers! I'd also like to give a little Christmas gift to all of my customers who have helped to make my paper flower tutorials so wildly successful.
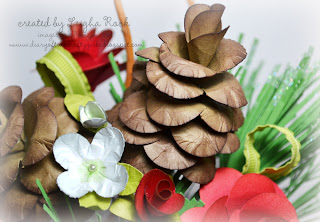
I've created this Elegant Holiday Bouquet entirely out of paper and various Stampin' Up! punches and dies simply by putting together three of my previous flower tutorials: the ever popular and original Paper Flower Bouquet, the Candy Cane Bouquet, and the Jumbo Paper Pinecone Tutorial. These tutorials are so versatile. There are limitless ways to use the flowers shown in these step-by-step tutorials.
Any customer who has bought two or more of my tutorials (valued at $5.95 each or higher) this year (I know there are a ton of you) is eligible to receive the Elegant Holiday Bouquet Tutorial entirely FREE! All you have to do is fire me off an email before Dec16th, 2011. Important: Be sure to give the name and email address which was attached to the PayPal account you used to make the purchases. Please include which tutorials you have purchased. That's it! I will send it off to you within 72 hours. It's just my of saying thank you and showing you how versatile those tutorials you bought are!
This bouquet is made completely out of paper and various Stampin' Up! punches and dies (well, that and a little floral wire, floral tape, and a couple of sticks :)) This detailed tutorial contains step-by-step instructions on how make each of these stunning flowers and how to replicate the bouquet. The tutorial is in five parts. Each tutorial gives clear instructions with tons of gorgeous photos on how to make the white hydrangea, roses, rose buds, pine needles, large pinecones to make this bouquet plus step-by-step instructions on how to assemble and put it all together. The complete tutorial is 21 pages in length and has 59 photos. The flowers are not difficult to make, but a lot of photos are required to give complete step-by-step instruction. It also gives lots of instruction on how to create the subtle effects that really make everything look real and come to life.
Once again, the complete 5 part tutorial is FREE if you've bought two or more tutorials from me in the last year valued at $5.95 each or higher. All you have to do is email me by Dec 16th 2011, and I will send it to you *see note at end of post* (After this date, the tutorial will be available for purchase only)
Been contemplating purchasing a couple of tutorials? NOW is the PERFECT time -- you'll get this one completely free with your order.
Alternatively, you can purchase this tutorial as a stand alone tutorial for only $6.95.
UPDATE: (added June 1, 2012): You are purchasing a tutorial from 2011. Some of the items used in the tutorial have been discontinued from Stampin' Up! This tutorial is still easily re-created. Simple substitutions are noted here. As of June 1, 2012, Stampin' Pastels, the 5-Petal Punch, and the Mat Pack are no longer available for ordering through Stampin' Up! The Stampin' Pastels can easily be substituted for other pastels, or with the corresponding classic ink sponged on with a cotton tipped applicator. The 5-petal punch was used to create the tiny green leaves amongst the white hydrangea flowers. This punch can easily be substituted for the Blossom Petals Builder punch or or the 5-petal shaped flower from the Island Floral die. Any piece of thin foam can be substituted for the foam mat from the Mat Pack.
As always, paid tutorials will be e-mailed to the email address registered to your PayPal account within 24 hours as Adobe PDF files following your purchase. If you do not receive your email, please check your spam box. If you still have not received your file within 24 hours, please contact me so I can correct any issues.
*Free tutorials will be mailed within 72 hours. I will be collecting emails requesting free tutorials and compiling mailing lists. I know there will be a lot of you. Please be patient. Once again, please remember to include the name and email as well as which tutorials you purchased from your PayPal account.
Wednesday, November 30, 2011
Gorgeous Jumbo Paper Pinecones {Tutorial}
Just in time for your holiday decorating! Detailed Step-by-Step Tutorial Available for Purchase.
These big, gorgeous, life-like, jumbo pinecones are made completely out of cardstock and Stampin' Up! punches and dies.
Or find the link to purchase on the top right sidebar. The tutorial will be e-mailed to the email address registered to your PayPal account within 24 hours as an Adobe PDF file following your purchase. If you do not receive your email, please check your spam box. If you still have not received your file within 24 hours, please contact me so I can correct any issues.
Feel free to contact me if you have any questions.
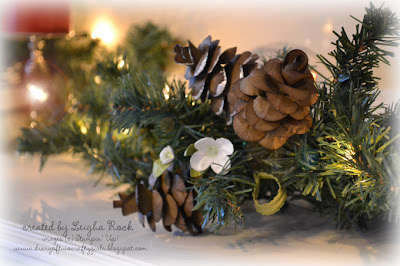
These jumbo pinecones are almost as big as my hand! I've gone pinecone crazy! I've decorated my holiday mantel with them. I've used them to make a beautiful wreath. Plus, I've used them in some stunning paper flower arrangements that I will be giving away as gifts. I've found tons of holiday decorating to do with them, and I know you will too!
I have put together a detailed tutorial on how make each of these beautiful, detailed and life-like pinecones. Note: these pinecones are very different from the mini pinecones featured in my Candy Cane Bouquet Tutorial . The tutorial gives clear step-by-step instructions with tons of gorgeous photos on how to make the pinecones, plus lots of instruction on how to create the subtle effects that really make them look real and come to life (click on the picture to see the close up details). The complete tutorial is 7 pages in length and has 21 photos. The pinecones are not difficult to make, but a lot of photos are required to give complete step-by-step instruction.
The complete tutorial on how to make these big, life-like pinecones is available for purchase for only $2.50
Feel free to contact me if you have any questions.
Subscribe to:
Posts (Atom)