CLICK HERE FOR FREE BLOGGER TEMPLATES, LINK BUTTONS AND MORE! »

Tutorials

Showing posts with label Tutorial. Show all posts

Friday, January 20, 2012

Long Stemmed Rose {Tutorial}

Detailed Step-by-Step Tutorial Available for Purchase - Just in time for Valentine's Day!


This stunning single long-stemmed red rose is made completely out of cardstock and various Stampin' Up! punches and dies.  Yep, that's right.........cardstock!.....and the Blossom Petals Builder Punch (121808) and the new Hearts Collection Framelits Dies (125599).


Pictures just don't relay how gorgeous these are, or their majestic size!  These roses are 18" long and measure almost 4" across!  They are true long-stemmed beauties!


(I made the valentine to my husband, Keith, in MDS.  I got the idea here). 

Wouldn't you love to make this beauty  for someone special?  Or a whole dozen?! Now you can!  I have put together a detailed tutorial on how make each of these stunning roses.  The tutorial is in three parts.  Each tutorial gives clear step-by-step instructions with tons of gorgeous photos on how to make the roses, stems, calyces, and leaves.   The complete tutorial is 13 pages in length and has 43 photos.  The flowers are not difficult to make, but a lot of photos are required to give complete step-by-step instruction.   It also gives lots of instruction on how to create the subtle effects that really make these flowers look real and come to life.

I have tons of orders for these coming up for Valentines Day from all the guys in my office.  I'm going to be one busy girl!  I even have an order for a full dozen!  Hmmmm.........sounds special.......maybe like a proposal?  I'm charging them a ton, but you can make your own!..............

The complete three part tutorial on how to make this project is available for purchase for only  $5.95  


UPDATE:  (added June 1, 2012):  You are purchasing a tutorial from 2011.  Some of the items used in the tutorial have been discontinued from Stampin' Up!  This tutorial is still easily re-created.  Simple substitutions are noted here.  As of June 1, 2012,  the Mat Pack is  no longer available for ordering through Stampin' Up!    Any piece of thin foam can be substituted for the foam mat from the Mat Pack.  


Or find the link to purchase on the top right sidebar.  The tutorial will be e-mailed to the email address registered to your paypal account within 24 hours as three Adobe PDF files following your purchase.  If you do not receive your email, please check your spam box.  If you still have not received your file within 24 hours, please contact me so I can correct any issues.

 Feel free to contact me if you have any questions.


Tuesday, December 6, 2011

A Christmas Gift for You! {Tutorial}

A Christmas Gift from Me to You!


With Christmas just around the corner, I'd like to take a moment to thank all of our awesome readers!   I'd also like to give a little Christmas gift to all of my customers who have helped to make my paper flower tutorials so wildly successful. 


I've created this Elegant Holiday Bouquet  entirely out of paper and various Stampin' Up! punches and dies simply by putting together three of my previous flower tutorials:  the ever popular and original Paper Flower Bouquet,  the Candy Cane Bouquet, and the Jumbo Paper Pinecone Tutorial.  These tutorials are so versatile.  There are limitless ways to use the flowers shown in these step-by-step tutorials.

Any customer who has bought two or more of my tutorials (valued at $5.95 each or higher) this year  (I know there are a ton of you) is eligible to receive the Elegant Holiday Bouquet Tutorial entirely FREE!   All you have to do is fire me off an email before Dec16th, 2011.  Important:  Be sure to give the name and email address which was attached to the PayPal account you used to make the purchases. Please include which tutorials you have purchased.  That's it!  I will send it off to you within 72 hours.  It's just my of saying thank you and showing you how versatile those tutorials you bought are!


This bouquet is made completely out of paper and various Stampin' Up! punches and dies (well, that and a little floral wire, floral tape, and a couple of sticks :)) This detailed tutorial contains step-by-step instructions on how make each of these stunning flowers and how to replicate the bouquet.  The tutorial is in five parts.  Each tutorial gives clear  instructions with tons of gorgeous photos on how to make the white hydrangea, roses, rose buds, pine needles, large pinecones to make this bouquet plus step-by-step instructions on how to assemble and put it all together. The complete tutorial is 21 pages in length and has 59 photos.  The flowers are not difficult to make, but a lot of photos are required to give complete step-by-step instruction.   It also gives lots of instruction on how to create the subtle effects that really make everything look real and come to life. 


Once again, the complete 5 part tutorial is FREE if you've bought two or more tutorials from me in the last year valued at $5.95 each or higher.  All you have to do is email me by Dec 16th 2011, and I will send it to you *see note at end of post* (After this date, the tutorial will be available for purchase only) 

Been contemplating purchasing a couple of tutorials?  NOW is the PERFECT time -- you'll get this one completely free with your order.

Alternatively, you can purchase this tutorial as a stand alone tutorial for only $6.95.  


UPDATE:  (added June 1, 2012):  You are purchasing a tutorial from 2011.  Some of the items used in the tutorial have been discontinued from Stampin' Up!  This tutorial is still easily re-created.  Simple substitutions are noted here.  As of June 1, 2012, Stampin' Pastels, the 5-Petal Punch, and the Mat Pack are  no longer available for ordering through Stampin' Up!  The Stampin' Pastels can easily be substituted for other pastels, or with the corresponding classic ink sponged on with a cotton tipped applicator.  The 5-petal punch was used to create the tiny green leaves amongst the white hydrangea flowers.  This punch can easily be substituted for the Blossom Petals Builder punch or or the 5-petal shaped flower from the Island Floral die.  Any piece of thin foam can be substituted for the foam mat from the Mat Pack.  

As always, paid tutorials will be e-mailed to the email address registered to your PayPal account within 24 hours as Adobe PDF files following your purchase.  If you do not receive your email, please check your spam box.  If you still have not received your file within 24 hours, please contact me so I can correct any issues.  

*Free tutorials will be mailed within 72 hours.  I will be collecting emails requesting free tutorials and compiling mailing lists.  I know there will be a lot of you.  Please be patient.  Once again, please remember to include the name and email as well as which tutorials you purchased from your PayPal account.  


Wednesday, November 30, 2011

Gorgeous Jumbo Paper Pinecones {Tutorial}

Just in time for your holiday decorating!  Detailed Step-by-Step Tutorial Available for Purchase.


These big, gorgeous, life-like, jumbo pinecones are made completely out of cardstock and Stampin' Up! punches and dies.


These jumbo pinecones are almost as big as my hand!  I've gone pinecone crazy!  I've decorated my holiday mantel with them.  I've used them to make a beautiful wreath.  Plus, I've used them in some stunning paper flower arrangements that I will be giving away as gifts.   I've found tons of holiday decorating to do with them, and I know you will too!


I have put together a detailed tutorial on how make each of these beautiful, detailed and life-like pinecones.  Note:  these pinecones are very different from the mini pinecones featured in my Candy Cane Bouquet Tutorial .   The tutorial gives clear step-by-step instructions with tons of gorgeous photos on how to make the pinecones, plus lots of instruction on how to create the subtle effects that really make them look real and come to life (click on the picture to see the close up details).   The complete tutorial is 7 pages in length and has 21 photos.  The pinecones are not difficult to make, but a lot of photos are required to give complete step-by-step instruction.  


The complete tutorial on how to make these big, life-like pinecones is available for purchase for only  $2.50


Or find the link to purchase on the top right sidebar.  The tutorial will be e-mailed to the email address registered to your PayPal account within 24 hours as an Adobe PDF file following your purchase.  If you do not receive your email, please check your spam box.  If you still have not received your file within 24 hours, please contact me so I can correct any issues. 


Feel free to contact me if you have any questions. 


Friday, November 18, 2011

Candy Cane Bouquet {Tutorial}

Detailed Step-by-Step Tutorial Available for Purchase


This stunning bouquet is made completely out of paper and various Stampin' Up! punches and dies. (Well, and a little floral wire and some candy canes of course!)  

Wouldn't you love to make this stunning Christmas centerpiece for yourself or for someone special?  Now you can!   I have put together a detailed tutorial on how make each of these stunning flowers and how to replicate and assemble this bouquet.

The tutorial is in four parts.  Each tutorial gives clear step-by-step instructions with tons of gorgeous photos on how to make the velvety roses, the frosty pine needles, and the snowy mini pinecones to make this bouquet. I wish the photos showed off how much this centerpiece shimmers!  The complete tutorial is 12 pages in length and has 34 photos.  The flowers are not difficult to make, but a lot of photos are required to give complete step-by-step instruction.   It also gives lots of instruction on how to create the subtle effects that really make the flowers, pinecones and greenery come to life. 


The complete  four part tutorial on how to make this project is available for purchase for only  $5.95  


UPDATE:  (added June 1, 2012):  You are purchasing a tutorial from 2011.  Some of the items used in the tutorial have been discontinued from Stampin' Up!  This tutorial is still easily re-created.  Simple substitutions are noted here.  As of June 1, 2012,  the Mat Pack is  no longer available for ordering through Stampin' Up!  Any piece of thin foam can be substituted for the foam mat from the Mat Pack.  

The tutorial will be e-mailed to the email address registered to your paypal account within 24 hours as four Adobe PDF files following your purchase.  If you do not receive your email, please check your spam box.  If you still have not received your file within 24 hours, please contact me so I can correct any issues. 


Here is a testimonial from one of my customers: 

"The tutorial looks fabulous!  You've done such a wonderful job of explaining each flower and leaf, and I can hardly wait to give the paper flowers a try.  A couple of times recently I've been disappointed with for-fee tutorials, but certainly not with yours.  I know it was a lot of work for you, and it was worth every penny to me!  Thanks so much for sharing your creativity and for putting together a thorough and well-illustrated tutorial."


 Feel free to contact me if you have any questions. 


Friday, October 28, 2011

Paper Wedding Bouquet


I created this stunning wedding bouquet COMPLETELY out of paper!  I used both my original  Paper Orchid Tutorial and my original  Paper Flower Bouquet Tutorial to create it.  I simply changed up the colours a bit, and put them together.


I've been selling these bouquets for quite a large sum of money like CRAZY!, but you can create them yourself for a whole lot cheaper (shhhh - don't tell my customers).  The flowers are not difficult to make.   My tutorials provide tons of gorgeous, detailed, step-by-step instructions (and tons of beautiful photos) on how to create each flower, including the subtle effects that really make the flowers look real and come to life.

If you purchase both the original Paper Orchid Tutorial and the original Paper Flower Bouquet Tutorial, I will also include a 5 page step-by-step Wedding Bouquet tutorial (lots of gorgeous pics here too) on how to do the colour variation for the wedding orchids (aren't they gorgeous in Blushing Bride?), and how to make and assemble the wedding bouquet.  (Of course, as always, the Paper Orchid Tutorial and the Paper Flower Bouquet Tutorial  will continue to be available seperately). 

To celebrate this new bouquet,  I am offering the Paper Orchid Tutorial AND the Paper Flower Bouquet Tutorial  TOGETHER for a reduced price. 


The complete five part  Paper Orchid tutorial and template AND the compete four part Paper Flower Bouquet tutorial PLUS the 2 part Wedding Bouquet Tutorial and colour variation  is available for purchase for only  $11.95.


UPDATE:  (added June 1, 2012):  You are purchasing a tutorial from 2011.  Some of the items used in the tutorial have been discontinued from Stampin' Up!  This tutorial is still easily re-created.  Simple substitutions are noted here.  As of June 1, 2012, the card stock colour Blushing Bride, Stampin' Pastels, the 5-Petal Punch, and the Mat Pack are  no longer available for ordering through Stampin' Up!  This tutorial includes instructions on how to make white orchids, and they would be equally beautiful in many other colours.  Also, the Stampin' Pastels can easily be substituted for other pastels, or with the corresponding classic ink sponged on with a cotton tipped applicator.  The 5-petal punch was used to create the tiny green leaves amongst the white hydrangea flowers.  This punch can easily be substituted for the Blossom Petals Builder punch or or the 5-petal shaped flower from the Island Floral die.  Any piece of thin foam can be substituted for the foam mat from the Mat Pack.  

Or find the link to purchase on the top right sidebar.  The tutorial will be e-mailed to the email address registered to your paypal account within 24 hours as several  PDF files following your purchase.  If you do not receive your email, please check your spam box.  If you still have not received your file within 24 hours, please contact me so I can correct any issues.

Did you purchase one of my tutorials already?  Wondering if you "upgrade" to both tutorials and qualify for the free Wedding Bouquet Tutorial?  Of course!  I want to be know for my awesome customer service and support!  E-mail me and I can send you a link to "upgrade" for a reduced cost. 

Details on the Paper Orchid Tutorial and Template are available here ($5.95 purchased separately).  
Details on the Paper Flower Bouquet Tutorial  are availble here ($6.95 purchased separately).

Here is a testimonial from one of my customers: 

"The tutorial looks fabulous!  You've done such a wonderful job of explaining each flower and leaf, and I can hardly wait to give the paper flowers a try.  A couple of times recently I've been disappointed with for-fee tutorials, but certainly not with yours.  I know it was a lot of work for you, and it was worth every penny to me!  Thanks so much for sharing your creativity and for putting together a thorough and well-illustrated tutorial."


Questions?  Please feel free to email me.  I'd love to hear from you! 


Friday, September 23, 2011

Paper Orchid Tutorial

Detailed Step-by-Step Tutorial Available for Purchase


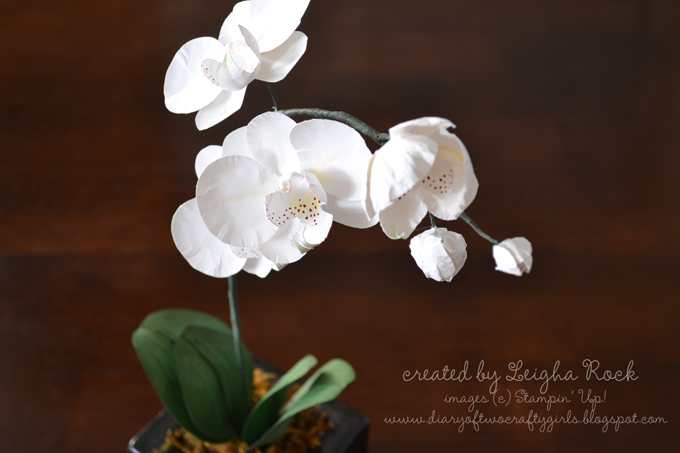
This stunning spray of orchids and the leaves are completely out of paper (and a little floral wire and tape). 


Wouldn't you love to make this beautiful arrangement  for someone special?  Now you can!  Due to an overwhelming demand  from this post, I have put together a detailed tutorial on how make each of these stunning flowers and how to replicate the arrangement.  The tutorial is in six parts.  The tutorial includes the orchid template (designed by me) necessary to create the flowers and leaves.  It also includes five detailed tutorials which give clear step-by-step instructions with tons of gorgeous photos on how to make the full blooms, the partially opened orchids, the buds, the leaves, and how to put it all together.  The complete tutorial is 15 pages in length and has 32 photos.  The flowers are not difficult to make, but a lot of photos are required to give complete step-by-step instruction.   It also gives lots of instruction on how to create the subtle effects that really make the flowers look real and come to life.  


The complete template and five part tutorial on how to make this project is available for purchase for only  $5.95  


UPDATE:  (added June 1, 2012):  You are purchasing a tutorial from 2011.  Some of the items used in the tutorial have been discontinued from Stampin' Up!  This tutorial is still easily re-created.  Simple substitutions are noted here.  As of June 1, 2012, Stampin' Pastels and the Mat Pack are  no longer available for ordering through Stampin' Up!  The Stampin' Pastels can easily be substituted for other pastels, or with the corresponding classic ink sponged on with a cotton tipped applicator.   Any piece of thin foam can be substituted for the foam mat from the Mat Pack.  

Or find the link to purchase on the top right sidebar.  The tutorial will be e-mailed to the email address registered to your paypal account within 24 hours as six Adobe PDF (one template and 5 tutorials) files following your purchase.  If you do not receive your email, please check your spam box.  If you still have not received your file within 24 hours, please contact me so I can correct any issues.

Please note:  these flowers are created with a template (which is included in the tutorial), not with punches* like my other paper flower tutorial.   The great thing about this is, you do not need a tons of supplies to make these blooms, just some paper, a little ink, and some floral wire and tape. (* except the orchid bud which is formed with the Fun Flowers die)   

Alternatively, place a minimum of $60 in Stampin' Up! products on my online store , and I will email you the PDF Tutorial free of charge!


Here is a testimonial from one of my customers: 

"Leigha!!!!

Your tutorial is fantastic! I’m making Christmas gifts and can hardly wait to get started for  two daughters, three daughters-in-laws, and one other gift. And one for myself. I have an orchid that blooms for about 3 months and then it’s done for a while…this will be great to add when it’s not blooming."  -- Elaine


The blooms can be wired and made into an arrangment like above (these leaves are paper and are also included in the tutorial), or they could be worked into a beautiful paper flower bouquet.  You can also make the blooms without wiring them, and use them for lots of different papercrafting projects. 


or contact me  to place an order (Canadian orders only please).    
(NOTE:  if you are ordering online, please check that you see my name listed at the top of the website as the demonstrator for your order.  Sometimes it will default to a demonstrator you have used previously.  You may need to clear your cookies before a new demonstrator's name will appear.  This is important if you want to qualify for the free tutorial).
or click here to email me your order 

Feel free to contact me if you have any questions.


Tuesday, July 5, 2011

Paper Flower In Colors Bouquet {Tutorial}


Well, as you know, the new 2011 - 2012 Ideas Book and Catologue was released on July 1st.  The gorgeous cover shows that paper flowers are hot, hot, hot right now.  I used the cover as my inspiration to recreate the beautiful Paper Flower Bouquet that I first introducted you to here.  These bouquets are made completely out of paper using various Stampin' Up! punches and dies. 


Several In Colors are featured in this bouquet.  I used Calypso Coral, Poppy Parade, and Peach Parfait, So Saffron as the main colours. Wouldn't you love to make this beautiful bouquet  for someone special?  Now you can!  Due to an overwhelming demand, I have put together a detailed tutorial on how make each of these stunning flowers and how to replicate the bouquet.  The tutorial is in four parts.  Each tutorial gives clear step-by-step instructions with tons of gorgeous photos on how to make the roses, leaves, ranunculus, and white hydrangea to make this bouquet. The complete tutorial is 22 pages in length and has 57 photos.  The flowers are not difficult to make, but a lot of photos are required to give complete step-by-step instruction.   It also gives lots of instruction on how to create the subtle effects that really make the flowers look real and come to life.  Click here for more pics. 


The complete  four part tutorial on how to make this project is available for purchase for only  $6.95 


UPDATE:  (added June 1, 2012):  You are purchasing a tutorial from 2011.  Some of the items used in the tutorial have been discontinued from Stampin' Up!  This tutorial is still easily re-created.  Simple substitutions are noted here.  As of June 1, 2012, the card stock colours Peach Parfait, and Poppy Parade are no longer available.  Also, Stampin' Pastels, the 5-Petal Punch, and the Mat Pack are  no longer available for ordering through Stampin' Up!  The Stampin' Pastels can easily be substituted for other pastels, or with the corresponding classic ink sponged on with a cotton tipped applicator.  The 5-petal punch was used to create the tiny green leaves amongst the white hydrangea flowers.  This punch can easily be substituted for the Blossom Petals Builder punch or or the 5-petal shaped flower from the Island Floral die.  Any piece of thin foam can be substituted for the foam mat from the Mat Pack.  The card stock colours Peach Parfait and Poppy parade can be substituted for many different colour combinations.  Please see the original colour combinations for this bouquet here.  

The tutorial will be e-mailed to the email address registered to your paypal account within 24 hours as four Adobe PDF files following your purchase.  If you do not receive your email, please check your spam box.  If you still have not received your file within 24 hours, please contact me so I can correct any issues. If you have purchased this tutorial from me in the past, and would like an updated colour list to recreate this new In Color Bouquet, simply email me, and I am happy to pass that info along free of charge :)

Alternatively, purchase a minimum of $60 in Stampin' Up! products, and I will email you the PDF Tutorial free of charge!

Here is a testimonial from one of my customers: 

"The tutorial looks fabulous!  You've done such a wonderful job of explaining each flower and leaf, and I can hardly wait to give the paper flowers a try.  A couple of times recently I've been disappointed with for-fee tutorials, but certainly not with yours.  I know it was a lot of work for you, and it was worth every penny to me!  Thanks so much for sharing your creativity and for putting together a thorough and well-illustrated tutorial."


or contact me  to place an order (Canadian orders only please).    
(NOTE:  if you are ordering online, please check that you see my name listed at the top of the website as the demonstrator for your order.  Sometimes it will default to a demonstrator you have used previously.  You may need to clear your cookies before a new demonstrator's name will appear.  This is important if you want to qualify for the free tutorial).

 Feel free to contact me if you have any questions. 


Thursday, June 9, 2011

Paper Flower Bouquet {Tutorial}

Detailed Step-by-Step Tutorial Available for Purchase


This stunning bouquet is made completely out of paper and various Stampin' Up! punches and dies. 

Wouldn't you love to make this beautiful bouquet  for someone special?  Now you can!  Due to an overwhelming demand, I have put together a detailed tutorial on how make each of these stunning flowers and how to replicate the bouquet.  The tutorial is in four parts.  Each tutorial gives clear step-by-step instructions with tons of gorgeous photos on how to make the roses, leaves, ranunculus, and white hydrangea to make this bouquet. The complete tutorial is 22 pages in length and has 57 photos.  The flowers are not difficult to make, but a lot of photos are required to give complete step-by-step instruction.   It also gives lots of instruction on how to create the subtle effects that really make the flowers look real and come to life.  


The complete  four part tutorial on how to make this project is available for purchase for only  $6.95 


UPDATE:  (added June 1, 2012):  You are purchasing a tutorial from 2011.  Some of the items used in the tutorial have been discontinued from Stampin' Up!  This tutorial is still easily re-created.  Simple substitutions are noted here.  As of June 1, 2012, Stampin' Pastels, the 5-Petal Punch, and the Mat Pack are  no longer available for ordering through Stampin' Up!  The Stampin' Pastels can easily be substituted for other pastels, or with the corresponding classic ink sponged on with a cotton tipped applicator.  The 5-petal punch was used to create the tiny green leaves amongst the white hydrangea flowers.  This punch can easily be substituted for the Blossom Petals Builder punch or or the 5-petal shaped flower from the Island Floral die.  Any piece of thin foam can be substituted for the foam mat from the Mat Pack.  

Or find the link to purchase on the top right sidebar.  The tutorial will be e-mailed to the email address registered to your paypal account within 24 hours as four Adobe PDF files following your purchase.  If you do not receive your email, please check your spam box.  If you still have not received your file within 24 hours, please contact me so I can correct any issues. 

Alternatively, purchase a minimum of $60 in Stampin' Up! products, and I will email you the PDF Tutorial free of charge!

Here is a testimonial from one of my customers: 

"The tutorial looks fabulous!  You've done such a wonderful job of explaining each flower and leaf, and I can hardly wait to give the paper flowers a try.  A couple of times recently I've been disappointed with for-fee tutorials, but certainly not with yours.  I know it was a lot of work for you, and it was worth every penny to me!  Thanks so much for sharing your creativity and for putting together a thorough and well-illustrated tutorial."


or contact me  to place an order (Canadian orders only please).    
(NOTE:  if you are ordering online, please check that you see my name listed at the top of the website as the demonstrator for your order.  Sometimes it will default to a demonstrator you have used previously.  You may need to clear your cookies before a new demonstrator's name will appear.  This is important if you want to qualify for the free tutorial).

 Feel free to contact me if you have any questions.