CLICK HERE FOR FREE BLOGGER TEMPLATES, LINK BUTTONS AND MORE! »

Tutorials

Tuesday, May 31, 2011

Birthday Weekend - Part 2


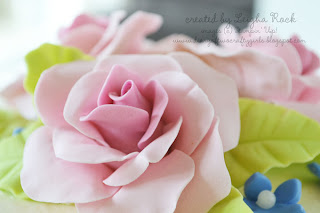
Well, if you read my Birthday Weekend - Part 1  post, you'll remember that I had not one, but two parties to do last weekend.  That birthday was my 12 year old daughter Emma's birthday.  This party was the next day, and was for my upline Jenn's daughter Isabelle.  Isabelle was turning 4.  One of her favorite TV shows to watch is Cake Boss.  She knows that I make cakes, and asked me, "Please Leigha, will you make me a cake with pretty flowers on it for my birthday?"  How could I refuse her?  She's so stinkin' cute!  This the cake I made her. 


The flowers are hand pulled sugar flowers.  They took me a week to make!  They are made from sugar and gumpaste, and are completely edible! 

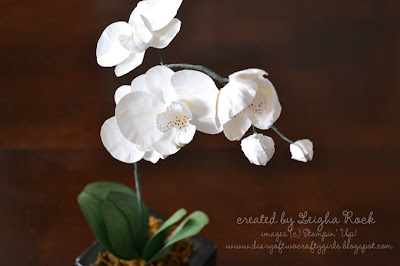
My newest obsession, has been making paper flowers that look as real as possible.  Making the shift from sugar flowers to paper flowers seemed pretty easy for me.  If you've been following my posts at all, you'll know that I have really been into flower punch art.  Lately, I have kicked it up a notch, and really tried to make the flowers look as real as possible.  Since Isabelle's party had a garden/flower theme, I decided to make her a bouquet of flowers for her birthday. 


Every last detail of this bouquet is made from paper. 

Cardstock:  Old Olive, Whisper White, Pink Pirouette, Pretty in Pink, Regal Rose

Ink Pads:  Old Olive, Regal Rose

Re Inkers:  Rose Red, So Saffron

Stampin' Pastels:  Certainly Celery, Old Olive

Assessories:  Basic Pearl Jewels, Blossom Petals Punch,  Itty Bitty Punch Pack,  5-Petal Flower Punch, Floral Fusion Sizzlit, Fun Flowers Bigz Die, Floral Wire, Floral Tape..


We also decorated Isabelle's present with a flower.  This ranunculus flower is also made from cardstock.  I used Whisper White, Pink Pirouette, and Pretty in Pink Cardstock.  I used the Fun Flowers Bigz Die.  Some Pear Pizzazz Seambinding Ribbon finished it off nicely.  
 

Then we headed off to bring her her cake, bouquet, and present.  This is my 3 year old son Finn.  He and Isabelle are great friends.  Doesn't he look so handsome in his jacket with his bouquet?  


P.S.  Wow!  Thanks for all your inquiries and comments here and on Splitcoast........to answer your questions regarding upcoming tutorials...........yes, I will be posting some tutorials with projects from this bouquet soon. Keep checking back, or  Email me if you'd like to have me email you when the tutorials are available. 

Sunday, May 29, 2011

Grab Our iPhone Icon and Link!!! and Blog Candy Winner

Guess what we've done now?

Yep, that's right, we've created our very own Diary of Two Crafty Girls icon and link for iPhone, iPad, and iPod!!


To add us to your home screen, just:

1. open our website www.diaryoftwocraftygirls.blogspot.com on the web browser on your device.
2. press the + button at the bottom of the page.
3. click on Add to Home Screen
4. a screen will come up with the name of our blog, press Add (top right screen)


That's it! Now you have an app to link directly to our blog! How cool is that?


Now for the Blog Candy Winner!

Thank you so much for your wonderful comments! We truly appreciate the time you take to leave your words behind. Our readers are so important to us!! Your encouraging words keep us posting from week to week!! We absolutely love sharing our creativity with all of you!!.

So, lets pick our Blog Candy Winner!


We used a true random number generator to pick from the comments, and the result came up at comment # 14 !! (sorry, tried, tried and tried to get a pic of the widget on here with the result, but haven't been able to figure it out yet) Commenter Number 14 - Teresa says "Love, love,love your blog! I check it everyday. Beautiful projects! Thank you ladies for the inspiration". THANKS Teresa! Congrats to you. Please email us with your contact info and we'll get your stamp set off to you.

We both created a card to send off to you with your stamp set.


To create this card I dyed white Baker's Twine with Ink Refills. I used by Paper Piercing Tool and Mat Pack to create the holes, I threaded the dyed Baker's twine onto a needle, and sewed the cardstock by hand. I created the sky with Bashful Blue ink pad, sponge and a Scallop Circle Punch as a mask. The grass is free cut by hand with Paper Snips. The card is 5-1/4" x 5-1/4" so it fits perfectly into Stampin' Up! Medium Square Envelopes (107289).

Products used for this project:

Stamp Sets: So Happy for You (retired Sale-a-bration), Party Hearty (111532) 30% off until May 31st!!

Card Stock: Whisper White (100730), Regal Rose (105130), Subtles Patterns DSP Stack (117152)

Ink: Bashful Blue (105209), Tempting Turquoise (100814), Regal Rose (105211), Wild Wasabi (109014), Daffodil Delight (119667), Melon Mambo (115656).

Ink Refills: Melon Mambo (115662), Daffodil Delight (119672) (to dye the white Bakers Twine)

Accessories and More: Scallop Trim Border Punch (118402), Scallop Circle Punch (119854), Beautiful Wings Embosslit (118138), White Baker's Twine (124262), Linen Thread (104199), Vintage Trinkets (118764), Paper-Piercing Tool (116631), Mat Pack (105826), Stampin' Dimensionals (104430), Ice Cream Parlour Buttons (retired Sale-a-bration), and sewing machine.


Products used for this project:

Stamp Sets: Great Friend (113792), Flight of the Butterfly (111564)

Card stock: Crumb Cake (120953): 8 ½” x 5 ½” scored at 4 ¼” on the 8 ½” side
Early Espresso (119686): 2 ¾” x 5 ½”
River Rock Textured (119944): 2” x 5 ½”
Whisper White (100730): Scraps

Ink: Sahara Sand (105208), Early Espresso (119670)

Accessories and more: Linen Thread (104199)) 6” Piece and a 4” Piece, Glue Dot (103683), Basic Pearls (119247), White Button (Neutrals 119743), Snail Adhesive (104332), Multipurpose liquid Glue (110755), Paper Snips (103579), Bone Folder (102300) Sewing Machine and Thread


- Fold your Crumb Cake Card Stock, crisp with bone folder. Unfold and set aside.
- Ink up your butterfly stamp with Sahara Sand ink and stamp on a Whisper White peice of scrap card stock (3x) – cut out butterflies with your paper snips. Add your pearls and set aside.
- Adhere River Rock card stock to Early Espresso using snail adhesive– Sew top and bottom of the River Rock card stock with sewing machine.
- Attach 6” piece of Linen thread to the bottom of the Early Espresso Card Stock. Thread the 4” piece of linen thread through the button, tie bow and adhere with a glue dot to the Early Espresso card stock.
- Adhere the Early Espresso card stock to your Crumb Cake base using snail adhesive.
- Ink up Greeting in Early Espresso ink and stamp on Crumb Cake card base.
- With your card base flat, unfolded, line up your piercing guide under the greeting and pierce a line of holes.
- Place a small amount of multipurpose glue on the back and in the middle of the butterflies and adhere to River Rock card stock.
- Volia!

Hope you like.. : )


Thanks again for all your kind comments. Enjoy your day!
Friday, May 27, 2011

Birthday Weekend - Part 1


Wow, what a busy weekend!!! Not one, but two birthday parties!  The first party, was my daughter's 12th birthday.  Do you remember my daughter Emma?  I first showed you her bedroom here.  When I asked her what she wanted to do for her birthday this year, she told me that she wanted to go shopping at the mall with her friends.  What a great idea!  What 12 year old girl doesn't LOVE to go hang out at the mall with her friends?  All I had to do was drive them, give them a little spending money, and lie low a little while they had fun.  This meant I got off scott free on activities, goody bags, and all the other things that usually are required at a party.  The girls took care of that on their own!

There were 4 girls all together (including the birthday girl).  I sent each of them off with their own little purse.  I purchased the Tres Chic Handbag Tutorial from Becky Roberts here.  I used Basic Black and Melon Mambo cardstock and Newsprint DSP to make each purse a little different.  Of course the Basic Rhinestone Jewels added just the necessary "bling". 


And what did each girl find in their little purse?  A $25 prepaid Visa card.  They were thrilled......and so was I.  See.......activities and goody bags done! 


After a couple of hours at the mall, I drove home with 4 giggling girls, admiring their purchases, and they enjoyed some birthday cake (yep, make by ME) and "hors d'oeurves".  


Earlier in the week, my daughter (who is ALSO a "craft-a-holic") and I made these cute little bath bombs.


The recipe is mix 1 cup baking soda with 1/2 cup citric acid (you can find this in powdered form at health food stores and specialty stores).  Put some water in a spray bottle, and add one or 2 drops of scented oil.  My daughter already had some on hand from a soap making kit she once had.  We chose one that smelled like candy.   Lightly mist the baking soda and citric acid with water.  Add only a little at a time.  You want the mixture to be a little crumbly, and to barely hold together when you press it together.  Then pat it into cupcake holders set into a cupcake tin.  Let dry at least 24 hours.  Lastly, we piped some royal icing on top and let dry.  


You can find a tutorial for the the cupcake stand on my Cupcake Challenge post here.  This time, I changed up the colours and added Basic Rhinestone Jewels instead of pearls.

Well, that was actually a busy day.  Next time I come back and post, I'll show you all the projects for the party the next day!

Until then............


Tuesday, May 24, 2011

Blog Candy!


Guess what we're giving away?


We're celebrating a big blog hit milestone with some blog candy!


We're giving away Punched Posies, a retired Level 2 Hostess Set, in clearmount. To enter, just leave a comment on this post.  (That's it!). We'd love to hear what you like about our blog. What would you like to see more of? Do you like clean and simple, or more detailed projects? Do you want to see more cards? more scrapbook pages? or more 3D projects?

This giveaway is open to everyone, no matter where you are in the world. We're going to fire it off into the mail for you. We appreciate all of our followers.........you guys are so awesome!  It's just our way of saying thanks for reading..........and we're so glad you are here!

(If you have been following our blog but haven't offically signed up see the subscribe or follow by email button on the upper left sidebar to join).

Winner will be selected by random draw and will be announced on Sunday May 29th, 12:00 noon.

Good luck and thanks so much!
and

Sunday, May 22, 2011

Faux Metal - Artistic Etchings


I cased this card from Carrie Gaskin. I changed up the ribbon but kept the layout and colours the same!! I just loved her "metal tower" idea with the faux metal technique. I was excited to show it off to my club memebers this month.

Faux Metal Technique: Press your Versamark pad onto a piece of card stock (i used basic gray) and emboss with the same color (i used silver embossing powder). Do this three times to build it up. Ink your stamp in Versamark and after the third coating while the embossing powder is still hot carefully press your stamp into the melted powder to imprint the image.


TO ORDER STAMPIN' UP! PRODUCTS ON-LINE 24/7, CLICK HERE


Products used for this project:

Stamp Set: Artistic Etchings (W118517, C120573)

Card Stock: Cherry Cobbler (119685), Basic Black (121045), Very Vanilla (101650), Basic Gray (121044)

Ink: VersaMark (102283)

Accessories and More: Newsprint DSP (117166), Antique Brads (117273), Cherry Cobbler Seam Binding Ribbon, Sticky Strip (104294), Stampin' Deminsionals (104430), Dotted Scallop Ribbon Border Punch (119275), Silver Embossing Powder (109131), Powder Pals (102197)

Hope you like... : )


Friday, May 20, 2011

Clean and Simple Thanks CASE


This clean and simple card came together so quickly and easily.  It is a 3" x 6" card, which once again, fits perfectly into Stampin' Up!'s Small Open-End Envelopes (107286). 

To create this card, you will need:

Stamp Set: Happy Greetings (w123311, c123313) from the Summer Mini Catalogue

Card Stock: Daffodil Delight textured (119688), Cherry Cobbler (119685), Early Espresso (119686), and Old Olive textured (119934).  .

Ink: Early Espresso ( 119670).

Accessories and More: Fun Flowers Bigz Die (1214812),  Tasteful Trim  Bigz XL Die (120893), Blossoms Petal Punch (121808), White uni-ball Signo Gel Pen (105021), Linen Thread (104199), and Stampin' Dimensionals (104430).


Wednesday, May 18, 2011

Artistic Etchings

I made these two cards at an event i attended last July in Salt Lake City. Di Gibbs designed the cards for the event! I love the idea of stamping on DSP!.. it looks so cool on the Newsprint DSP!!


Quick Tip: To adhere your Rhinestones use a Paper Piercing Tool to lift them off the sheet. (Hoping with the angle of the photo you can see the Rhinestones on the Crown....)

Products used for this project:

Stamp Sets: Artistic Etchings (W118517, C120573), Just Believe (W116948, C120453)

Card Stock: Very Vanilla (101650), Basic Black (121045), Cherry Cobbler (119685)
Ink: Basic Black (101179), Cherry Cobbler (119669)

Accessories and More: Daffodil Delight Marker (119677), Cherry Cobbler Marker (119681), Newsprint DSP (117166), 1/8" Black Taffeta Ribbon (119261), Basic Rhinestones Jewels (119246), Paper Piercing Tool (116631)


This card uses the same stamp set and colour scheme.

Products used for this project:

Stamp Sets: Artistic Etchings (W118517, C120573)

Card Stock: Very Vanilla (101650), Basic Black (121045), Cherry Cobbler (119685), Daffodil Delight (119683)

Ink: Basic Black (101179), Cherry Cobbler (119669), Daffodil Delight (119667)

Accessories and More: Newsprint DSP (117166), 5/8" Black Satin Ribbon (117285), 1-3/4" Oval Punch (119855), Scallop Oval (119856), Stampin' Dimensionls (104430)

TO ORDER STAMPIN' UP! PRODUCTS ON-LINE 24/7, CLICK HERE

or click here to email me your order!


Hope you like... : )

Monday, May 16, 2011

Love Potion No. 9 {Tutorial}

Okay, so I'm trying to write this post, sitting at my computer, and I'm laughing so hard........ (out loud even.......oh dear, I just snorted)...... imagining Natasha's reaction to this post.  I'm really going to hear about this one.

Those of you who know me, know that:  a)  I love to drink wine.........,and  b)  I love to make crafts.  Well........I finally found a way to combine both of those interests.

You know when you drink a bottle of wine, but you don't drink the whole thing?  No???  I know, it rarely happens to me too, but once in a while it does.  I wanted to make something that was nicer than just sticking the old cork back in.......voila!.......... Love Potion No. 9 wine stopper <wink, wink>. 

To create this you will need:

A ceramic knob, a cork. super strong glue, and double ended screw (not shown).  All of these things can be purchased for super cheap in the bulk section of your local hardware store.  You will also need:  StazOn Ink Pad (101406), StazOn Cleaner (109196), Stamps: Clearly for You (W121911, C121976) (to stamp the "No.", and Calendar Alphabet & Numbers (111610) (to stamp the "9"). Or, you can use stamps of your choice....make it your own!


Ink up the "No.5" stamp from the Clearly for You (W121911, C121976) stamp set with StazOn.  Be careful to only ink up the "No.", and not the "5".  Stamp it onto your ceramic knob.  If you make a mistake, you can clean it off with StazOn Cleaner and try again.  Next, ink up the "9" from the Calendar Alphabet and Numbers set (111610) and carefully stamp it beside the "No.".  Let it dry. 


Next, I screwed one end of the double ended screw into the knob.  I placed super strong glue on the cork, and onto the base of the knob.  Then I carefully screwed the knob (with the screw attached) into the cork.  Let it dry.


So the next time you and your sweetie, don't finish a bottle of Love Potion No. 9, you have a super cute wine stopper to use to save it for another time.


Happy sipping......

Saturday, May 14, 2011

New Flower Garden Embossing Folder and Bakers Twine


I couldn't wait to show my club girls some new products from the Summer Mini. The Summer Mini was released May 1st and features some incredible products. I had the opportunity to pre order from the Summer Mini and have created some awesome projects that i can't wait to show you over the next few weeks!!

This card was inspired by Mary Fish. I just love her style!! Such elegance.. Oh so "pretty--pretty"! : )


Products used for this project:

Stamp Sets: Fabulous Phrases (W117002, C120501)

Card Stock: Soft Suede (115318), Sahara Sand (121043), Old Olive (100702), Whisper White (100730).

Ink: Soft Suede (115657)

Accessories and More: Silver Hodgepodge Hardware (111325), 1-3/8" x 5/8" Oval Punch, Early Espresso Bakers Twine (123124), Distresser (106958 - Cutter Kit), Big Shot (113439), Flower Garden Textured Impressions Embossing Folder (123113 - Summer Mini Pg. 24)

TO ORDER STAMPIN' UP! PRODUCTS ON-LINE 24/7, CLICK HERE


Hope you like... : )

Thursday, May 12, 2011

Sweet and Simple


This simple little thank you card is so easy and quick to make up, but is big on style.


To recreate this sweet little card you will need:

Stamp Sets: script stamp (Flores Suaves used here), Tiny Tags (W118091, C118592).

Card Stock: Old Olive textured (119934), Baja Breeze textured (119972), Whisper White (100730).

Ink: Old Olive (102277), Cherry Cobbler (119669).

Accessories and More: Lattice Bigz Die (115958),  Whipser White Bakers Twine,  Jewellery Tag Punch (117190),   Floral Fusion Sizzlit (115969) , Itty Bitty Shapes Punch Pack (118309), and Basic Pearls Jewels (119247).


Tuesday, May 10, 2011

Telescoping Circles Card

I was WOWED when one of my Downline, Jenn, showed me her Telescoping card she had created. (Thanks Jenn for the Inspiration). Jenn saw the idea on Barb Mullikin's Blog. Check out Barb's card and video HERE.

Here's the Card i created for stamp club this month:


Products used for this project:

Stamp Sets: Happy Greetings (W123311, C123313 Summer Mini Pg 26), Flight of the Butterfly (111564), Wonderfully Worn Background Stamp (118533)

Card Stock: Whisper White, Pumpkin Pie, Rich Razzleberry, Wild Wasabi,

Ink: Rich Razzleberry, Daffidol Delight,

Accessories and More: Greenhouse Gala DSP (117167), 5/8" Whisper White Organza Ribbon (114319), Basic Rhinestones Jewels (119246), Silver Brads (104336), Paper Piercing Tool (116631), Mat Pack (105826), Itty Bitty Shapes Punch Pack (118309), Big Shot (113439), Beautiful Wings Embosslits Dies (118138), Circles #2 Die (114526), Scallop Circle Die (113468), 3" Circle Originals Die (122125 carry over list), 3-1/2" Circle Originals Die (121811 carry over list),

Quick Tip: You can also use the Circle Scissor plus for cutting out the circles - Product: 112530

TO ORDER STAMPIN' UP! PRODUCTS ON-LINE 24/7, CLICK HERE


Hope you like... : )