CLICK HERE FOR FREE BLOGGER TEMPLATES, LINK BUTTONS AND MORE! »

Tutorials

Monday, November 7, 2011

Happy Birthday Fabulous Mom


Today's my mom's Birthday. We love every inch of Nana...she is always there for us when we need her!! --and that is ALL THE TIME.. : ) : )
She's a fabulous mother and grandma!! We all love you!! (LOVE YOU MOM..!)

Ethan couldn't wait to make Nana a birthday card! He is really really close with his Nana! I hope they always have that special bond!! Both kids made birthday cards which i HAVE to show you because Alyssa kept asking if i wanted to take photos for my blog!!...lol..so stay tuned for the lovely Ms Alyssa Butterfly Card Tutorial.. : )

November is always a busy month so i was smart this year and created a card for mom months ago (when i was inspired by one of Mary Fish's Designs) I KNOW... me organized! --get outa here.. : )

Thank you Mary for the inspiration! : )


Products used for this project:

Stamp Sets: Broadsheet Alphabet (W118724,C120585), Fabulous Phrases (W117002,C120501)

Card Stock: Daffodil Delight (119683), Old Olive (100702), Early Espresso (119686), Whisper White

Ink: Real Red (103133), Old Olive (102277)

Accessories and More: Scallop Oval Punch (119856), Large Oval (119855), Boho Blossoms Punch (119858), White Bakers Twine (124262), Brights Designer Buttons (119747), Playdate DSP (retired), Cutter Kit (106958-distresser), Glue Dots (103683), Stampin Dimensionals (104430), Snail adhesive (104332),

Friday, November 4, 2011

Rememberance Day Poppy {Tutorial}

Rememberance Day is just around the corner, and we are all wearing poppies on our lapels to honour those who have served, and continue to serve our country during times of war, conflict and peace. 

Well you already know that I love to make flowers (just check out that side bar to the right....), but did you know I make hats?  Yup, lots and lots of different styles of hats!  I orginally made this hat for my upline Jenn's daughter Isabelle with a removable holly berries clip on it at Christmas time last year.  This year, I made a poppy clip for her to change up her hat a little.

This poppy is super easy to make.  Items you will need to create one:  Big Shot (113439), Circles #2 die (114526), Fun Flowers die (121812), red felt or polar fleece, black felt, aligator clip, needle and thread or glue gun (note:  although I am actually a pretty good seamstress, I can't tell you the number of times I've traded in my needle and thread for my hot glue gun when making dance costumes, dance headpieces, halloween costumes, etc. -- WAY faster than sewing, but you can do it either way).   


Cut 5 circles out of red felt (or, I used a super soft polar fleece) from the Circles #2 Original die.   I used the 2-2/2" size, but any size will work).  This job is super easy as the Big Shot will cut 5 layers easily all at once! 

Use the Fun Flowers Bigz XL die to cut the center out of black felt (or any other small circle die you happen to have).

Take four of the circles, and fold them into quarters by folding them in half, and then in half again.  Use a hot glue gun to lightly tack them down (to prevent them from opening) near the point.  Then arrange all four onto the last remaining circle.  Use the glue gun again to tack them down at the center.  


Glue the black center down.


To make it into a clip, glue an alligator clip to the back.  Or  you could use them to make a beautiful memorial wreath. 


Thanks for letting me share my lastest crafting venture with you!  


or click here to email me your order.

Thursday, November 3, 2011

Spice Cake Address Book and Note Pad Holder

Here are the other 2 handmade projects i donated to the Surrey International Writers Conference.

The first project is an Address book. Remember this Post? I loved the way my first address book turned out so i thought i'd give it another try using some different products and this is what i came up with.

Like the journal i glimmered the leaves with Shimmer Champagne Mist but unfortunelty you can't see any glimmer in the photos.


The second project is a note pad holder. I also did this project awhile ago and thought i'd do another one. If you missed the first note pad holder i designed click here to have a quick peek at it.


The spice cake line is all the rage right now!! To be honest i wasn't a big fan of it unitl it arrived on my doorstep!! I eagerly opened the package and after one quick look at all the designs in person i fell in love with it. I love working with new colours and when i say new colours i mean colours that i'd never think of putting together.. pool party and more mustard? who knew they would look so good together??


Products used for these projects:

Stamp Sets: French Foliage (W120845, C121166), Fabulous Phrases (W117002, C120501), Travel Log (Retired), Woodgrain Background Stamp (117100)

Card Stock: Early Espresso (119686) Very Vanilla (101650), Soft Suede (115318), Pool Party (122924), More Mustard (100946)

Ink: Early Espresso (119670), More Mustard (103162), Pool Party (122938)

Accessories and More: Big Shot (113439), Perfect Pennants Die (123126), Vintage Wallpaper Embossing Folder (120175), Buttons Sizzlet Die (113440), Champagne Mist Shimmer Paint (116806), Regals Designer Buttons (119744), 5/8" Neutrals Jumbo Brads (122533), Extra Large Oval Punch (119859), Decorative Label Punch (120907), 2-1/2" Circle Punch (120906), 1-3/4" Circle Punch (119850), Sponge Daubers (102892), Linen Thread (104199), Ruffled Pool Party Ribbon (122975), Early Espresso 1/8" Taffeta Ribbon (119959), Spice Cake DSP (124003), Cutter Kit-distresser (106958), Stampin Dimensionals (104430), Snail adhesive (104332), Sticky Strip (104294), Glue Dots (103683), Stampin Sponge (101610), Paper Snips (103579), Paper Piercing Tool (116631)

Wednesday, November 2, 2011

Basket full of Spice Cake

I was asked by the Surrey International Writers Conference (www.siwc.ca) for a donation for their annual conference silent auction. Since it was a writers conference i thought I'd do up a nice basket full of goodies and add some handmade items such as a journal, and some other items "writers" might enjoy.... : )


Here is the Journal i created. It features the Spice Cake DSP and French Foliage stamp set. You can't see in the photo but the leaves have a bit of glimmer to them. I inked up my leaf stamps in more mustard ink, then rock n' rolled them Cajun craze, then using my sponge daubers i dabbed a bit of champagne mist directly onto the rubber of the stamp before stamping.


I'll be back tomorrow with the other handmade projects i donated.. : )


Products used for this project:

Stamp Sets: French Foliage (W120845, C121166), Inspired by Nature (111656), Woodgrain Background Stamp (117100)

Card Stock: Early Espresso (119686) Very Vanilla (101650), Crumb Cake (120953), Pool Party (122924), More Mustard (100946)

Ink: Early Espresso (119670), More Mustard (103162), Cajun Craze (119671)

Accessories and More: Big Shot (113439), Perfect Pennants Die (123126), Tasteful Trim Die (120893), Champagne Mist Shimmer Paint (116806), Neutral Designer Buttons (119743), Basic Pearls (119247), Extra Large Oval Punch (119859), Decorative Label Punch (120907), 2-1/2" Circle Punch (120906), Sponge Daubers (102892), Spiral Border Punch (retired), Linen Thread (104199), Ruffled Pool Party Ribbon (122975), Spice Cake DSP (124003), Cutter Kit-distresser (106958), Stampin Dimensionals (104430), Snail adhesive (104332), Sticky Strip (104294), Glue Dots (103683), Stampin Sponge (101610), Paper Snips (103579), Paper Piercing Tool (116631)

Monday, October 31, 2011

Happy Halloween

Hope you all had fun and safe Halloween. Just a quick post as I'm exhausted from a busy Halloween weekend! The kids had so much fun tonight!

We had a fun full weekend of Halloween adventures. It started off Friday with the pumpkin patch with Alyssa's preschool class. Then Saturday we took the kids to a Halloween parade and then Sunday we carved pumpkins and went on the spooky Halloween train ride at Bear Creek park. NOTE TO SELF: don't ever take young kids to anything spooky unless you are prepared for them to sleep with you for weeks! the chainsaw massacre actually came into our teeny weeny train cart blazing the chainsaw in our faces...when i saw my nieces face and the tears flying off her face i said "that thing was real.. i smell gas!"...hum yeah Natasha that makes things better!! ...Alyssa started to cry...Ethan had his face inside my jacket the whole time!! My niece came home with a dirt/grease mark above her eyebrow!! --lets say we all headed for ice cream afterwards to cheer everybody up!! : )

After Alyssa checked out every room in the house for big bad gorilla's...they were off to bed and I'm amazed that they slept through the night without any nightmares!

On to the projects...

I created these cards and chocolates for the kids teachers this year.


I'm just loving the Peek a boo die from the Holiday Mini!....it's so versatile.


These were quick fun cards to create using the circle peek a boo!! I switched up the DSP so the teachers didn't receive the same design. Ethan has 2 teachers and Alyssa 2as well.. ; )


Since the cards were pretty simple i dressed them up with black textured card stock for the "BOO" and added some black striped ribbon with a Happy Halloween greeting attached. oh and of course i complicated things for myself by tying a bow....you know how i LOVE bows.. : )


I wrapped the candy bars using the Halloween DSP from the Holiday Mini, Pick your Poison. And used the cute Halloween owl from the set Warmest of Wishes, also from the Holiday Mini. I used the Perfect Polka Dot's embossing folder on the black band that is around the DSP.


This scallop circle is from the Perfect Pennant die. I can't get enough of it! you'll see more projects using that specific scallop circle in the near future as I've been busy creating projects with this die! (note: i did use the 2-3/8" scallop punch on one of the chocolate bars - first photo above)


Friday, October 28, 2011

Paper Wedding Bouquet


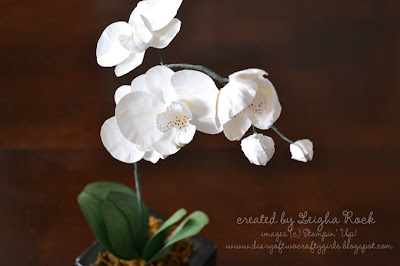
I created this stunning wedding bouquet COMPLETELY out of paper!  I used both my original  Paper Orchid Tutorial and my original  Paper Flower Bouquet Tutorial to create it.  I simply changed up the colours a bit, and put them together.


I've been selling these bouquets for quite a large sum of money like CRAZY!, but you can create them yourself for a whole lot cheaper (shhhh - don't tell my customers).  The flowers are not difficult to make.   My tutorials provide tons of gorgeous, detailed, step-by-step instructions (and tons of beautiful photos) on how to create each flower, including the subtle effects that really make the flowers look real and come to life.

If you purchase both the original Paper Orchid Tutorial and the original Paper Flower Bouquet Tutorial, I will also include a 5 page step-by-step Wedding Bouquet tutorial (lots of gorgeous pics here too) on how to do the colour variation for the wedding orchids (aren't they gorgeous in Blushing Bride?), and how to make and assemble the wedding bouquet.  (Of course, as always, the Paper Orchid Tutorial and the Paper Flower Bouquet Tutorial  will continue to be available seperately). 

To celebrate this new bouquet,  I am offering the Paper Orchid Tutorial AND the Paper Flower Bouquet Tutorial  TOGETHER for a reduced price. 


The complete five part  Paper Orchid tutorial and template AND the compete four part Paper Flower Bouquet tutorial PLUS the 2 part Wedding Bouquet Tutorial and colour variation  is available for purchase for only  $11.95.


UPDATE:  (added June 1, 2012):  You are purchasing a tutorial from 2011.  Some of the items used in the tutorial have been discontinued from Stampin' Up!  This tutorial is still easily re-created.  Simple substitutions are noted here.  As of June 1, 2012, the card stock colour Blushing Bride, Stampin' Pastels, the 5-Petal Punch, and the Mat Pack are  no longer available for ordering through Stampin' Up!  This tutorial includes instructions on how to make white orchids, and they would be equally beautiful in many other colours.  Also, the Stampin' Pastels can easily be substituted for other pastels, or with the corresponding classic ink sponged on with a cotton tipped applicator.  The 5-petal punch was used to create the tiny green leaves amongst the white hydrangea flowers.  This punch can easily be substituted for the Blossom Petals Builder punch or or the 5-petal shaped flower from the Island Floral die.  Any piece of thin foam can be substituted for the foam mat from the Mat Pack.  

Or find the link to purchase on the top right sidebar.  The tutorial will be e-mailed to the email address registered to your paypal account within 24 hours as several  PDF files following your purchase.  If you do not receive your email, please check your spam box.  If you still have not received your file within 24 hours, please contact me so I can correct any issues.

Did you purchase one of my tutorials already?  Wondering if you "upgrade" to both tutorials and qualify for the free Wedding Bouquet Tutorial?  Of course!  I want to be know for my awesome customer service and support!  E-mail me and I can send you a link to "upgrade" for a reduced cost. 

Details on the Paper Orchid Tutorial and Template are available here ($5.95 purchased separately).  
Details on the Paper Flower Bouquet Tutorial  are availble here ($6.95 purchased separately).

Here is a testimonial from one of my customers: 

"The tutorial looks fabulous!  You've done such a wonderful job of explaining each flower and leaf, and I can hardly wait to give the paper flowers a try.  A couple of times recently I've been disappointed with for-fee tutorials, but certainly not with yours.  I know it was a lot of work for you, and it was worth every penny to me!  Thanks so much for sharing your creativity and for putting together a thorough and well-illustrated tutorial."


Questions?  Please feel free to email me.  I'd love to hear from you! 


Thursday, October 27, 2011

Stitched Stocking - Sunshine Preschool SAS Card


Yesterday i mentioned i'd show you what card I designed for an upcoming fundraiser SAS card class. This is the card that made the cut! How could you go wrong with Cherry Cobbler..! : )

I wanted something quick and easy for these ladies and i'm happy with the design i've come up with for Sunshine Hills Preschool Stamp a Stack Fundraiser Class (located in Delta, BC). You can click here to veiw one of the other card designs that will be created at this class. Stay tuned for the 3rd design which i'll post next week.

This stamp a stack class is open to everyone so if you are interested in attending please email me at alittlebitofink@gmail.com for a registration form and more details. There are 2 scheduled sessions, November 30th and December 1st so you don't have to miss this event! Come out and join us for a fun night of stamping!!

If you can't join us for this class but are interested in creating the cards i will have some pre cut card kits available for purchase. All you have to do is purchase and assemble. E-mail me for more details...!!


Products used for this project:

Stamp Sets: Stitched Stockings (W123782,C123784), Four the Holidays (116921)

Card Stock: Cherry Cobbler (119685), Early Espresso (119686) Very Vanilla (101650)

Ink: Cherry Cobbler (119669), Early Espresso (119670)

Accessories and More: Big Shot (113439), Scallop Squares Duo Bigz Die (120903), Basic Rhinestones (119246), Stocking Builder Punch (124095), Linen Thread (104199), Jolly Holiday DSP (retired), Stampin Dimensionals (104430), Snail adhesive (104332),