CLICK HERE FOR FREE BLOGGER TEMPLATES, LINK BUTTONS AND MORE! »

Tutorials

Monday, May 9, 2011

What a GREAT Mother's Day it was!

I hope everyone had a GREAT Mother's Day!! I had the most awesome day with my family!! Ethan had a ball game in the afternoon and we had some family over for dinner! BESIDES me dumping the pie ALL OVER the place (don't even ask!!) it turned out to be a GREAT day!! : )

Ever since pre-school Ethan has handmade something for me for Mother's Day. Every year he is super excited to present his gift to me. This year he brought the gift home all wrapped up. He kept telling me i couldn't open it until Mother's Day!! Sooooooo when Sunday morning rolled around...i was anxious to open my gift. I really love it when Ethan makes something!!! He puts his heart and soul into his 10 minute projects...LOL!! ...it's the thought that counts...right..? : )

Not sure if you can guess what this is. My husband and i looked at each in shock when i opened it. We were speechless! --i'm not sure what was going through hubby's mind but i was thinking "what the heck is this".. i turned to Ethan and he said to me "it's a key chain mom" and i said... I LOVE IT! : )


I asked Ethan how he made the key chain and he said they were allowed to use 'Permanent Markers' and when they were done drawing their picture the teacher put it in the oven and the thick plastic paper shrunk up.. (i can still hear his words "super cool huh mom"...!!)

Here's the inside? or is it the outside..? ; )


And here's the cute card he made me. (gets his craftiness from his ol' mom)- wink wink.


Don't you love how the back of the card is the front....so cute! Love how he has shortened the word "mother's" day to moms day! (such a guy thing to do..!!)

.....here's the inside. There's me again with my big boy!....


I'm so proud of my big guy! and of course my little munchkin is darlin' as well!! I have the best kids anyone could ask for!!

I had to take a quick photo of my cutie bears before i went to bed!! ALL tucked in!! --- Well after i tucked them both in their own beds Alyssa decided to sneak into big brother's room for some cuddles. (Soooooo cute)


Hope you all had a wonderful day with your families.


Saturday, May 7, 2011

Silk Flower Pin {Tutorial}


Well, it's time for another tutorial!  This time, I thought I'd share how to make this cute flower with your Big Shot.  Once you are done, you can wear it as a pin, make it into a headband, or use it to decorate a gorgeous Mother's Day present instead of a bow.  The possibilities are endless. 


I actually wore mine as a pin attached to my blouse to Stampin' Up's Vancouver Regionals in February.  Shelli Gardner herself commented on it.  She told me that she loved it, and asked me how to make it.  Needless to say I was extremely flattered, and was inspired to put together this tutorial to show you how to make your own. 


You will need your Big Shot, and either the Island Floral Die, or the Fun Flowers Die.  Please note, the completed pin and the headband shown in the finished pictures are made with the Island Floral Die, but the step-by-step tutorial I have created, shows how to make them with the Fun Flowers Die.  I have made them both ways, and the turn out beautiful either way.  Each of the dies create flowers that are a little different from one another, but both are gorgeous.


You will then need to choose your fabrics.  I chose fabrics that were dark, moody, purples and blues such as Elegant Eggplant, Night of Navy, and Concord Crush.  I then chose fabrics that had different sheens and textures.  One is a stretch silk (the Elegant Eggplant), one is a silk shantung (the Concord Crush), and the other is an organza (the Night of Navy).  It doesn't matter, as long as there are a variety of colours and types of fabric.  I grabbed what was on sale, or in the remnant section of the fabric store. 


Next, cut your fabrics into rough squares that will cover the die template that you are using.  Then start cutting your flowers.


Cut out two of each of the three shapes of flowers on the die in each fabric (ie.  6 Night of Navy flowers - two of each flower, 6 Elegant Eggplant flowers, and 6 Concord Crush flowers).


When you are done, you should have 18 assorted flowers (but this doesn't really matter, as long as you have a good assortment of different fabrics, sizes, and shapes).  Now the FUN begins........................................


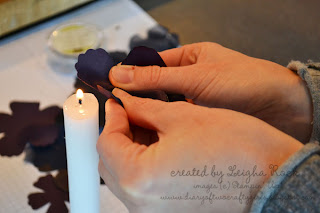
You need to take each of the flowers, and bring them really, really close to an open flame to melt (but not burn) the edges of each flower.  As the edges melt from the heat of the flame, it will seal the fabric, and start to cause the petal to curl inwards.  When my husband came upstairs while I was doing this, he saw the open flame, and just shook his head, and said "what are you doing NOW?"  I'm so lucky that he is so awesome and puts up with my constant, crazy crafting quests :).  Okay, maybe this wasn't the fun part...........when I had Natasha over to do this, she kept burning her fingers. (There was more than just a little whining going on -- just kidding Natasha)  We still laugh about it whenever it comes up.  In the end, Natasha persevered, and when we were done, our flowers looked like this:


Next, stack your flowers one on top of the other to create a pile.  Poke through the pile with your Paper Piercier.  I used an Antique Brad to hold everything together.


It will look something like this when it is done.  Although the above tutorial was made with the Fun Flowers Die, this flower was created with the Island Floral Die.  I simply used a safety pin to pin it onto my blouse.  You could also get a little fancier and sew or glue a proper broach pin onto the back.


I also made a sweet headband simply by glueing the flower onto a ribbon covered headband.  I cut out a small circle of felt with my Big Shot and glued this to the back of the flower to cover/finish the back of the flower and help provide stability to the flower. 


Isn't my upline Jenn's daughter, Isabelle just the cutest little model? I hope you try this project, and leave us your comments, or links to your completed projects.............we'd LOVE to see them.

Thursday, May 5, 2011

Soccer Card


With Ethan's birthday last week and his busy sports schedule i found myself scrambling to create a card at the last minute for his friends birthday party this past weekend!! : )

---what do you think?? should i create a stash of cards so i don't have to stress myself out at the last minute..??!!

The birthday party was on Sunday and with all the prep for Ethan's birthday on the Saturday making a card for his friend totally slipped my mind! So with a busy Sunday, hockey in the morning and baseball in the afternoon i literally had 15 minutes in between to whip up a card. This card came together fairly quickly.

I flipped through the Idea Book and Catalogue for some inspiration and came across a soccer card on page 89 (card below). I bolted over to my scraps and pulled out already cut pieces of card stock and grabbed the stamp sets i needed and started stamping like mad! The card is super plain but I love how the impressions plate gave it a nice finish for a bit of a WOW!


Quick Tip: Spray your card stock with Stampin Mist (My bottle contains half stampin' spray and half water) before you run it through the Big Shot. You'll get a deeper impression on your card stock.


TO ORDER STAMPIN' UP! PRODUCTS ON-LINE 24/7, CLICK HERE


Products used for this project:

Stamp Set: Goal (W120159, C120639), Extreme Elements (115181),

Card Stock: Whisper White (100730), Night of Navy (100867), Cherry Cobbler (119685), Crumb Cake (120953)

Ink: Night of Navy (102977), Crumb Cake (121030), Cherry Cobbler (119669)

Accessories & More: Postage Stamp Punch (122344), 1-3/8" Circle Punch (119860), Stampin Dimensionals (104430), Distresser (106958 Cutter Kit), Stamping Sponge (101610), Big Shot (113439), Texture Plates Kit #4 (114531), Stampin Mist (102394)

Hope you like.... : )

Tuesday, May 3, 2011

Mother's Day is Just Around the Corner!


Wow, Mother's Day is just around the corner!  Imagine pictures of your cuties around the outside of this heart.  Wouldn't you just love to make and give this Photo Heart Frame to the special mom in your life? I made this one for my friend Kristy.  Isn't her daughter Kianna the cutest? 


The complete  tutorial on how to make this project is available for purchase for only  $2.50.   The link to purchase on the top right sidebar.  The tutorial will be e-mailed to the email address registered to your paypal account within 24 hours as an Adobe PDF file following your purchase.  If you do not receive your email, please check your spam box.  If you still have not received your file within 24 hours, please contact me so I can correct any issues.  

You will need My Digital Studio (MDS) or some other photo editing software that you are familiar with to complete this project.  This tutorial gives you step by step instructions how to make the heart with a photo strip, designer paper, and accessories.  Although I do give basic instructions on how to create the photo strip, you must be familiar with and have photo editing software to create the photo strip.  I've used MDS, but you can use other photo editing software that you are familiar with too.

Products used for this project (Please note, the Occasions Mini Catalogue has expired, not all of these items are still available, but you can change things up, and make it your own)!:  I've used You're a Gem stampset and Trinket Keys (carried over!) from the retired Occasions Mini Catalogue to create mine.  You will also need some Designers Series Paper (DSP) and a photo frame.  I've used First Edition and Sweet Stitches DSP  (both from the retired Occasions Mini).  I finished my heart off with some Pretty in Pink Satin Ribbon,

More photos of this project can be viewed here.


Sunday, May 1, 2011

Happy Birthday Ethan

This past week has been a busy one! My son turned 7!! He was so excited and could NOT WAIT to have a big play day with his friends!

On Thursday (his actually birthday) we had his grandparents over for his choice of dinner---PIZZA! and cake. The Hockey game was on so what could be more fun on your birthday--eating pizza, watching the big playoff game and having some delicious cake!!

Yesterday he met all his friends at "Go Banana's" play center. Spending more then 2 hours there could make ANYONE go bananas!! : )

Here are the invites we sent out to his little buddies.


Products used for this project:

Stamp Set: Extreme Elements (115181), Power Play (retired), Cheese Cloth (retired)

Card Stock: Whisper White (100730), Basic Black (121045), Glorious Green (Retired), Brillant Blue (Retired)

Ink: White Craft (101731), Sahara Sand (105208)

Markers: Daffodil Delight (119677), Brilliant Blue and Glorious Green (both retired)

Accessories and More: Black StazOn (101406),
Blender Pens (102845), Spiral Border Punch (119872), Distresser (106958 Cutter Kit), Big Shot (113439), Top Note (113463).

Sorry some of these supplies are retired! boowoo..! Never be afraid to pull out your retired supplies and create..!! Isn't that why we purchase these items!! : )

Here's a photo of my hockey fanatic!! Ethan has LOVED hockey since he was able to walk and hold a hockey stick (about 10 months old)!! -- not sure where he got the love of hockey but he has such passion for the game!


Here is the Birthday card from Mom, Dad and Little Sis! (yes i created it...wink, wink)
I used the Cracked Glass Technique.


Products used for this project:

Stamp Set: Power Play (retired), Cheese Cloth (retired)
Card Stock: Whisper White (100730), Basic Black (121045), Glorious Green (Retired), Brilliant Blue (Retired)

Ink: Neutrals Craft Stampin Spots (Black) (119719)

Markers: Daffodil Delight (119677) Basic Black (100082), Brilliant Blue (retired)

Accessories and More: Black StazOn (101406), Blender Pens (102845), Clear Emboss Powder (109130), Heat Tool (100005), Embossing Buddy (103083), Powder Pals (102197), Spiral Border Punch (119872), 1 1/4" Circle Punch, 1 3/8" Circle Punch, Distresser (106958 Cutter Kit), Sponge (101610), Big Shot (113439), Scallop Squares Duo (120903 Summer Mini Pg 24).

Again some of these supplies are retired! boowoo..! BUT watch for some "current" cards using the same layouts and techniques!! : )

Hope you like... : )

Off to watch my big boy play some hockey!

Saturday, April 30, 2011

National Scrapbooking Month Promotion


May is National Scrapbooking month, and to celebrate, Stampin' Up! is offering this great promotion from May 1st - May 31st! 

  • Select stamp sets are 30% off. 
  • Select digital download bundles are 30% off.
  • Select My Digital Studio print products are 30% off.
  • The Digital+ Starter kit is 30% off


Feel free to contact either Natasha or Leigha if you have any questions, or to place an order. 

Wednesday, April 27, 2011

April Showers............Bring May Flowers!

front of card

I created this card for the So Shelli April Showers Bring. . . . Creative Challenge.  I was totally insipred by the challenge, and decided to take a literal take on it........so here is my April Showers . . . . Bring May Flowers card.  I created the outside of the card to be a little gloomy, and the inside of the card to surprise with a huge pop of colour!

inside of card
I designed the card onto a  5 1/4" x  5 1/4" card base.  That way it will fit perfectly into Stampin' Up's Medium Square Envelopes (107289).  The card base is made from Baja Breeze textured cardstock, and I sponged Basic Grey around the edges on the front of the card to make it a little more gloomy.  When scoring the card base, I scored the fold twice approx 1/16" apart to allow for extra room for the bulk of the flowers inside the card.  That way the card will lie flat.   All of the pieces on the front of the card are from the Big Bold Cupcakes Sizzlits 4-Pack dies.


 The raindrops are cut from the heart (in Bashful Blue), and cut straight up the center to create two raindrops from each heart.  The cloud is from the cupcake top (Whisper White), and the rays from the sun (Daffodil Delight) are the candles.  The sun is cut out from the 1" circle Punch. 
I wanted the front of the card to be a little drab, and gloomy, with the only pop of colour coming from the sun in Daffodil Delight.  I stamped each raindrop with the Sanded Background Stamp, and sponged the edges for more depth.  I sewed them onto the Baja Breeze textured card base, and bent each one out slightly.  I covered up the stitching on the inside of the card with some Bashful Blue cardstock.  The cloud has been run through the paper Crimper.  The sun and cloud have been popped out on Dimensionals.  I created the banner in My Digital Studio (MDS).  This program is the best!!! It really opens up what you can do with not only digital papercrafting, but great for "hybird" projects too, like this one.  It was the perfect way to create a custom saying to go on my card.   The banner was cut out with the banner piece from the Petal Cone Bigz L die after I printed it onto Whisper White cardstock. 


inside of card
 I sponged some Whisper White cardstock with Bashful Blue ink, and used a piece of cardstock punched out of the Scallop Circle punch as a mask to create the cloud effect.  The flowers are created out of the Blossoms Petal Punch, the Itty Bitty Shapes Punch Pack, and the Boho Blossoms Punch.  The stems are cut 3/8" on my Paper Cutter.  The leaves and grass have been cut freehand.  The banner was cut from the Petal Cone Bigz L die, and created in MDS as well. 

The daffodil was made with Whisper White and Daffodil Delight (sponged with Pumpkin Pie) cardstock (Blossoms Petal Punch and Boho Blossoms Punch).  The crocus was made from Perfect Plum cardstock (sponged with Whisper White craft ink) (Blossoms Petal Punch).  The hyacinths were cut from Rich Razzleberry and Concord Crush cardstock (Itty Bitty Shapes Punch Pack), and the Tulips were cut from Daffodil Delight (sponged), Regal Rose (sponged), and Melon Mambo cardstock (Blossoms Petal Punch). 


Products used for this project:

Stamp Sets: Sanded background stamp (109294)

Card Stock: Whisper White(100730), Baja Breeze (textured) (119972), Bashful Blue 105120), Daffodil Delight(119683), Regal Rose(105130), Melon Mambo(115320), Concord Crush(119792), Perfect Plum(101889),  Rich Razzleberry(115316), Certainly Celery(105125), Wild Wasabi(108641), and Garden Green(102584).

Inks: Basic Grey(109120), Bashful Blue105209), Pumpkin Pie(105216) , Daffodil Delight(119677), and Regal Rose(105211).

Accessories and More: Big Bold Cupcakes Sizzlits 4-Pack (114509), 1" Circle Punch (119868), Paper Crimper (101618), Dimensionals (104430), sewing machine, Blossoms Petal Punch (121808), Boho Blossoms Punch (119858), Itty Bitty Shapes Punch Pack (118309), Scallop Circle Punch (119854), Stamping Sponges (101610),  Petal Cone Bigz L Die (121810), Mini Glue Dots (103683), Sticky Strip(104294), Mulitpurpose Glue(110755), and My Digital Studio(118108).


Hope April showers bring you lots of May flowers!