CLICK HERE FOR FREE BLOGGER TEMPLATES, LINK BUTTONS AND MORE! »

Tutorials

Showing posts with label Nature Walk. Show all posts

Sunday, April 29, 2012

Nature Walk - Masking and Brick Wall Technique


For Club this month i showed Masking and the Brick Wall technique.  I heard gasps at the beginning of class but at the end of it the ladies were very happy with the out come and really surprised by how quick and easy it was to create a "brick wall"! 

Here's how to create a Brick Wall: 

1.  On a 3-1/2" x 3-1/2" Very Vanilla piece of card stock stamp the greeting.  Stamp the bird from Nature Walk just above the greeting. 


2.  On a scrap piece of card stock stamp the bird and cut it out with paper snips.  Place the cut out bird  over top of the stamped bird image on the Very Vanilla card stock.  This technique is called masking.  With markers ink up the flower image stamp and stamp over top of the cut out bird.   


3.  Remove the cut out bird.  The flower image is now behind the bird. 


4. With a paper cutter, cut the Very Vanilla card stock horizontally into 1/2" strips. 

5.  Now cut each strip vertically to create bricks.  For the first row, the first brick will be 1/2" and the other 3 bricks will be 1".  The second row, the first three bricks will be 1" and the last brick will end up being 1/2".  The third row the bricks will start out at 1/2" again and the rest in the row will be 1".. keep repeating this pattern until all 7 rows of strips have been cut out.   Make sure as the pieces are cut you line them back up so they stay in order.  


6.  Once all the bricks have been cut, sponge each one with Sahara Sand ink.  As each brick is being sponged with ink adhere it to a piece of 3-1/2" x 3-1/2" Crumb Cake card stock with a glue stick.  Piecing your "puzzle" together.  I left a few of the 1/2" bricks out which shows a bit of the crumb cake card stock.    


7.  Finish the card by backing the brick wall onto a Riding Hood Red piece of card stock and add Ribbon. With stampin dimensionals adhere to DSP and then to card base.  


Products used for this project:

Stamp Sets: Nature Walk (W121925,C121997), Delightful Dozen (W122650,C122652)

Card Stock: Very Vanilla (101650), Riding Hood Red (111348), Early Espresso (119686), Crumb Cake (120953), First Edition Specialty DSP (121878)

Ink: Early Espresso (119670),  Sahara Sand Marker (105208), Cherry Cobbler Stampin Write Marker (119681), Always Artichoke Stampin Write Marker (105113), Early Espresso Stampin Write Marker (119680)

Accessories and More: Riding Hood Reg Pleated satin ribbon (125569),  Paper Cutter (104152), Stampin Sponges (101610),  Stampin Dimensionals (104430), (103683), Snail adhesive (104332)


My very popular Cupcake Punch Tutorial is Now Available!  Check out the top Right Hand side bar to purchase and receive your 45 page step by step tutorial.--Are you looking for new fresh ideas? Looking to be inspired? Look no further, I have put together a 7 part tutorial which includes 6 amazing cards and one stinkin' cute scrapbook page layout! The tutorial is in seven parts. Each tutorial gives step-by-step instructions with tons of photos to help you recreate each card. The complete tutorial is 45 pages long and includes over 100 photos. Four of the 6 cards have hidden greetings and i have incorporate the cupcake punch into all 6 cards! You'll be amazed at what you can do with the cupcake punch! I'm so excited to share this tutorial with you! : )
Click here to read more...

Friday, April 20, 2012

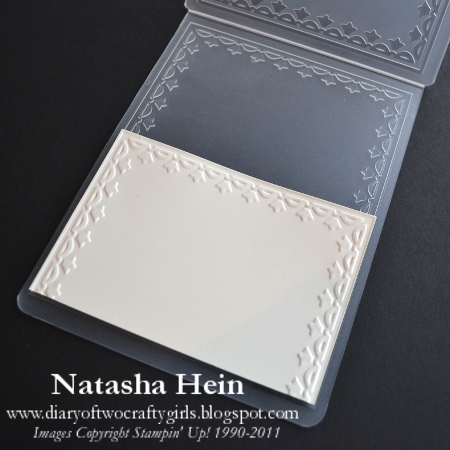
Shortened Framed Tulips Embossing Folder club card


I created this card with my club girls a couple months ago.  I showed them how to shorten the 
Framed Tulips Textured Embossing folder.

Here's how to create a smaller tulip frame border:

1.  Place a 4" x 2-3/4" piece of card at the bottom of the Tulip embossing folder and run it through the big shot.


Your card stock will now have a tulip border around 3 sides.


2.  Once run through the big shot, open folder and turn (do not flip) your card stock half way around.  The already embossed sides should "lock" into the embossing folder.  Feed the open end of the embossing folder into the Big Shot turning the handle only 2 or 3 times, reverse the embossing folder back out after the 2 or 3 turns. You do not want to feed the embossing folder all the way through as it will flatten the already embossed tulip border at the top of the card stock.   If the sides are properly locked in they will remain the same and no new markings on the sides should appear.


Voila.. you have a shorten tulip frame border.


Now you are ready to stamp your image!  The nature walk bird fits nicely.  : )


Products used for this project:

Stamp Sets: Nature Walk (W121925,C121997), Tiny Tags (W118091,118592), Wonderfully Worn Background (118533)

Card Stock: Very Vanilla (101650), Soft Suede (115318), Cherry Cobbler (119685), Baja Breeze (111352),

Ink: Early Espresso (119670), Crumb Cake (121030), Cherry Cobbler (119669), Sahara Sand Marker (105105)

Accessories and More: Big Shot (113439), Framed Tulip Embossing folder (121809), Cutter Kit (106958-distresser), Jewelry Tag Punch (117190), Antique Brads (117273), 3/8" Blushing Bride Pleated satin ribbon (125570), Spritzer Tool (107066), Piercing Tool and mat for brad, Stampin Dimensionals (104430), (103683), Snail adhesive (104332)


My very popular Cupcake Punch Tutorial is Now Available!  Check out the top Right Hand side bar to purchase and receive your 45 page step by step tutorial.--Are you looking for new fresh ideas? Looking to be inspired? Look no further, I have put together a 7 part tutorial which includes 6 amazing cards and one stinkin' cute scrapbook page layout! The tutorial is in seven parts. Each tutorial gives step-by-step instructions with tons of photos to help you recreate each card. The complete tutorial is 45 pages long and includes over 100 photos. Four of the 6 cards have hidden greetings and i have incorporate the cupcake punch into all 6 cards! You'll be amazed at what you can do with the cupcake punch! I'm so excited to share this tutorial with you! : )
Click here to read more...

Friday, April 22, 2011

Series of Nature Walks... Scrapbook Page and Matching Card - Take 2

When i first saw the Occasions Mini one of the sample projects that caught my eye was the scrapbook page featured on page 26. I love how the designer used the Framed Tulip Textured Impressions Embossing Folder with the Photo Corner punch and attached it to the corner of the photo! I was determined to try this out. I gathered some supplies that were similar to what the designer had used and started creating!! This is what i came up with!!

Click on the Photo to get a better view of all the details. (sorry for the poor photos.. i can't seem to get the lightening right for better photos)

TO ORDER STAMPIN' UP! PRODUCTS ON-LINE 24/7, CLICK HERE

Products used for this project:
Stamp set: Nature Walk (W:121925 C:121997)
Card Stock: Chocolate Chip Textured (121078), Very Vanilla (101650), Pear Pizzazz (119795), So Saffron (105118), Botanical Gazette DSP (121783 Occasions Mini Pg. 26), First Edition DSP (121878 Occasions Mini Pg. 25)
Ink: Early Espresso (119670)
Markers: Pear Pizzazz (119801), Riding Hood Red (120971)
Accessories and More: Photo Corners Punch (119878), Decorative Label Punch(120907), Distresser (106958 Cutter Kit), The Tearing Edge (102930), Aqua Painter (103954), Rosettes (118774 Occasions Mini Pg. 16), Linen Thread (104199), Pear Pizzazz Stitched-Poly Ribbon (119265), Paper Snips (103579), Snail Adhesive (104332), Sticky Strip (104294), Glue Dots (103683), 2-Way Glue Pen (100425), Chocolate Chip Button (Retired - can use Neutrals Designer Buttons -119743), Big Shot (113439), Framed Tulips Textured Impressions Embossing Folder (121809 Occasions Mini Pg 12), Alphabet Simple Bigz Die (115960), Billboard Sizzlit Decorative Strip Die (114510)

Quick Tips: To adhere your die cut letters use 2-Way Glue Pen. To adhere your ribbon use Sticky Strip.

Here is the card to match! I once again used the Rosettes for the scrapbook page and card. This time i coloured them with the Riding Hood Red Marker and used the aqua painter to soften the colour. I moved the Vanilla Framed Tulip Border that was at the top right hand corner on the scrapbook page to the bottom for the card and stamped "Friend" to finish it off.


Products used for this project:
Stamp set: Nature Walk (W:121925 C:121997), You're a Gem (W:122268 C:122270)
Card Stock: Chocolate Chip (102128), Very Vanilla (101650), Botanical Gazette DSP (121783 Occasions Mini Pg. 26), First Edition DSP (121878 Occasions Mini Pg. 25)
Ink: Early Espresso (119670)
Markers: Pear Pizzazz (119801), Riding Hood Red (120971)
Accessories and More: Distresser (106958 Cutter Kit), The Tearing Edge (102930), Aqua Painter (103954), Rosettes (118774 Occasions Mini Pg. 16), Linen Thread (104199), Pear Pizzazz Stitched-Poly Ribbon (119265), Paper Snips (103579), Snail Adhesive (104332), Sticky Strip (104294), Glue Dots (103683), 2-Way Glue Pen (100425), Chocolate Chip Button (Retired - can use Neutrals Designer Buttons -119743), Big Shot (113439), Framed Tulips Textured Impressions Embossing Folder (121809 Occasions Mini Pg 12)

Hope you like... : )

I have a couple more Nature Walk Scrapbook Pages and matching cards to show you but i'm going to hold off until closer to the end of the month as I have some other cards i want to share with you next week. I'll continue with "Series of Nature Walks" soon!! BUT don't wait to purchase the Nature Walk Stamp Set, if YOU LOVE this set you must purchase it before April 30th because the Occasion Mini ends at the end of the month!! -- there are so many great items in this MINI!! The Rosettes, Seam bindig Ribbons, Some cool DSP's....and some GREAT stamp sets... don't delay --get your wish list items today! : )

TO ORDER STAMPIN' UP! PRODUCTS ON-LINE 24/7, CLICK HERE


Wednesday, April 20, 2011

Series of Nature Walks...Scrapbook Page and Matching Card - Take 1

I was disappointed when they announced that we'd be getting Nature Walk at Vancouver Regionals. Although, in the back of my mind i knew they'd demo some cute projects with the set and then I'D JUST HAVE TO HAVE IT!! ; )

I have to say I'm very happy that i now own Nature Walk!! I can't stop using it!! It's so versatile!! Today i'm showing you how you can incorporate a card into a scrapbook page or vice versa!! I have more cards and layouts to show you in my next post!! woohoo..! (again ..love love this stamp set)

In this post i show the Clear Block Technique. Here is an 8x8 Scrapbook Page using the Clear Block Technique.


Here i used 2 clear blocks and brought in a bit more colour! Click on the photo above to in large it...you'll see the page in more detail. (how i used Marina Mist Ink with the Texture Jumbo Wheel to texturized the paper and create a soft background)

I also used Rosettes. These are adorable ribbon flowers that make quick and pretty accents. I dyed the Rosette so it would coordinate with the Marina Mist Background.

A Quick Tip: To dye your Rosettes you use Classic Stampin' Ink (reinkers or markers). In this case i used Marina Mist marker and a little bit of water from the aqua painter. I coloured the flower with my Marina Mist Marker and then went over top with the aqua painter. A litte bit of water softens the colour. Attach with a Glue Dot.

TO ORDER STAMPIN' UP! PRODUCTS ON-LINE 24/7, CLICK HERE

Products used for this project:
Stamp Set: Nature Walk (W:121925, C:121997)
Card Stock: Marina Mist (119682), So Saffron (105118), Very Vanilla (101650), Early Espresso (119686), Pear Pizzaz (119795), Not Quite Navy (101722), Botanical Gazette DSP (121783 Occasions Mini Pg 26)
Ink: Crumb Cake (121030, Marina Mist (119668), Early Espresso (119670), Soft Suede (115657),
Marker: Riding Hood Red (120971), Pear Pizzazz (119801), Marina Mist )(119679)
Accessories and More: Rosettes (118774 Occasions Mini Pg. 16), Early Espresso 1/8" Ribbon (119959), Texture Jumbo Wheel, Stampin' Around Jumbo Handle (103661), Sponge (101610), Alphabet Simple Bigz Dies (115960), Billboard Sizzlit Decorative Strip Die (114510), 1 3/4" Circle punch, Framed Tulips Textured Impressions embossing folder (121809 Occasions Mini Pg 12), Distresser (106958 Cutter Kit), Clear blocks D (118485)and H (118490), Dotted Scallop Ribbon Border Punch (119275), Aqua Painter (103954), Glue Dots (103683), Dimensionals (104430), Snail Adhesive (104332)
_______________________________________________________
Here is the matching card. I added a greeting and some glitter to jazz it up!!


TO ORDER STAMPIN' UP! PRODUCTS ON-LINE 24/7, CLICK HERE

Products used for this project:
Stamp Set: Nature Walk (W:121925, C:121997), You're a Gem (W:122268, C:122270)
Card Stock: Marina Mist (119682), So Saffron (105118), Very Vanilla (101650), Early Espresso (119686)
Ink: Crumb Cake (121030, Marina Mist (119668), Early Espresso (119670), Soft Suede (115657),
Marker: Riding Hood Red (120971), Pear Pizzazz (119801), Marina Mist )(119679)
Accessories and More: Rosettes (118774 Occasions Mini Pg. 16), Early Espresso 1/8" Ribbon (119959), Texture Jumbo Wheel, Stampin' Around Jumbo Handle (103661), Distresser (106958 Cutter Kit), Clear blocks D (118485)and H (118490), Dotted Scallop Ribbon Border Punch (119275), 2-Way Glue Pen (100425), Dazzling Diamonds Glitter (102023), Glue Dots (103683), Aqua Painter (103954), Dimensionals (104430), Snail Adhesive (104332)

Hope you like... : )