CLICK HERE FOR FREE BLOGGER TEMPLATES, LINK BUTTONS AND MORE! »

Tutorials

Monday, April 30, 2012

Spring Bouquet {Tutorial}

Detailed Step-by-Step Tutorial Available 


This fresh green and white Spring Bouquet is made completely out of paper and various Stampin' Up! punches and dies. I simply put together two of my previous flower tutorials:  the ever popular and original Paper Flower Bouquet,  and the Candy Cane Bouquet, then added the Southern Magnolia flower and Magnolia leaves.   These tutorials are so versatile.  There are limitless ways to use the flowers shown in these step-by-step tutorials.


Wouldn't this beautiful Spring Bouquet be perfect for Mother's Day? Wouldn't you love to make it for someone special?   Now you can!   I have put together a detailed tutorial on how make each of these stunning flowers and how to replicate the bouquet.  The tutorial is in six parts.  Each tutorial gives clear step-by-step instructions with tons of gorgeous photos on how to make the Southern Magnolia, the red Roses, the White Ranunculus, the acid green Hydrangea, and the Magnolia Leaves to make this bouquet. And as always,complete instructions on how to assemble the arrangement are also included.  The complete tutorial is 21 pages in length and has 62 photos.  The flowers are not difficult to make, but a lot of photos are required to give complete step-by-step instruction.   It also gives lots of instruction on how to create the subtle effects that really make the flowers look real and come to life.  


You can purchase the complete six part tutorial for only  $6.95

UPDATE:  (added June 1, 2013):  You are purchasing a tutorial from 2012.  Some of the items used in the tutorial have been discontinued from Stampin' Up!  For the most part, these beautiful flowers can still be recreated using alternate colours and products.  

Or find the link to purchase on the top right sidebar.  As always, tutorials will be e-mailed to the email address registered to your PayPal account within 24 hours as six Adobe PDF files following your purchase.  If you do not receive your email, please check your spam box.  If you still have not received your file within 24 hours, please contact me so I can correct any issues.   

Here is a testimonial from one of my customers: 

"The tutorial looks fabulous!  You've done such a wonderful job of explaining each flower and leaf, and I can hardly wait to give the paper flowers a try.  A couple of times recently I've been disappointed with for-fee tutorials, but certainly not with yours.  I know it was a lot of work for you, and it was worth every penny to me!  Thanks so much for sharing your creativity and for putting together a thorough and well-illustrated tutorial."


Feel free to contact me if you have any questions. 

Sunday, April 29, 2012

Nature Walk - Masking and Brick Wall Technique


For Club this month i showed Masking and the Brick Wall technique.  I heard gasps at the beginning of class but at the end of it the ladies were very happy with the out come and really surprised by how quick and easy it was to create a "brick wall"! 

Here's how to create a Brick Wall: 

1.  On a 3-1/2" x 3-1/2" Very Vanilla piece of card stock stamp the greeting.  Stamp the bird from Nature Walk just above the greeting. 


2.  On a scrap piece of card stock stamp the bird and cut it out with paper snips.  Place the cut out bird  over top of the stamped bird image on the Very Vanilla card stock.  This technique is called masking.  With markers ink up the flower image stamp and stamp over top of the cut out bird.   


3.  Remove the cut out bird.  The flower image is now behind the bird. 


4. With a paper cutter, cut the Very Vanilla card stock horizontally into 1/2" strips. 

5.  Now cut each strip vertically to create bricks.  For the first row, the first brick will be 1/2" and the other 3 bricks will be 1".  The second row, the first three bricks will be 1" and the last brick will end up being 1/2".  The third row the bricks will start out at 1/2" again and the rest in the row will be 1".. keep repeating this pattern until all 7 rows of strips have been cut out.   Make sure as the pieces are cut you line them back up so they stay in order.  


6.  Once all the bricks have been cut, sponge each one with Sahara Sand ink.  As each brick is being sponged with ink adhere it to a piece of 3-1/2" x 3-1/2" Crumb Cake card stock with a glue stick.  Piecing your "puzzle" together.  I left a few of the 1/2" bricks out which shows a bit of the crumb cake card stock.    


7.  Finish the card by backing the brick wall onto a Riding Hood Red piece of card stock and add Ribbon. With stampin dimensionals adhere to DSP and then to card base.  


Products used for this project:

Stamp Sets: Nature Walk (W121925,C121997), Delightful Dozen (W122650,C122652)

Card Stock: Very Vanilla (101650), Riding Hood Red (111348), Early Espresso (119686), Crumb Cake (120953), First Edition Specialty DSP (121878)

Ink: Early Espresso (119670),  Sahara Sand Marker (105208), Cherry Cobbler Stampin Write Marker (119681), Always Artichoke Stampin Write Marker (105113), Early Espresso Stampin Write Marker (119680)

Accessories and More: Riding Hood Reg Pleated satin ribbon (125569),  Paper Cutter (104152), Stampin Sponges (101610),  Stampin Dimensionals (104430), (103683), Snail adhesive (104332)


My very popular Cupcake Punch Tutorial is Now Available!  Check out the top Right Hand side bar to purchase and receive your 45 page step by step tutorial.--Are you looking for new fresh ideas? Looking to be inspired? Look no further, I have put together a 7 part tutorial which includes 6 amazing cards and one stinkin' cute scrapbook page layout! The tutorial is in seven parts. Each tutorial gives step-by-step instructions with tons of photos to help you recreate each card. The complete tutorial is 45 pages long and includes over 100 photos. Four of the 6 cards have hidden greetings and i have incorporate the cupcake punch into all 6 cards! You'll be amazed at what you can do with the cupcake punch! I'm so excited to share this tutorial with you! : )
Click here to read more...

Thursday, April 26, 2012

You're a Star...

The release of a new Stampin’ Up! Catalogue is always an exciting time for stampers. This year, I’m thrilled the new catalogue will be released a month early! Of course, whenever we get a new catalogue, we have to say goodbye to the old one.  We are saying goodbye to stamps and accessories and some at discounted prices.  Be sure to check out the retiring stamp sets and accessories now - so you don’t miss out on your retiring favorites! All the stamp sets on the list are going away on May 31st.  All accessories are available only while supplies last. Order online to avoid disappointment.

The Occasions Mini catalogue will end this month and the current Idea Book & Catalogue will retire at the end of May instead of the end of June! If you are one of the many stampers with items still on your wish list, now is the time to place your order.

Here's one of my Favorites cards to date.  My good friend Amanda (miss you soooo much darlin')...created this card for my birthday back in December.  It's sooooooooooooooooooooooooo easy to recreate and i have to admit it's been recreated many times for kids birthday parties.  I love how you can switch up the colour scheme to suite anyone and any occasion!   It's literally a 10 min card!  LOVE IT! 


I'm super sad the stars die is retiring.. i love it!  and the crimper....it's so easy and fun to use!  I will be keeping both for future projects for sure.. ; )

Thanks again Amanda for the lovely card and for the Inspiration..you're a STAR.. : ) : )


Products used for this project:

Stamp Sets: Word Play (W120308,C120651)

Card Stock: Crumb Cake (120953), Pretty in Pink (100459), So Saffron (105118), Tempting Turquoise (102067)

Ink: Pretty in Pink (101301) and So Saffron Stampin Write Marker (105114)

Accessories and More: Big Shot (113439), Stars #2 Die (113461), 3/8" Soft Suede Taffeta Ribbon (122967), White Bakers Twine (124262), Crimper (101618), 1-3/4" Circle Punch (119850), Glue Dots (10383),  Stampin Dimensionals (104430), (103683), Snail adhesive (104332)


My very popular Cupcake Punch Tutorial is Now Available!  Check out the top Right Hand side bar to purchase and receive your 45 page step by step tutorial.--Are you looking for new fresh ideas? Looking to be inspired? Look no further, I have put together a 7 part tutorial which includes 6 amazing cards and one stinkin' cute scrapbook page layout! The tutorial is in seven parts. Each tutorial gives step-by-step instructions with tons of photos to help you recreate each card. The complete tutorial is 45 pages long and includes over 100 photos. Four of the 6 cards have hidden greetings and i have incorporate the cupcake punch into all 6 cards! You'll be amazed at what you can do with the cupcake punch! I'm so excited to share this tutorial with you! : )
Click here to read more...

Sunday, April 22, 2012

Grow


Here is a great gift idea.  It would be perfect for Mother's Day.   All you need is a glass jar, some Decor Elements vinly,  your choice of alphabet die, and some glass etching paste.  I used the Billboard sizzlit decorative strip die.  Cut your letters out of the decor viny (any colour, it doesn't matter).  Note:  you will be using the NEGATIVE from the vinyl that is left behind from when you cut the letter.  You can discard the actual letter.  Basically, you will be creating a stencil of each letter out of decor vinyl.  Adhere the decor vinyl to the glass to form the word you want. Place the entire word.  This might require trimming the vinyl so that you can fit each letter close enough together.  Rub the vinyl well onto the glass to get it to really adhere down and seal so that there is no leakage of the etch underneath.  Apply the glass etching paste with a paint brush onto each of the open spaces of the vinyl to form the letters.  Glass etch can be purchased from a craft supply store.  Follow the manufacturers instructions. I left the paste on for 15 minutes.  Rinse the paste off well with water and then peel the decor vinyl off.  Your word should now be nicely etching into the glass.  A nice bow and tag finished the project off nicely.  You could do this with any glass item - a vase, with the word "MOM" etched into it would be gorgeous filled with a bouquet of flowers.   


Products used for this project:

Stamp Sets: Tiny Tags

Card Stock: Very Vanilla, Whisper White, Old Olive

Ink: Old Olive, Early Espresso

Accessories and More: Big Shot, Billboard Sizzlits Decorative Strip Die, Mini Vintage Tags, So Saffron Grosgrain Ribbon (retired), Pearl Jewel, Decor Elements Vinyl (any colour), Glass Etching Paste, Glass Jar, sterilized soil, and basil plant.

The paper flowers in this project are from my Paper Flower Bouquet Tutorial available here


Friday, April 20, 2012

Shortened Framed Tulips Embossing Folder club card


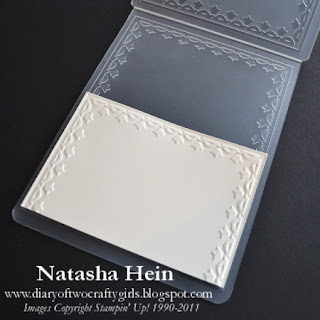
I created this card with my club girls a couple months ago.  I showed them how to shorten the 
Framed Tulips Textured Embossing folder.

Here's how to create a smaller tulip frame border:

1.  Place a 4" x 2-3/4" piece of card at the bottom of the Tulip embossing folder and run it through the big shot.


Your card stock will now have a tulip border around 3 sides.


2.  Once run through the big shot, open folder and turn (do not flip) your card stock half way around.  The already embossed sides should "lock" into the embossing folder.  Feed the open end of the embossing folder into the Big Shot turning the handle only 2 or 3 times, reverse the embossing folder back out after the 2 or 3 turns. You do not want to feed the embossing folder all the way through as it will flatten the already embossed tulip border at the top of the card stock.   If the sides are properly locked in they will remain the same and no new markings on the sides should appear.


Voila.. you have a shorten tulip frame border.


Now you are ready to stamp your image!  The nature walk bird fits nicely.  : )


Products used for this project:

Stamp Sets: Nature Walk (W121925,C121997), Tiny Tags (W118091,118592), Wonderfully Worn Background (118533)

Card Stock: Very Vanilla (101650), Soft Suede (115318), Cherry Cobbler (119685), Baja Breeze (111352),

Ink: Early Espresso (119670), Crumb Cake (121030), Cherry Cobbler (119669), Sahara Sand Marker (105105)

Accessories and More: Big Shot (113439), Framed Tulip Embossing folder (121809), Cutter Kit (106958-distresser), Jewelry Tag Punch (117190), Antique Brads (117273), 3/8" Blushing Bride Pleated satin ribbon (125570), Spritzer Tool (107066), Piercing Tool and mat for brad, Stampin Dimensionals (104430), (103683), Snail adhesive (104332)


My very popular Cupcake Punch Tutorial is Now Available!  Check out the top Right Hand side bar to purchase and receive your 45 page step by step tutorial.--Are you looking for new fresh ideas? Looking to be inspired? Look no further, I have put together a 7 part tutorial which includes 6 amazing cards and one stinkin' cute scrapbook page layout! The tutorial is in seven parts. Each tutorial gives step-by-step instructions with tons of photos to help you recreate each card. The complete tutorial is 45 pages long and includes over 100 photos. Four of the 6 cards have hidden greetings and i have incorporate the cupcake punch into all 6 cards! You'll be amazed at what you can do with the cupcake punch! I'm so excited to share this tutorial with you! : )
Click here to read more...

Tuesday, April 17, 2012

Popcorn Card "Take Two"...


It's been just over a week since the release of my Cupcake Punch Tutorial and I've really enjoyed reading all your heart warming emails.  Thank you so much for all the kind words!  I'm so happy you LOVE all the cards, especially the ripper zipper card.  --yes i know....that name sounds crazy doesn't it!  But it's a super fun card to create.  I'm sure the person whom you give the card to will absolutely love ripping their card open to see your hidden message!  soooooo cool!  --oh and don't fret the card still looks pretty after ripping.... : ) : )

There were some questions about "retiring" stamp sets so i thought I'd do a quick post to let you know that the only card with stamp images on it is this one here:  


It uses All in the Family stamp set.   AND yes SU just announced it's retiring. (Check out the Retiring List here) The great thing about the Cupcake Punch tutorial is the cards are based on "punch art" so there is not much stamping involved.  For most of the cards I've used the greetings from Create a Cupcake stamp set which is sticking around for at least another year...woohoo.  (this stamp set is designed to match the Cupcake Punch)  The cards that have greetings from other sets can easily be changed up with greetings you already own.  Also to keep things simple I've used the Brights Collection Prints Designer Series Papers which you can easily switch up with any DSP of your choice or use any solid colour card stock to coordinate with the rest of your card.  

As you can see this card was super easy to recreate using different images and the popcorn bag still looks cool with plain white and red card stock.   Isn't Make a Monster stamp set perfect for this card?   : )
And i thought i'd add switch up the red stars with a cute banner...

For more info about this tutorial please click here.  You can also find the link to purchase the Cupcake Punch Tutorial on the top right sidebar. The tutorial will be e-mailed to the email address registered to your paypal account within 24-48 hours as an Adobe PDF file following your purchase. If you do not receive your email, please check your spam box. If you still have not received your file within 24-48 hours, please contact me at alittlebitofink@gmail.com so I can correct any issues.

Saturday, April 14, 2012

Domestic Goddess Birthday


The layout for this Domestic Goddess card was inspired from this card.  As you can see, I changed it to a birthday card, and added the little gingham origami apron,  which suited the Domestic Goddess theme perfectly :)  Lastly, still keeping with the Domestic Goddess theme, I pulled out the sewing machine and added some domestic detail :)  


Products used for this project:

Stamp Sets:  Crazy for Cupcakes, Birthday Bakery (retired) 

Card Stock
: Whisper White, Pool Party, Domestic Goddess DSP

Ink: Jet Black StazOn, markers:  Poppy Parade, Blushing Bride, Pool Party, Chocolate Chip, Sahara Sand.

Accessories and More: Big Shot, Perfect Pennents Bigz L Die, Pool Party Ruffled Ribbon, Itty Bitty Buttons, Sewing Machine, and Dimensinals.  


Tuesday, April 10, 2012

Cupcake Punch {Tutorial} and Blog Candy Winners..

Hi Everyone...

Sorry I'm having a bit of a problem copy and pasting over the picture of the random.org graphic which shows the winning numbers. And since there are 3 winners i have to do this 3 times. I stayed up late trying to figure it out but still couldn't get it to work so i thought I'd give it a try this morning before i left for work but still can't figure it out. : (

Here are the numbers random.org picked.

5 - So cute! I love it!

What keeps me coming back to your blog? EVERYTHING!!!!!! I love all the projects you share! I love all the beautiful paper flowers! Oh, I just love everything! That's not to say all the inspiration I get from you blog.

Thanks for sharing all that you share!

Sandy

7 - I visit your blog regularly and love the variety of projects that you post - i like that you use lots of punches, the dimensional look of your cards and the bright and cheerful colours that are chosen! thanks ladies! laura j


11- I think you ladies are amazing! Love both your styles.

Natasha I can't wait to see what you have created in your tutorial.

Judy May

Thank you for all your kind comments and encouraging emails. Congrats to the winners!! If you see your name above please email me at alittlebitofink@gmail.com with your email address so i can send off your FREE tutorial.

Now on to the release of my Cupcake punch tutorial. wooooohooo!

Are you looking for new fresh ideas? Looking to be inspired? Look no further, I have put together a 7 part tutorial which includes 6 amazing cards and one stinkin' cute scrapbook page layout! The tutorial is in seven parts. Each tutorial gives step-by-step instructions with tons of photos to help you recreate each card. The complete tutorial is 45 pages long and includes over 100 photos. Four of the 6 cards have hidden greetings and i have incorporate the cupcake punch into all 6 cards! You'll be amazed at what you can do with the cupcake punch! I'm so excited to share this tutorial with you! : )

Please find the link to purchase on the top right sidebar. The tutorial will be e-mailed to the email address registered to your paypal account within 24-48 hours as an Adobe PDF file following your purchase. If you do not receive your email, please check your spam box. If you still have not received your file within 24-48 hours, please contact me at alittlebitofink@gmail.com so I can correct any issues.

Here's a sneak peek of one of the 6 cards i have included in the Cupcake Punch Tutorial.


Monday, April 9, 2012

Happy Easter

Happy Easter...

Hope everyone enjoyed their Easter Weekend... It's been a very busy week here at our house! Lots of visiting with family and friends. The kids are all hopped up on chocolate!! wooooooooooohoooooooooooooo... : )

If you haven't left a comment on this post please do so by 8:00 pm tonight for your chance to win some blog candy! I'll be releasing my Cupcake Punch tutorial and announcing the blog candy winners shortly after.. : )

We are off to "another" Easter egg hunt and then to visit family. --

Enjoy this beautiful day..


Saturday, April 7, 2012

Have an Egg-cellent Easter!


Hope everyone is having a wonderful Easter weekend!  I'm looking foward to sharing some of the crafty things my family has been up to this weekend.  "We put a little twist on our annual Good Friday Easter egg making day by covering some styrofoam eggs with pretty DSP.  Basically, we tore DSP into irregular strips approximately 1/2" wide by 6" long.  We used a foam brush to cover the back of the paper with Tombow Multipurpose Glue, and stuck them down onto the eggs.  I think they turned out quite pretty :)


Then I made a carrot cake with maple cream cheese frosting............YUM!  The banner is made from Pool Party, Wisteria Wonder, Lucky Limade, Calypso Coral and Wisper White cardstock.  It added just the right amount of decoration to mark the occasion. 


Next, it was time to decorate eggs with the kids.  This is alway so much fun!  This year, our inspiration was Natasha's awesome card:  Get Well Wishes that she made from the Make a Monster stamp set.  I LOVED this card.  I think it is one of the best cards I have ever seen made with this set.  TOO CUTE! 
I wanted to make a card with this adorable set based on Natasha's card that said "Have an egg-cellent Easter!", but in the end, we ran out of time.  It was such a busy weekend, and we had a ton of fun.  So, instead, I'll show you the little egg monsters we made that were inspired from this cute card.


Hope you have an Egg-cellent Easter!