CLICK HERE FOR FREE BLOGGER TEMPLATES, LINK BUTTONS AND MORE! »

Tutorials

Sunday, October 28, 2012

Spooky {Cardstock} Bouquet


This spooky Halloween bouquet was inspired by Martha Stewart.  I simply rearranged the dozen card stock roses that I made in this post, and added a little Martha twist.

Thanks to all my customers who bought my card stock  Long Stemmed Rose Tutorial and made it so successful!  I am always trying to show my customers how versatile these tutorials are.  I'm committed to showing  new ways to use the tutorials you've already bought from me.   For all of you who bought the Long Stemmed Rose Tutorial, here is another way to use it.


Cut a piece of floral foam to match the size of a container of your choice. Glue down some dried moss onto the floral foam.


Make one dozen roses from the Long Stemmed Rose Tutorial out of Real Red cardstock.   The roses in the tutorial are full blown roses with multiple layers.  To make these roses, which are smaller, and resemble tighter roses just leaving the bud stage, simply make the roses as per the tutorial but only with 6 layers instead of the usual number in the tutorial.   Remember to give the petals in the last row a little variation so that all the roses do not look exactly the same.   Cut the stems to 3".   Push the dozen roses down into the floral foam.


Add plastick snakes, spiders, and cobwebs to complete the look.


Wednesday, October 24, 2012

Mummy Card


Halloween night is fast approaching and my kids are getting excited!   Even though we've had treats around the house for a few weeks now from trick or treating in Disneyland, the kids feel the NEEEEEEEED for more candy!!.  They wonder how 10 lbs of chocolates/treats could go missing is such a short period of time.. : ) : )

I absolutely love Halloween!  I'm not sure why??  I'm scared of ghosts, goblins, skeletons and frankenstein ...lol!  I love decorating the house up and making all sorts of Halloween goodies and crafts.  We can make scary things look cute...right...?  Like turning scary mummies into cute crafts to make them look way to cute!!  I love this card!  Alyssa was a good helper with wrapping the twill around the card and punching out and gluging on the pieces for the eyes and mouth.  

Although twill tape has retired from the SU catty i bet you could use the new 7/8" Cotton Ribbon that is being offered in the Holiday Catty.  Check out page 20.   : )


Hope you like.. : )

Products used for this project:

Stamp Sets: Teeny Tiny Wishes

Ink: Staz-on Black (or Craft Black)

Card Stock: Pumpkin Pie, Basic Black, Whisper White

Accessories and More: Big Shot, Finishing Touches Edgelits, 1-3/8" Circle Punch, 1-1/4' Circle Punch, Snail adhesive, 3/4" Twill Tape.


Sunday, October 7, 2012

Pinecone Placecard Holders

Happy Thanksgiving! 


Here in Canada, we are celebrating Thanksgiving this weekend.  My Jumbo Pinecone Tutorial has been selling like hotcakes this month! I'm committed to showing my customers new ways to use the tutorials they've already bought from me.   I decided to take the pinecones from this tutorial to create placecard holders for our Thanksgiving table.  


To create this  projects: 

Make name cards, cut 3" x 7/8" out of Very Vanilla card stock.  Cut the ends into a "v" shape using your paper snips, and give the name cards a slight curve by working them slightly with your fingers into a gentle curve.  

Make the jumbo pinecone as per the tutorial instructions.  However, for this project, you will not need to wire it.  Then take your paper snips, and cut a vertical slit into the first two layers as shown above.

Slide name cards into the slit you've just created, and place onto your place setting.  They'll  add just the subtle touch to your fall table.  Wouldn't they also look stunning for an autumn wedding?


Thanks to all my customers you have bought this tutorial and made it wildly successful!  I have lots of holiday decorating ideas coming up using these gorgeous jumbo pinecones. 


If you don't already own it, you can purchase if for only $2.50 

The tutorial gives clear step-by-step instructions with tons of gorgeous photos on how to make the pinecones, plus lots of instruction on how to create the subtle effects that really make them look real and come to life (click on the picture to see the close up details).   The complete tutorial is 7 pages in length and has 21 photos.  The pinecones are not difficult to make, but a lot of photos are required to give complete step-by-step instruction.

Or find the link to purchase on the top right sidebar.  The tutorial will be e-mailed to the email address registered to your PayPal account within 24 hours as an Adobe PDF file following your purchase.  If you do not receive your email, please check your spam box.  If you still have not received your file within 24 hours, please contact me so I can correct any issues. 


Feel fee to contact me  if you have any questions.

Friday, October 5, 2012

Toxic Digital Designer Template


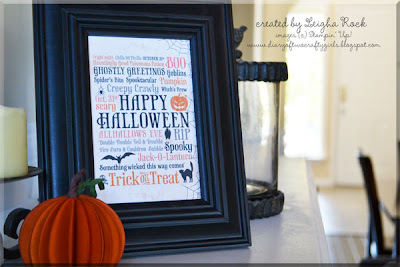
I decorated my mantel for Halloween by CASEing this framable artwork straight out of the Holiday mini.  I made it in MDS with the Toxic Framable Digital Designer Template.  Although the download is completely customizable, and includes a 34-peice stamp brush set, I simply printed it off exactly as the designer template and popped it into a frame.  How easy is that?


The cute little 3-D pumpkin sitting beside the frame is from a tutorial by Amanda Corbet.  You can find the tutorial here.

Products used for these projects: 

Card Stock: Pumpkin Pie, Garden Green, Chocolate Chip 

Ink: Cajun Craze

Accessories and More: Toxic Framable Digital Designer Template, frame, 2-1/2" Circle Punch, Little Leaves Sizzlit, Sponges.